
Purpose
Zendesk SSO enabled allows you to login to the web application as well as mobile app via Practice Protect Identity Service. You can choose single-sign-on (SSO) access to the Zendesk web application with IdP-initiated SAML SSO (for SSO access through the Practice Protect User Portal) or SP-initiated SAML SSO (for SSO access directly through the Zendesk web application) or both. Providing both methods gives you and your users maximum flexibility.
You can automatically handle adding and removing user accounts in web applications by enabling them for provisioning. With provisioned applications, you don’t have to manually add or change user accounts in those web applications yourself—the identity platform handles this task by creating synchronization jobs to sync user account data to provisioned applications.
When you run a user synchronization, the Practice Protect Identity Service takes the user attribute information in the source directory and adds or updates the user account in the provisioned application. The Practice Protect Identity Service automatically synchronizes user, group, contact, or resource information whenever you make changes to a role or applicable source directory object. The Practice Protect Identity Service can synchronize user accounts from Active Directory, LDAP, the Practice Protect Directory, or any combination of those sources.
It can be useful to open the web application and Admin Portal simultaneously and have them both open, perhaps side by side. As part of the SSO configuration process, you’ll need to copy and paste settings between the two browser windows.
Prerequisites
- Practice Protect Admin Portal Access
- Zendesk Administrator Login
- Practice Protect Login should match Zendesk Login
- Roles Created in PPO for Zendesk Users (i.e. Zendesk SAML Administrator, Zendesk SAML Agent, Zendesk SAML End User) – This roles in PPO are created according to their Zendesk role (End User, Agent, Administrator).
- Zendesk Subscription should be Professional, Enterprise or Elite
Instructions
1. Login to Practice Protect Admin Portal.
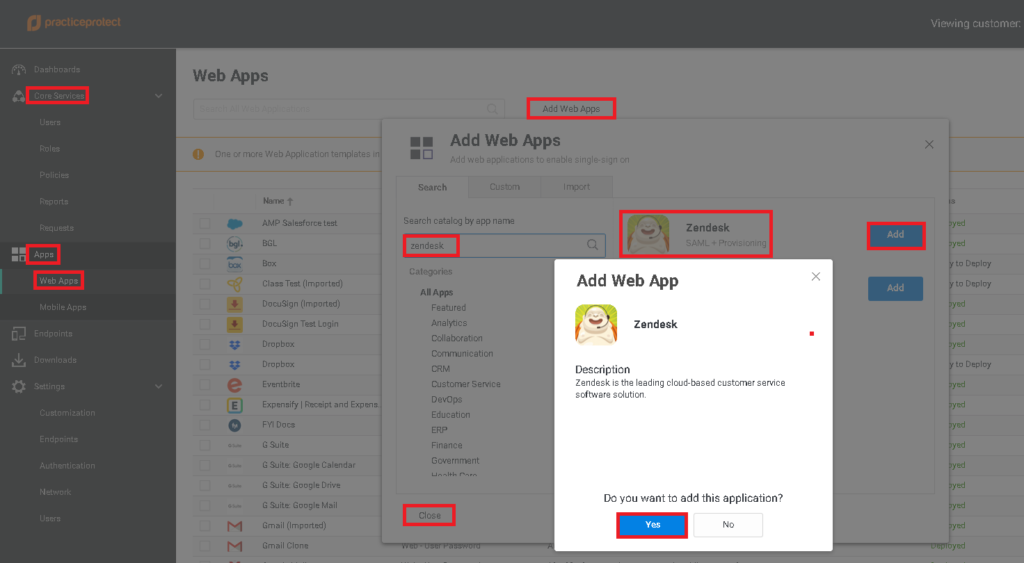
2. On Core Services, go to Apps > Web Apps > Add Web Apps . On the seach field type “zendesk”. Select Zendesk SAML + Provisioning then click Add. You will be prompted to add this application. Select Yes. Then Click Close.
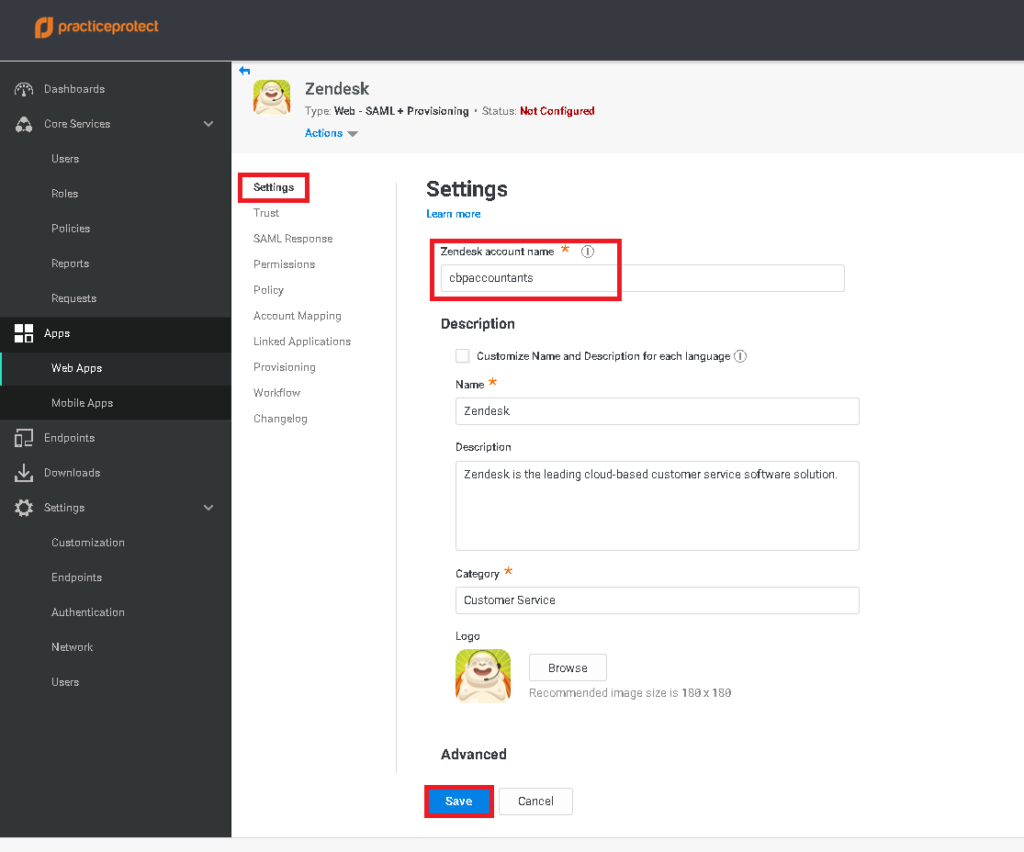
3. On Settings enter the Account name on Zendesk account name field (i.e. if URL is https://cbpaccountants.zendesk.com the account name is cbpaccountants) then click Save.
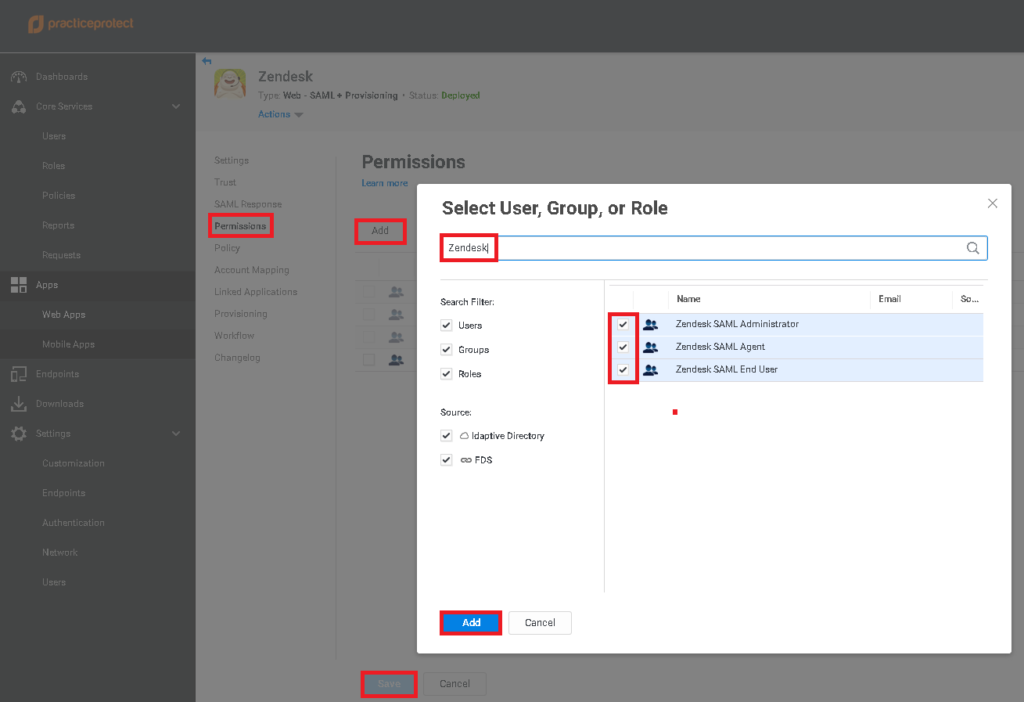
4. Click on Permissions > Search for the Role/s that needs to access Zendesk (i.e. Zendesk SAML Administrator, Zendesk SAML Agent, Zendesk SAML End User). Tick the box beside the role > Click Add. Click Save.
5. Click on Trust > On Identity Provider Configuration, Select Manual Configuration. On Signing Certificate, Click Download. This downloads the certificate on your local computer. Copy the SAML SSO URL and Remote Logout URL on a notepad. You will use these on SSO configuration in Zendesk Security settings.

6. Open another browser/tab and login to Zendesk using administrator account.
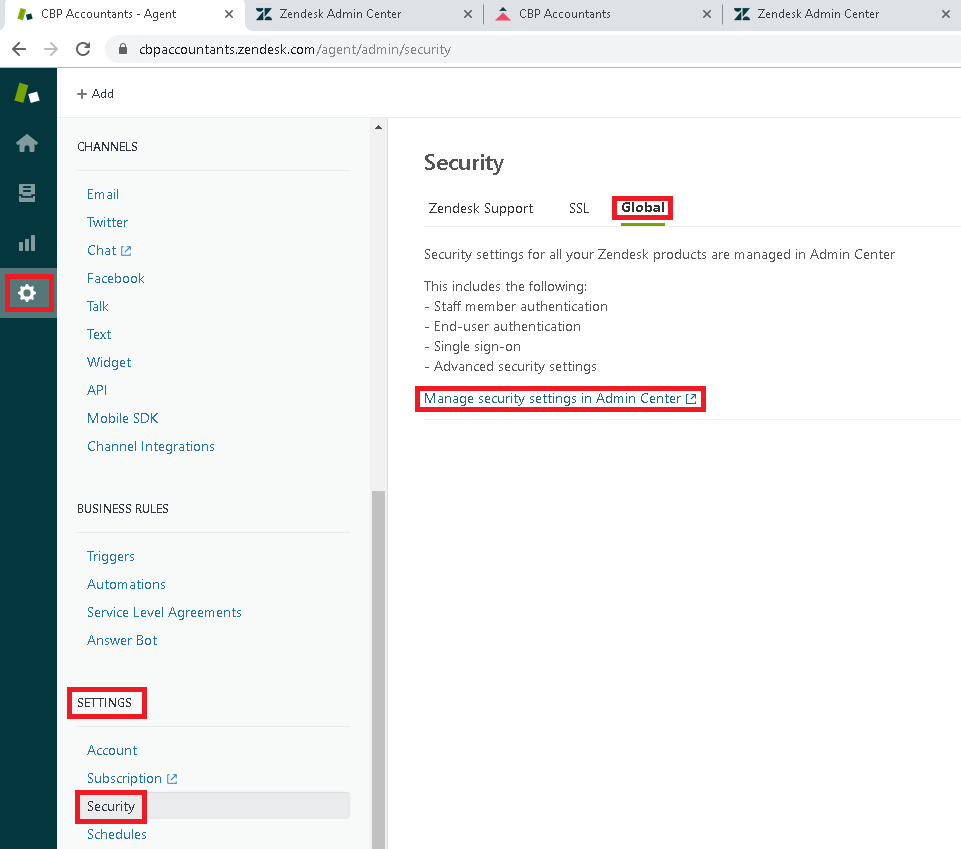
7. Click in the gear icon > Go to SETTINGS > Security > Click Global > Click on Manage security settings in Admin Center. This will open a new tab and takes you to Zendesk Admin Center.
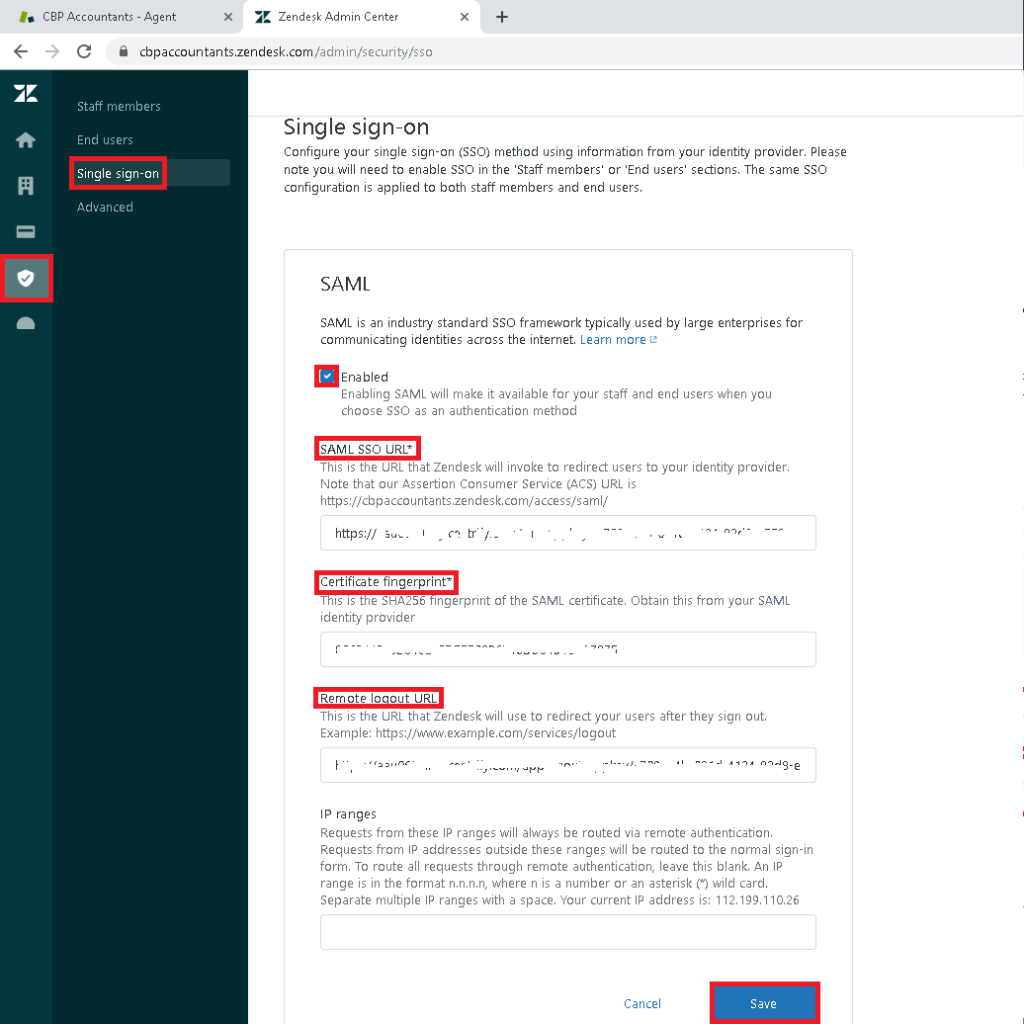
8. Click on Security > Select Single sign-on Select SAML and Click Configure. Tick the box beside Enable to enable SAML. Enter the corresponding details you got from step 5 (SAML SSO URL, Remote Logout URL and Certificate fingerprint (this will be the thumbprint)). Copy the Consumer Service (ACS) URL. (i.e. https://cbpaccountants.zendesk.com/access/saml/) You will use this later in the PPO admin portal. Click Save.
9. Go back to PPO Admin portal. On Trust, scroll down to Service Provider Configuration > Select Manual Configuration. On Assertion Consumer Service (ACS) URL, enter the value copied from Zendesk Admin Center (i.e. https://cbpaccountants.zendesk.com/access/saml/). Click Save.
10. Go back to Zendesk Admin Center.
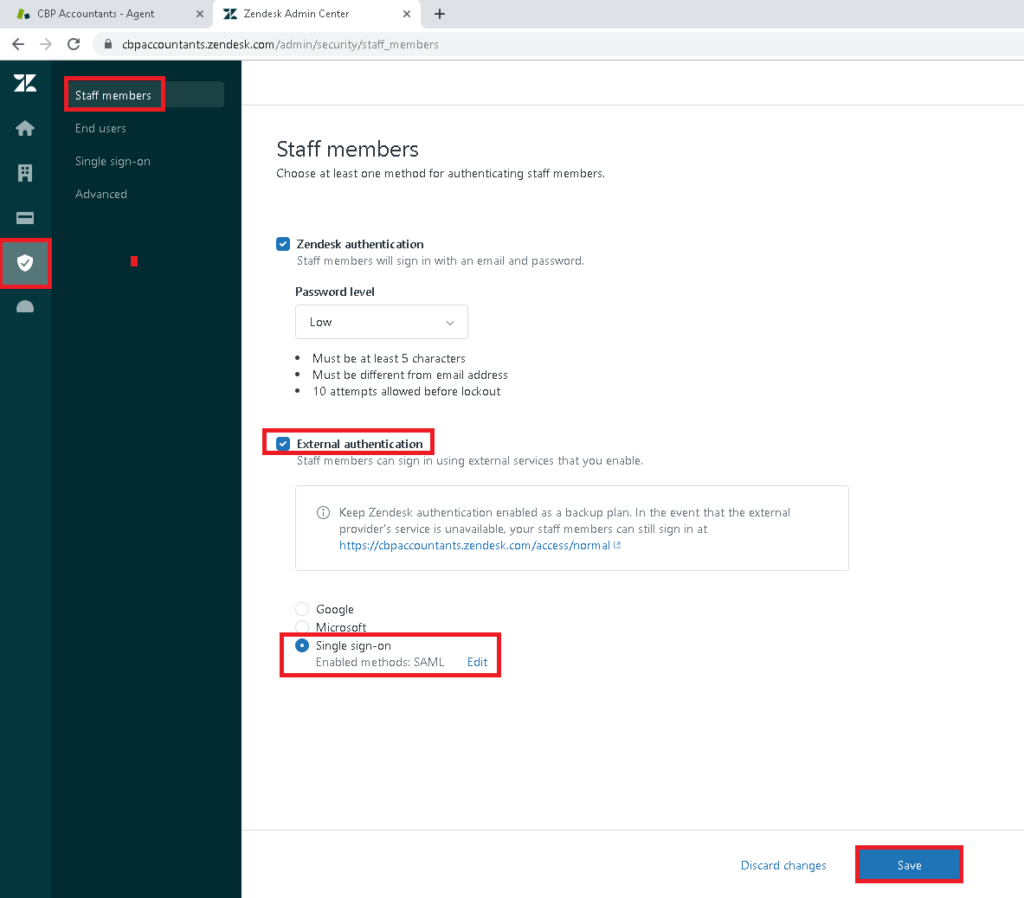
11. On Security Click on Staff members. By default, Zendesk authentication is selected. This means that users can login to Zendesk with their individual Zendesk username and password. We want to enable Single Sign-on (SSO) so we need to tick the box beside External authentication then select Single sign-on. Click Save.
12. If you want to enable SSO for End users, click on End users otherwise skip this step. Tick the box beside External authentication then click Save.
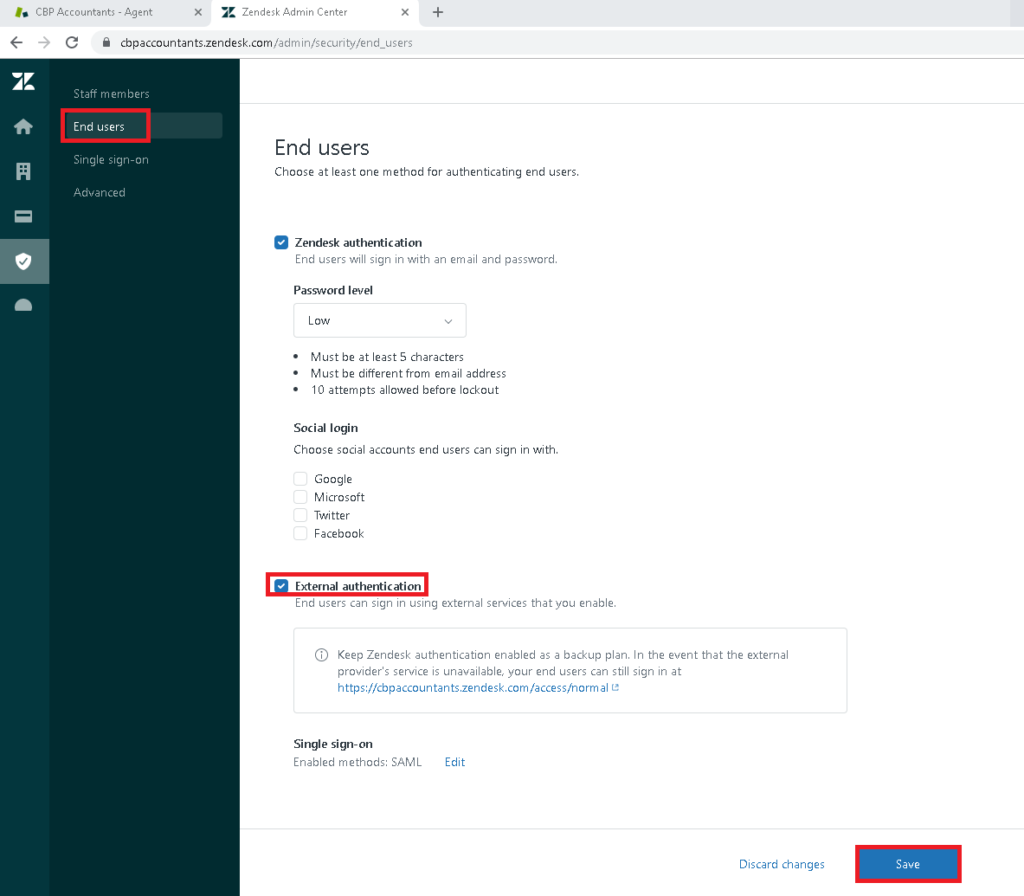
13. You may opt to leave Zendesk authentication ticked as backup if in case the external provider service (Practice Protect) is unavailable. You can find the backup login URL under the External authentication i.e. https://cbpaccountants.zendesk.com/access/normal
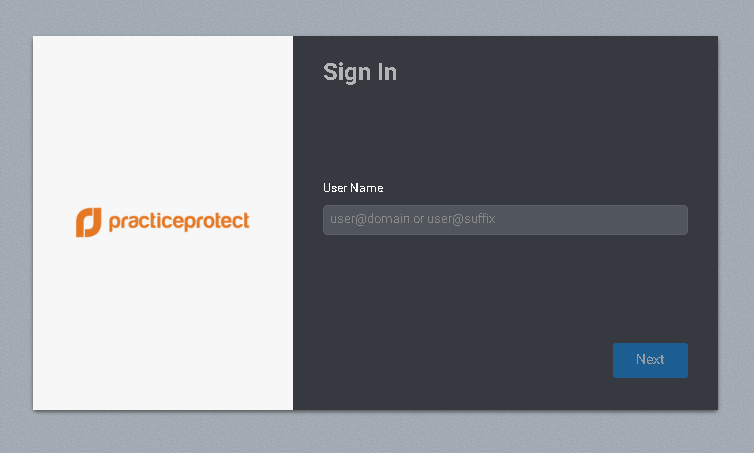
14. Test the Zendesk login. You will now be redirected to Practice Protect login page.
15. (Optional) Single Sign-on is already enabled. The next step is to Enable Provisioning. Provisioning allows you to create new user in Practice Protect and allow you to sync the users attributes to Zendesk.
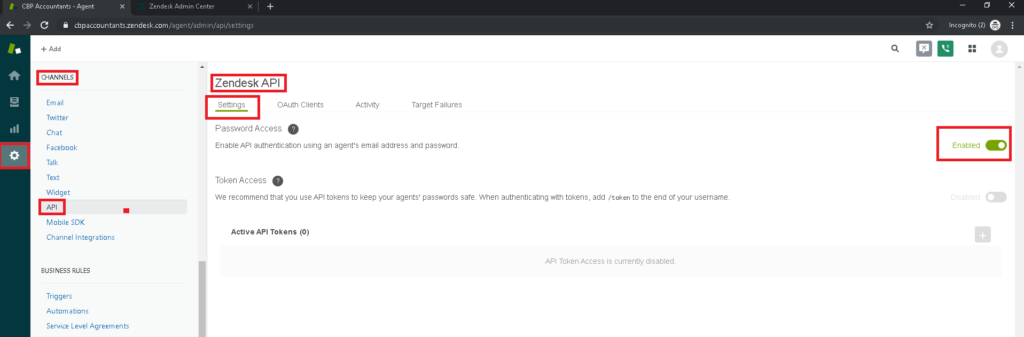
16. Go back to Zendesk Agent Portal. Click on the Gear icon > Scroll down to CHANNELS > Click on API > On Zendesk API, click on settings. On Password Access select Enabled.
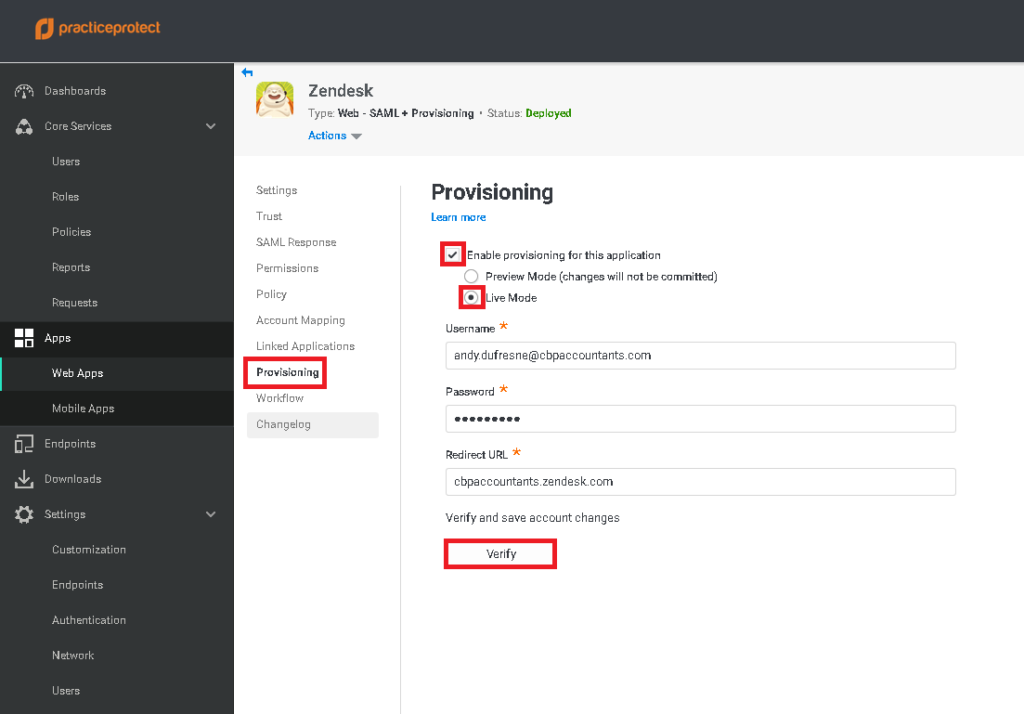
17. Go back to Practice Protect Admin Portal > Click on Provisioning > Tick the box beside Enable provisioning for this application. Enter the the following field and click Verify.
Username – Enter your Zendesk administrator user name. This is the same user name you use to log in to the Zendesk administrator portal.
Password – Enter the password for your Zendesk administrator account.
Redirect URL – Enter the custom domain name for your Zendesk instance. i.e. your custom domain may look something like cbpaccountants.zendesk.com.
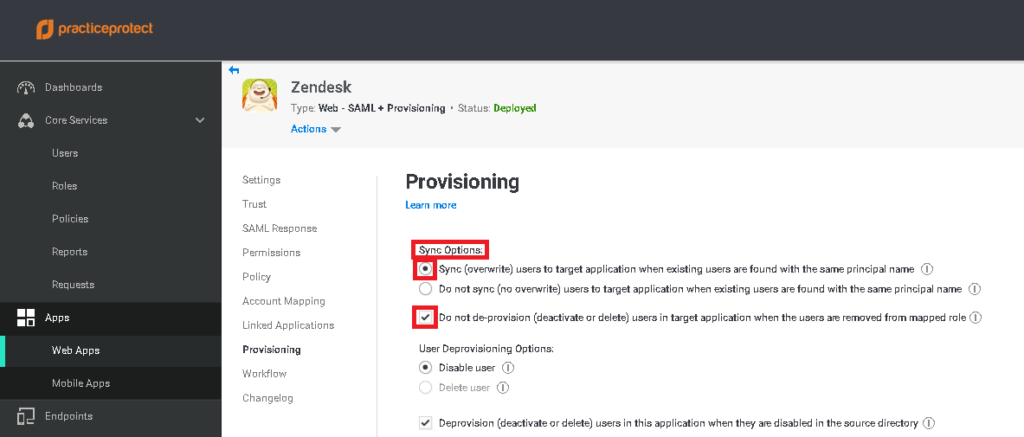
18. Scroll down to Sync Options: select the radio button Sync (overwrite) users to target application when existing users are found with the same principal name. Leave the option Do not de-provision (deactivate or delete) users in target application when the users are removed from mapped role ticked.
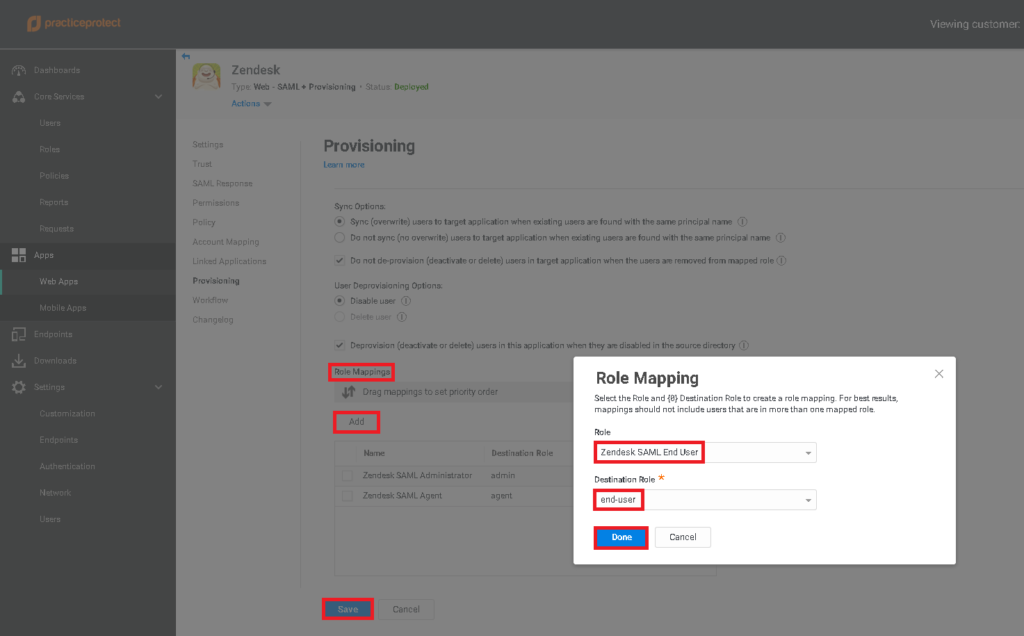
19. Scroll down to Role Mappings. Click Add > On Role Mapping window, select the Role (i.e. Zendesk SAML End User) and the corresponding Destination Role (end-user). Click Done. Do the same step for Zendesk SAML Administrator and Zendesk SAML Agent Roles. Click Save. This process maps the correct Role in Zendesk.
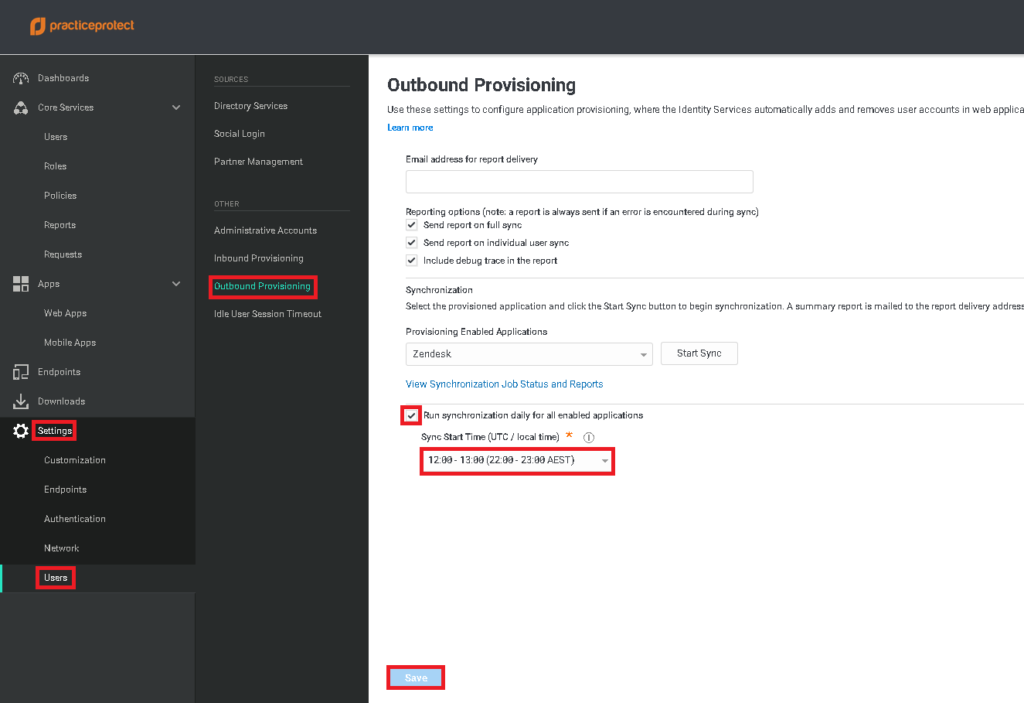
20. The next step is to schedule the daily synchronization.
21. On the PPO Admin portal, click on Settings > Users > Outbound Provisioning > tick the box beside Run synchronization daily for all enabled applications. Select the preferred time of Synchronization then Click Save.
22. The next step is to manually sync the users from PPO to Zendesk. On Provisioning Enabled Applications, select Zendesk then Click on Start Sync. Click Yes when prompted to start the Sync. Click Close.
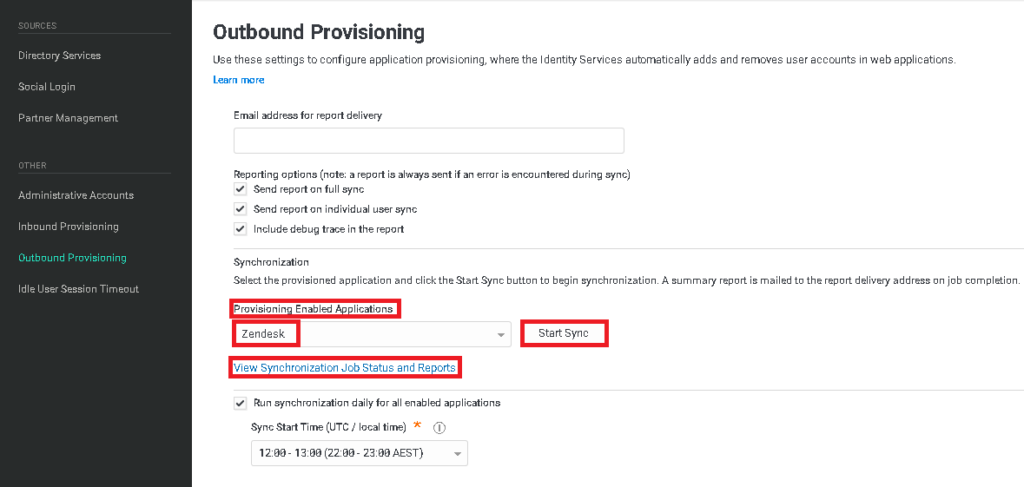
23. Make sure the Sync completes without any issue. Click on View Synchronization Job Status and Reports to see the Sync Job History.
