Purpose
Slack offers single sign-on via SAML integration with Practice Protect. This provides a seamless login experience to the Slack platform using IdP-initiated SAML.
It can be helpful to have both the Slack web application and the Admin Portal open at the same time – ideally side by side. During the SSO configuration process, you’ll need to copy and paste settings between these two browser windows.
Practice Protect will configure this on your behalf. Please send us an email at support@practiceprotect.com
Prerequisites
- Administrator Access in Practice Protect
- Active Slack account with workspace owner rights. (Note: this can be your account so you don’t have to pay and create for another license account)
- Must be on either Slack Business+ (Plus) or Enterprise Subscription only
- Slack username for staff should match the login usernames in Practice Protect.
Instruction
- Login to Practice Protect and switch to Admin portal.
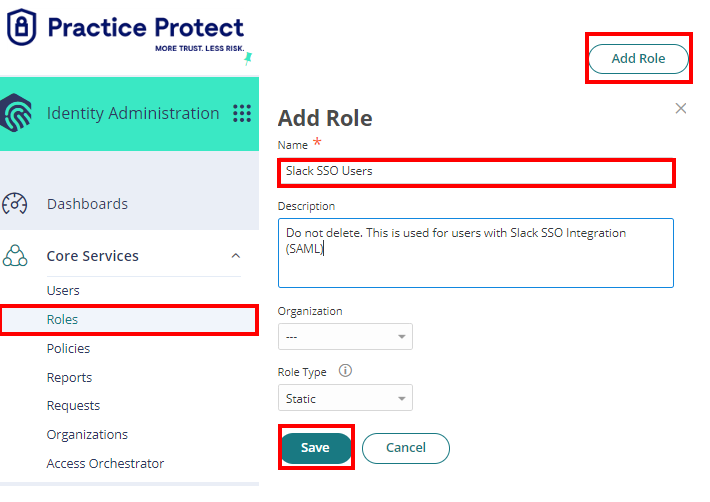
- On Core Services, Click on Roles > Add Roles. Create a role and set the name field to Slack SSO Users. Then Save.
Note: You can also create roles based on group memberships in Slack (e.g., Marketing, Administrator, Design, etc.), but this is only applicable if you map groups during the setup.
- With the created role, click on Members > Add. Add each member that will be part of the SSO. Then Save.

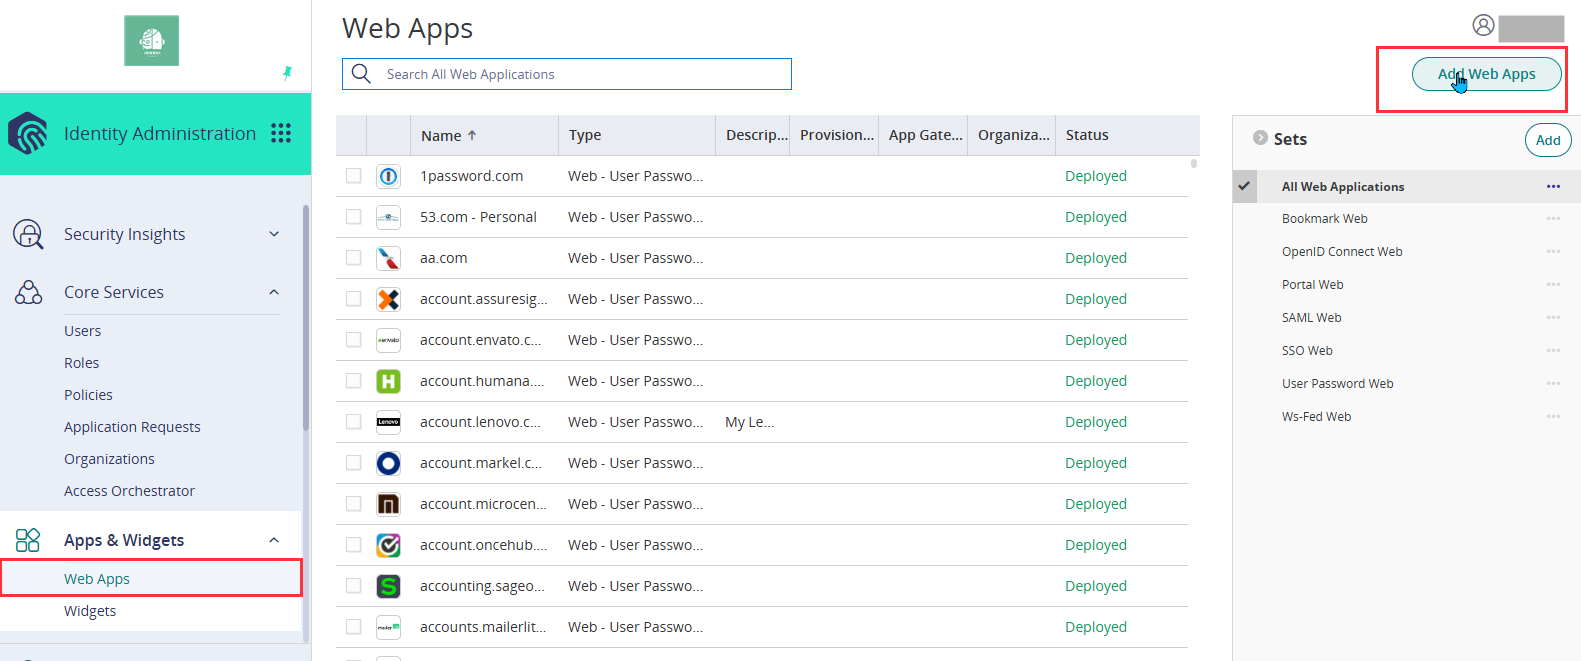
Note: If you have multiple Groups you may create these groups accordingly and repeat steps 2-3. - From the Apps & Widgets, go to Web Apps section. Then, choose Add Web Apps on the top right corner.
On the app catalog, search for Slack and Add the app Slack (SAML + Provisioning). Hit Yes to add the application. Click Close.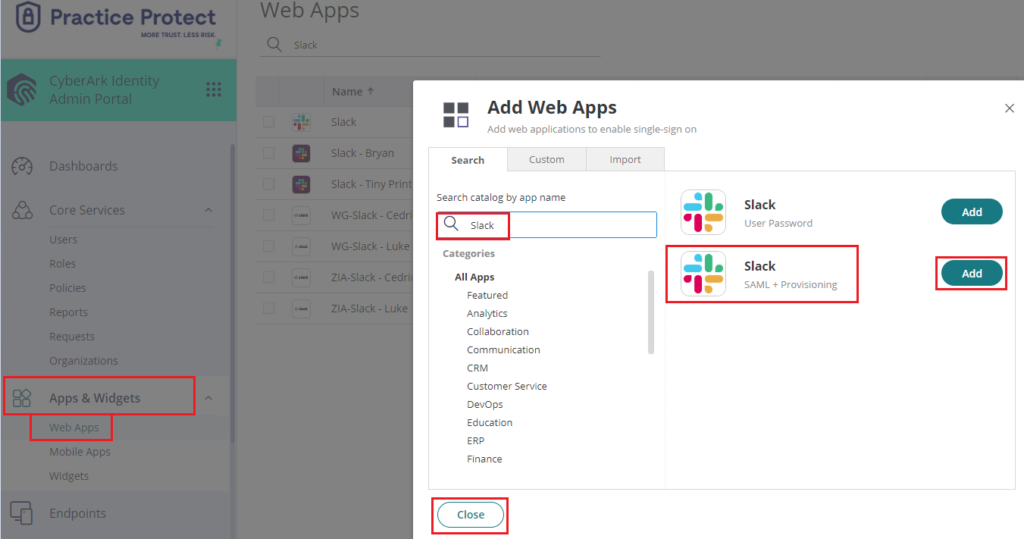
- The application that you just added opens to the Settings page. Set the Name of the app to Slack then click Save. Note: You can customize the name, category, or logo according to your preference.

- Go to the Trust page. In the Identity Provider Configuration select Manual Configuration. Then, click on Signing Certificate and click Download.

This will download the certificate to your local PC, which you’ll need for the next steps. - In the same page, copy the Identity Provider Issuer and SAML 2.0 Endpoint (HTTP) on a notepad. You will also need this details on the succeeding instructions.

- Click Save.
- On the Permissions page, click Add, select the role created in Step 2 (e.g., Slack SSO Users), and click Save.

- The status of the application will change from Ready to Deploy to Deployed. This means the app will now appear on the user portal. Note: The app won’t be ready to use until Slack SSO is enabled.

-
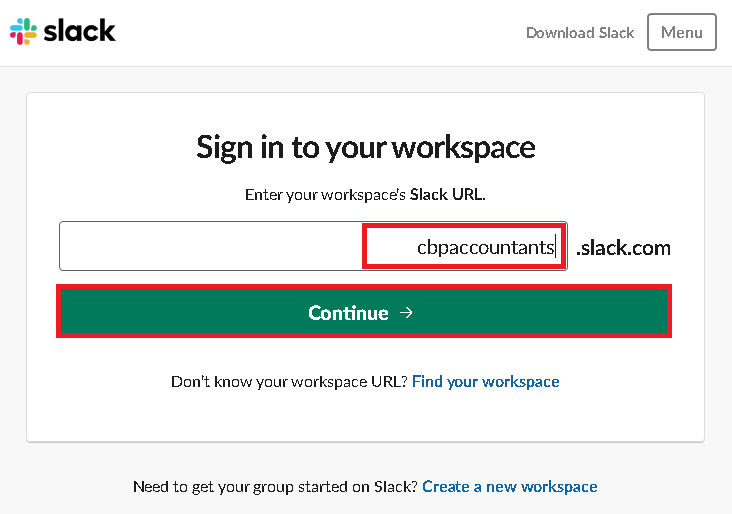
Login to Slack using your dedicated workspace URL (e.g.,
https://mydomain.slack.com) and sign in with your admin or owner account.On the left-hand menu, click Admin, then select Workspace Settings.

- Under Administration, click SSO & Authentication.
- Choose an authentication method, then click Configure SAML under An Identity Provider or custom SAML.

-
On the Configure SSO form, paste the SAML 2.0 Endpoint (HTTP) and Identity Provider Issuer into their respective fields. Use the values you copied from Step 7.
- In the Service Provider Issuer URL field, enter your Slack workspace URL (e.g.,
https://mydomain.slack.com). Remember this value, as you’ll need it later when setting up Practice Protect.
-
Open the signing certificate file you downloaded in Step 6 using Notepad. Copy all the text inside the file, then paste it into the Public (X.509) Certificate field.


- For AuthnContextClassRef, leave to it’s default settings
-
In SAML Request Signing, tick the box for Sign AuthnRequest. This will generate a certificate. Copy the entire certificate, paste it into Notepad, and save the file as slacksso.cer.
- In SAML Response Signing, tick the box for Sign the Response only

-
On another tab, go back to the Slack app in Practice Protect and navigate to Trust > Service Provider.
-
Under Service Provider Configuration, select Manual Configuration and apply the following settings.
-
SP Entity ID / SP Issuer / Audience: https://SLACK-DOMAIN.slack.com
Note: Replace SLACK-DOMAIN with your actual Slack workspace domain. -
Assertion Consumer Service (ACS) URL: https://SLACK-DOMAIN.slack.com/sso/saml
Note: Replace SLACK-DOMAIN with your actual Slack workspace domain. -
Recipient: Tick the box for Same as ACS URL
- Tick the box beside Encrypt SAML Response Assertion, then click Choose File and upload the certificate you saved in Step 18 (i.e., slacksso.cer).
-
-
Click Save.

- Return to Slack Configure SSO form and click Test Configuration

-
This will redirect you to the Practice Protect login page to test the SSO and verify the configuration by signing in using your Practice Protect credentials.
-
Once the test is successful, you’ll see a confirmation message indicating that everything looks good.

- Review the SSO and click on Continue to Options

-
In the SSO Options screen, you can choose who must use SSO to log in (Everyone, Regular members only, or No one). Since the SSO setup has already been tested, select Everyone under Require SSO authentication for to enforce it for all users.
Note that you can change this setting later if needed. - Leave the Profile settings section as it is. Note that you can change these settings later if needed.
-
Click Add SSO to save your configuration.

- Setup SSO name and sign in button by clicking on Edit.

- Enter Practice Protect as the SSO name and Save.

-
SSO is now enforced and enabled. To sign in, go to your Slack workspace URL and click Sign in with Practice Protect. You’ll be redirected to the Practice Protect login page, where you can enter your credentials to authenticate. Once signed in, you’ll be automatically logged in to Slack.
You can also access Slack directly from your Practice Protect portal by clicking the Slack tile, which will sign you in automatically without needing to re-enter your credentials.
 .
.

Enable Provisioning (Optional)
Enabling provisioning means that you can create users in Practice Protect and will automatically provision users in Slack. Once auto provisioning is enabled you do not need to create the user in Slack manually as it will just sync the users attributes from the platform.
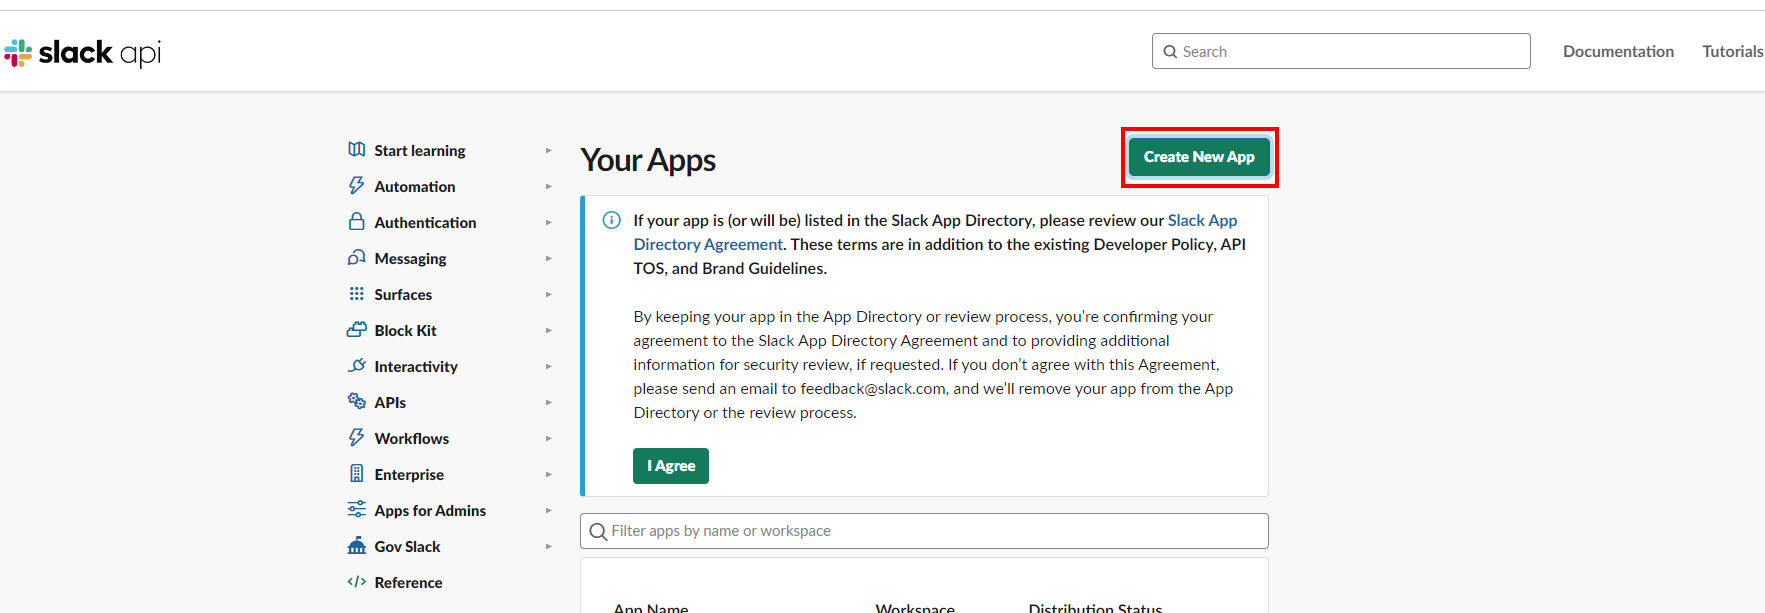
- Go to Slack API and click on Create New App
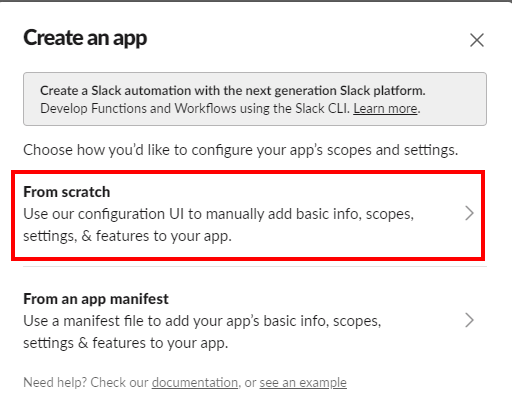
- On the form, choose “From Scratch“.
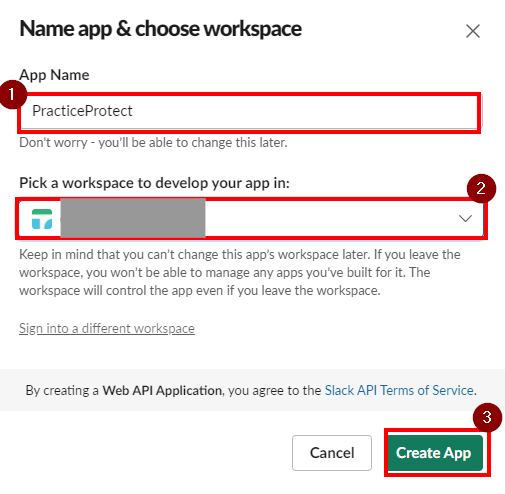
- Enter App Name (e.g. PracticeProtectApp) and select your organization’s workspace.
- Click, Create App.
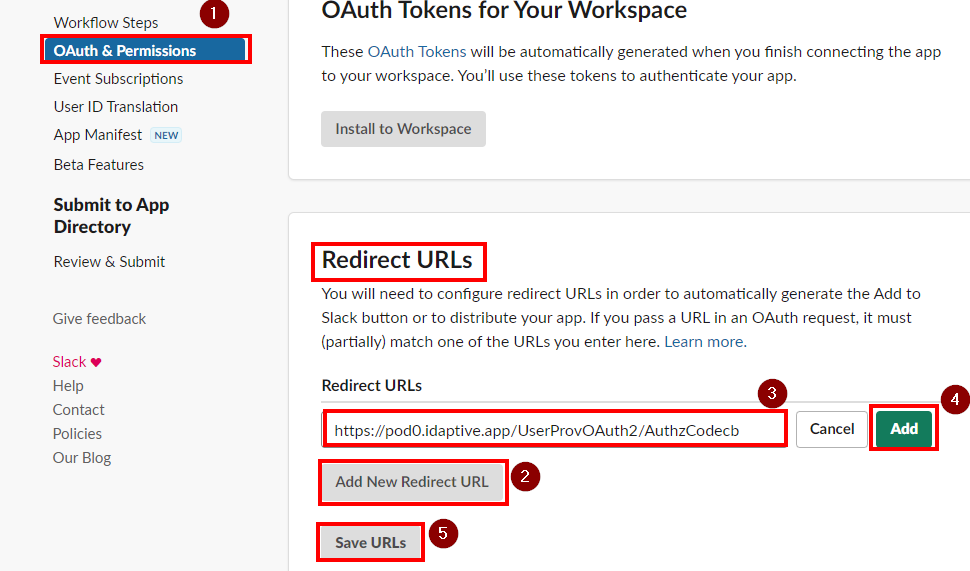
- Go to OAuth & Permissions and click Add New Redirect URL from Redirect URL’s section
- Add this URL: https://pod0.idaptive.app/UserProvOAuth2/AuthzCodecb
- Once added, click Save URL’s
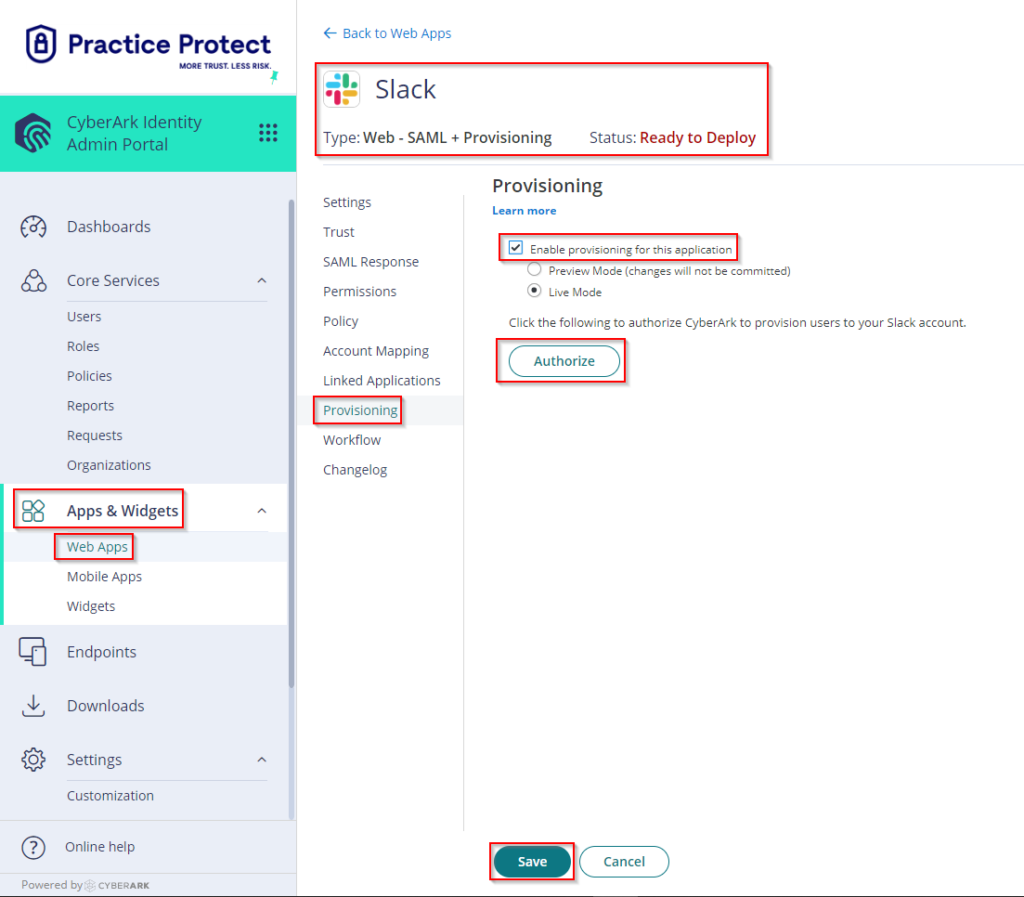
- Return to the Slack SSO App Settings in the Practice Protect Admin Portal.
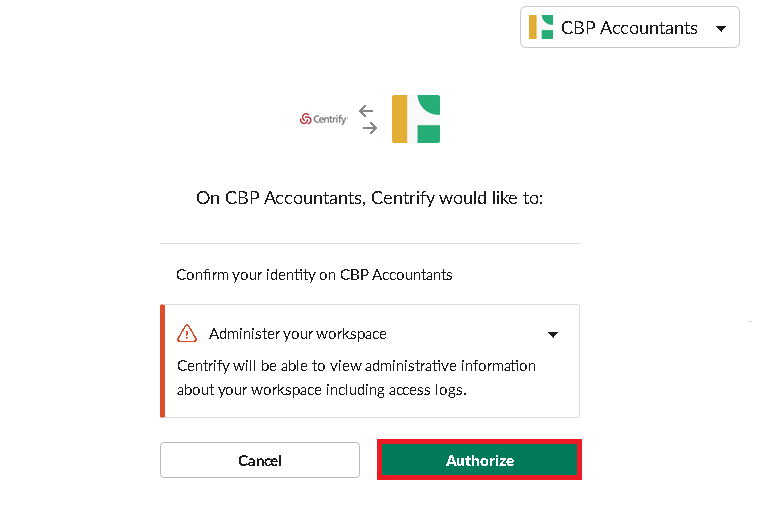
- Click on Provisioning. Tick the box beside Enable provisioning for this application then click on Authorize.
If you encounter an error with “Redirect_uri did not match any configured URIs.“, Please reach out to our support team. - This opens a new window where you need to login using an administrator account to authorize Idaptive to provision users. Enter your Workspace Name and click Continue. Then login as the Administrator in Slack.
- Click Authorize when prompted.
- Wait for a few minutes to complete the Authorization.

- Close the window and Click Save. You may need refresh or reload rights of the current admin portal page.
- Go to Apps > Web Apps > Click on Slack Web – SAML + Provisioning > Click on Provisioning > On Sync Options: Select Sync (overwrite) users to target application when existing users are found with the same principal name. Leave Do not de-provision (deactivate or delete) users in target application when the users are removed from mapped role ticked.
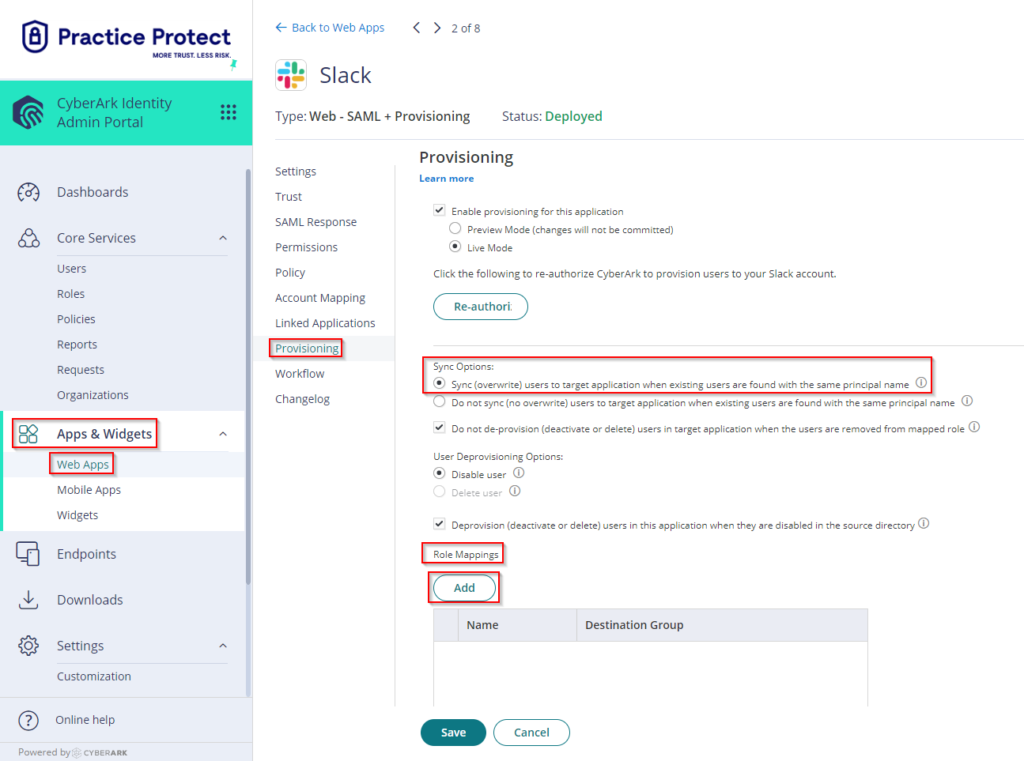
- On Role Mappings, Click Add. Select the respective Role (i.e. Slack SSO users – this is the equivalent group in Practice Protect)
Destination Group (this specifies the equivalent group in Slack if there’s any). On this example, there is no existing destination group in Slack, so we just select Slack SSO Users and this will sync to Slack users group. You may leave this blank or select from the drop down (if you have any existing group in Slack).
- Click Done and Save.
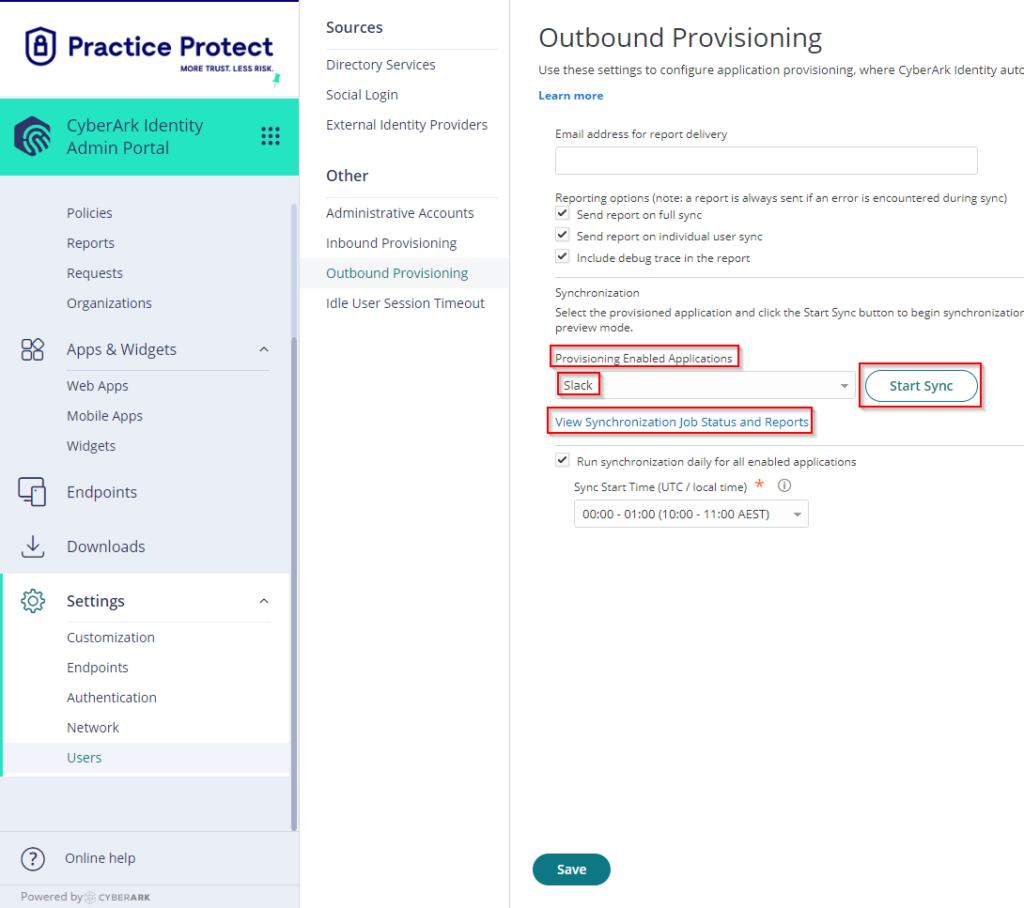
- (Optional) Go to Settings > Click Users > Click on Outbound Provisioning > Tick the box beside Run synchronization daily for all enabled applications > On Sync Start Time (UTC / local time), select the time to run the synchronization. The synchronization runs daily on the specified time.
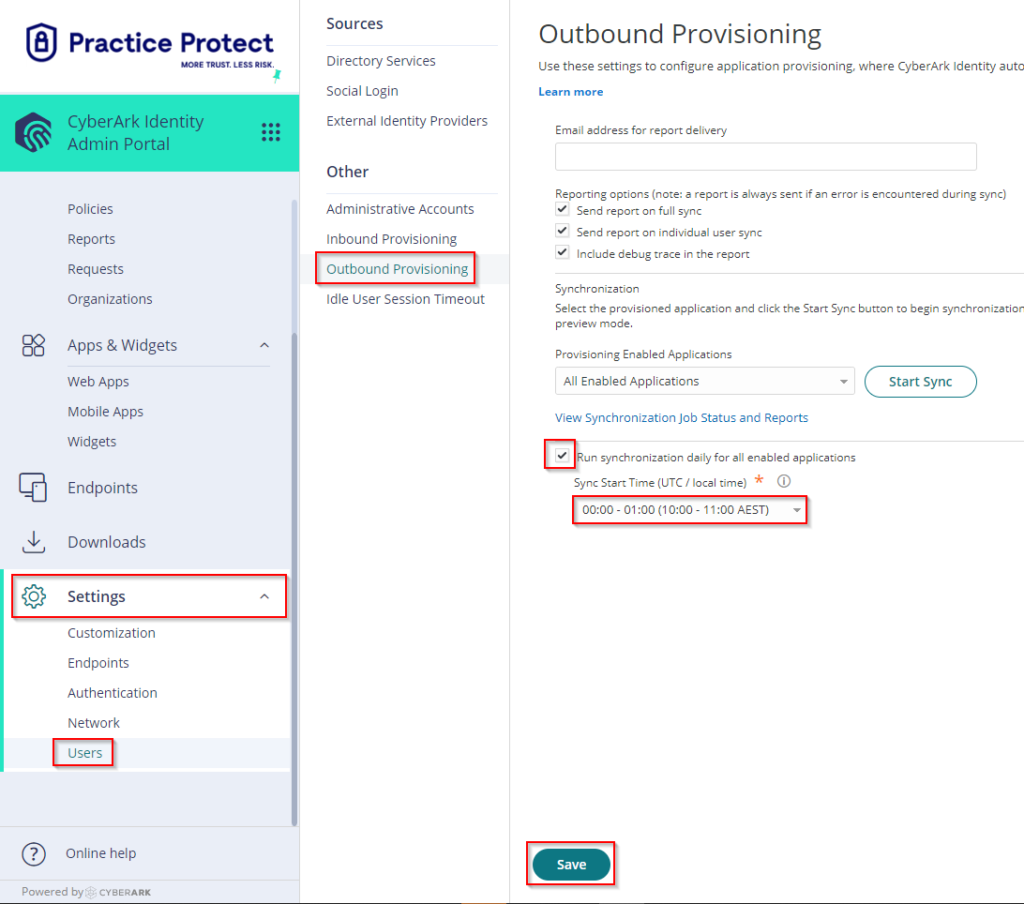
- Click Save. This completes the setup of Slack SSO with provisioning in Practice Protect.
- Run a manual synchronization. Go to Provisioning Enabled Application > Select Slack, then Click on Start Sync.
- You can view the real time status of synchronization by clicking on View Synchronization Job Status and Reports. Once the Synchronization completes any changes in Practice Protect will be reflected in the Slack Admin Console.