
Purpose
This guide explains how to set up the Microsoft Entra ID SAML integration with provisioning. With this configuration, user accounts will be provisioned from Entra ID and users will sign in to the Practice Protect portal using their Microsoft 365 account. As Microsoft Entra will control the authentication, it’s recommended to have MFA and Conditional Access policies in-place. Optionally, MFA can still be enforced on the Practice Protect platform for additional security.
Take note, if your tenant was created before 2nd May 2025, our team needs to make a configuration change on the Practice Protect tenant in order new user accounts to successfully provision to the portal. Please reach out to our support team to have this completed. While this is occurring, you can continue with the following article.
Pre-requisites
-
Microsoft Entra ID P1 is an optional pre-requisite. This license will allow groups to be assigned to the Entra Enterprise Application that controls user provisioning. Combined with dynamic security groups, this can streamline the management of user accounts across both systems. Without Entra ID P1 licensing, the integration and provisioning will continue to work however user accounts will need to be manually added and removed from the Entra ID Enterprise Application.
- Conditional Access Policies should be configured to enforce Multi-Factor Authentication (MFA) and apply country or IP based restrictions on the Microsoft 365 user accounts.
- System Administrator privileges in Practice Protect
- Enterprise Application Administrator, Groups Administrator and User Administrator privileges in Microsoft Entra ID
- Usernames in Entra ID match the usernames in Practice Protect
Instructions
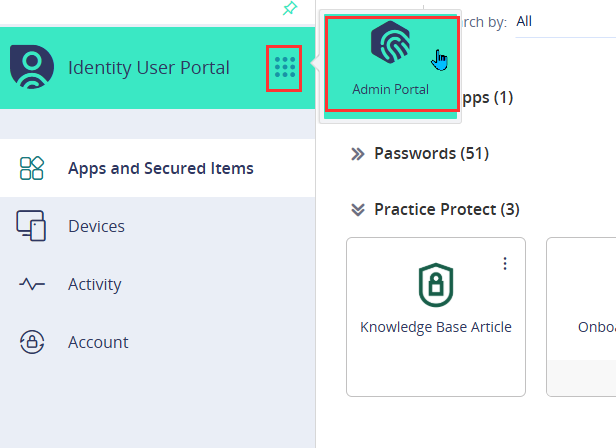
- Login to Practice Protect and switch to the Admin Portal
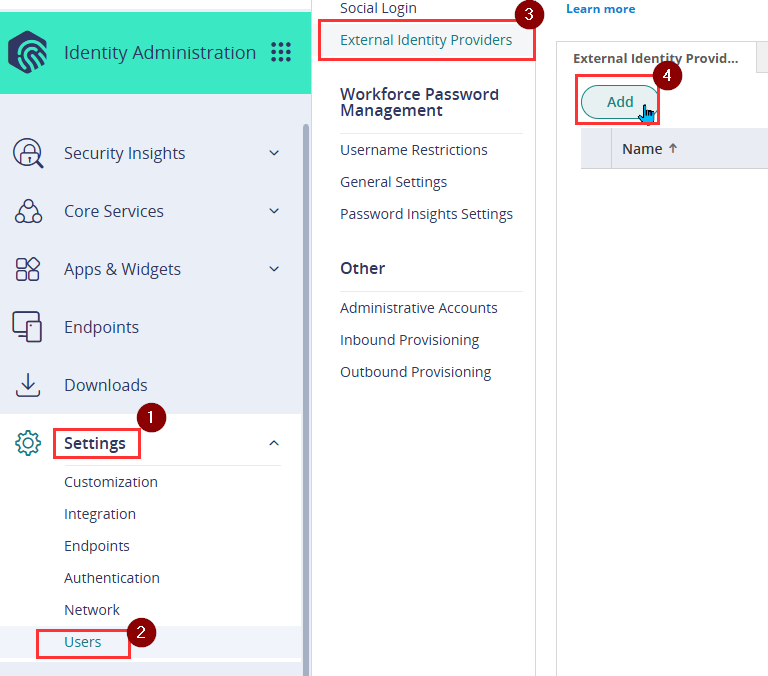
- Go to Settings > Users > External Identity Providers, then click Add
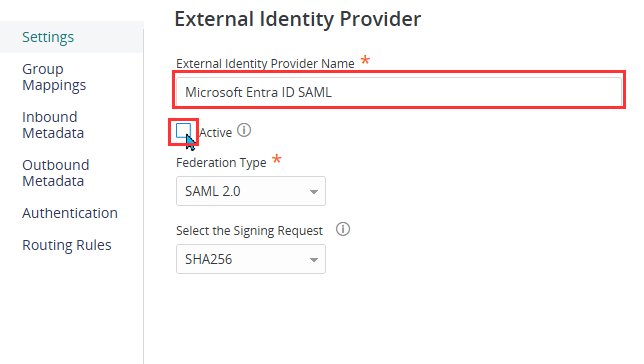
- Enter Microsoft Entra ID SAML as the External Identity Provider name.
- Untick the Active tick box. This ensures that logins to Practice Protect are not redirected to Microsoft until the configuration is complete.
- Go to Routing Rules under the Authentication section, click on Add.
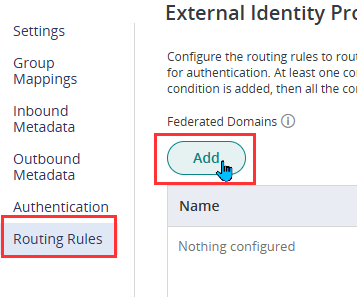
- Enter the domain names that should be included in this integration in the Federated Domains list. Any domains listed here will redirect to Microsoft for authentication when accessing Practice Protect.
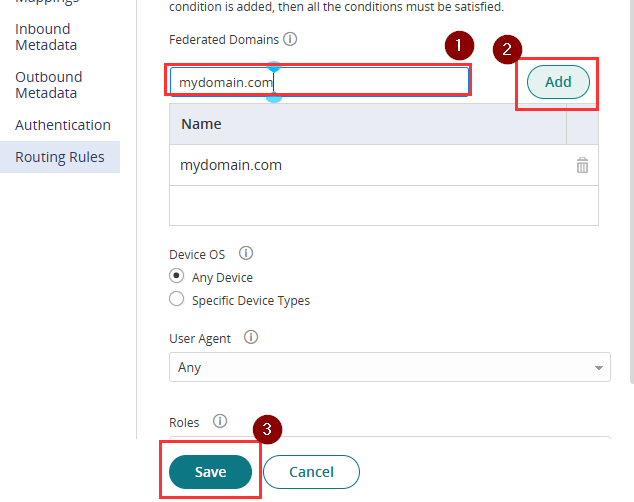
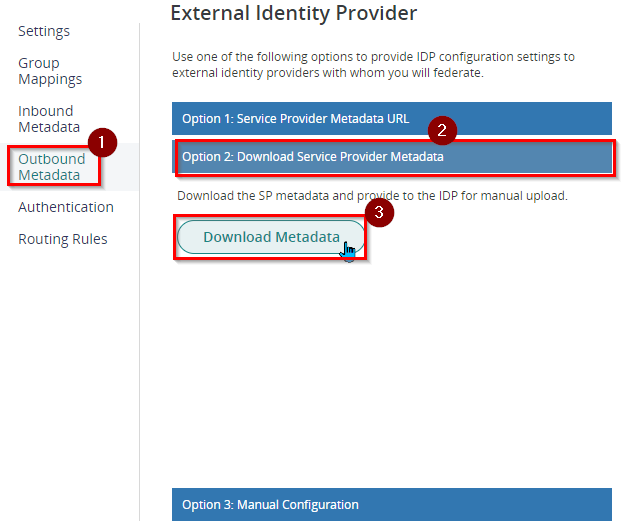
- Go to Outbound Metadata, select Option 2: Download Service Provider Metadata, then click Download Metadata. Do not save the configuration yet.
- Open another tab and sign in to Microsoft Entra Admin Center
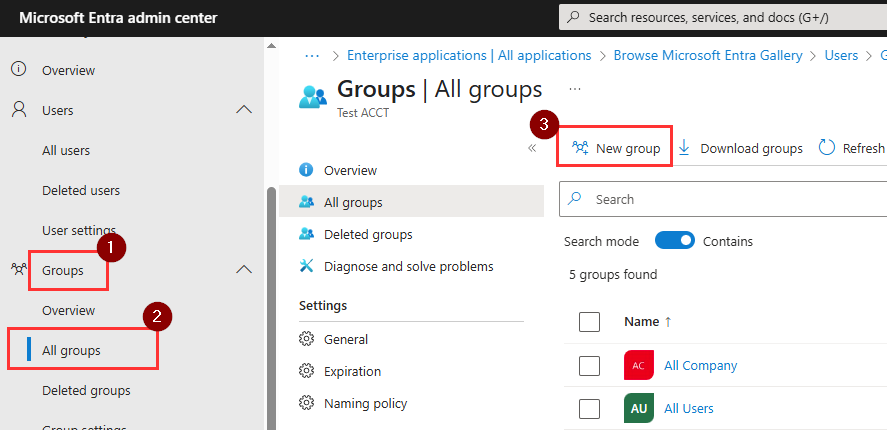
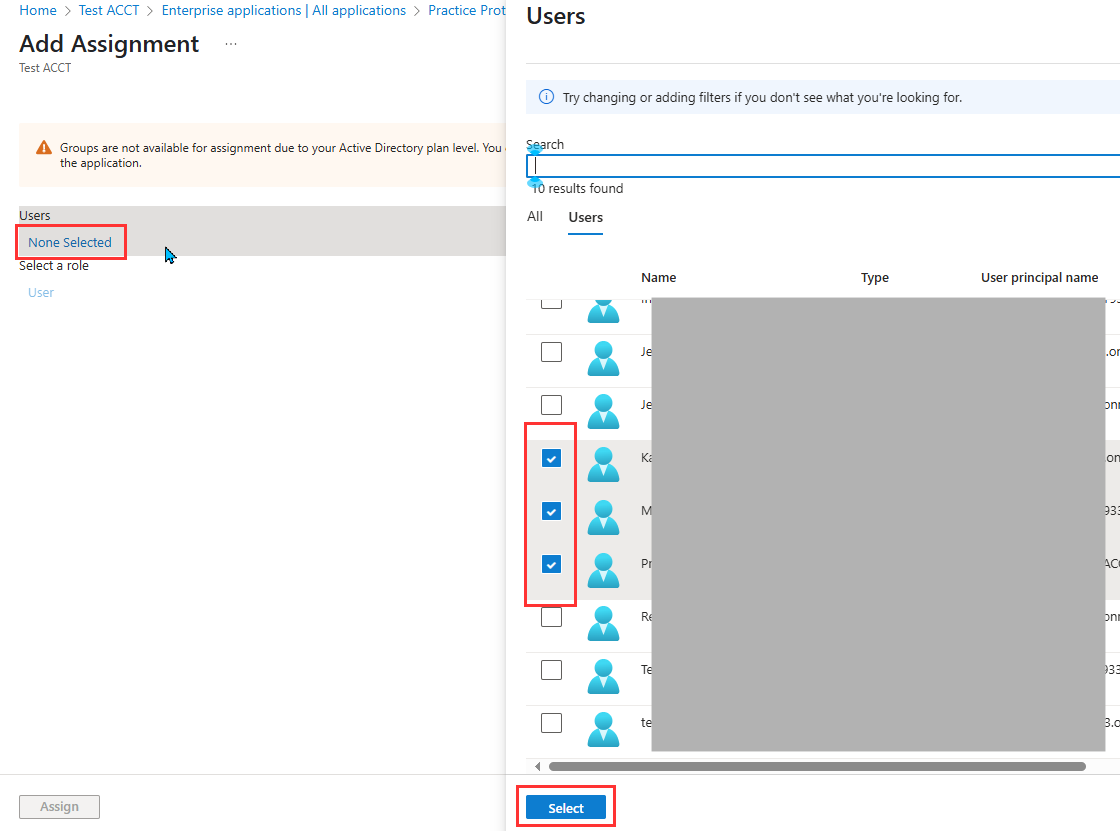
- On the left menu, go to Groups > All groups. Click New group to create a new security group for the SAML app. Skip this step if you are using the Microsoft Entra ID Free license. Security Groups can only be assigned to Entra Applications with at least a Microsoft Entra ID P1 license. Instead you will need to assign users to the application directly.
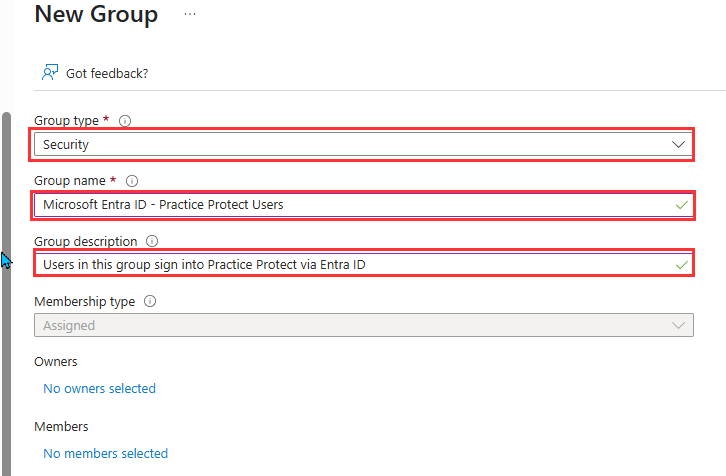
- Configure the group with the below details
-
Group Type: Security
- Group Name: Microsoft Entra ID – Practice Protect Users
- Group Description: Users in this group sign into Practice Protect via Entra ID
- Microsoft Entra roles can be assigned to this group: No
- Membership Type: (Choose based on your organization’s requirements)
-
- Once you choose the membership type (either Assigned or Dynamic), make sure that the intended members are added to the group.
- Assigned Membership:
Suitable for smaller organizations or where manual control is preferred. If using Assigned membership, ensure that all required users are manually added to the group.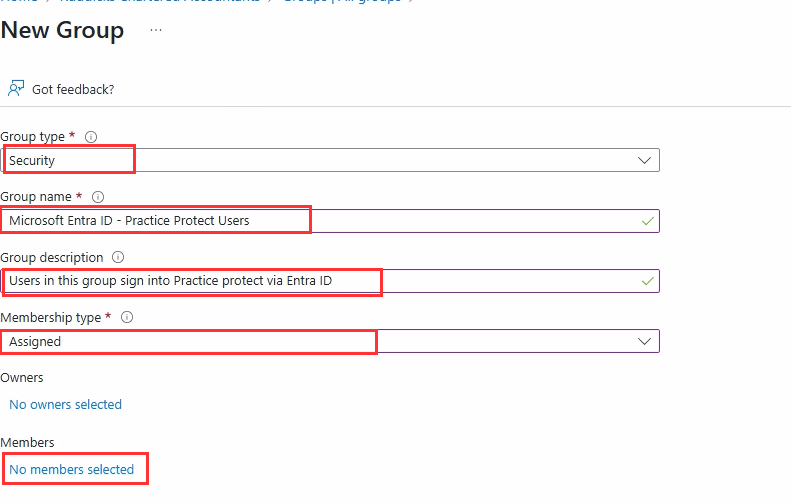
- Dynamic User Membership:
Ideal for larger environments or those looking for automation. Users matching a defined query are automatically added or removed from the group. This is recommended for streamlined user management.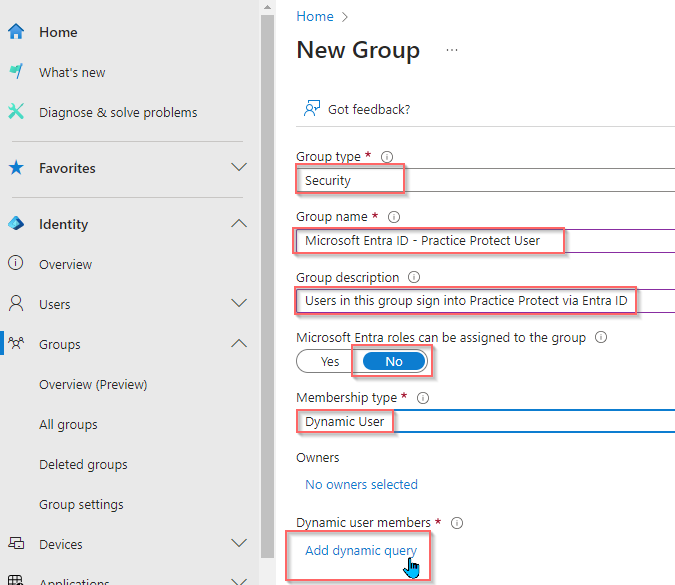
- Assigned Membership:
- Click Create to finish setting up the group.
-
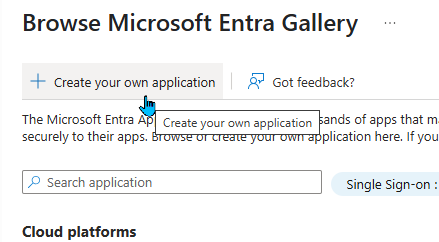
On the left menu, navigate to Applications > Enterprise applications. Click on New application at the top of the page.

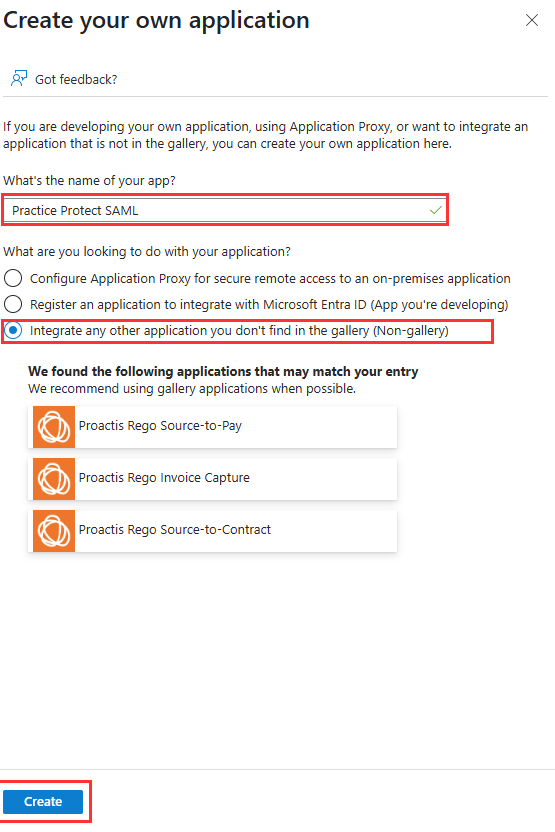
- Click Create your own application.
- Enter Practice Protect SAML as the Application name.
- Select Integrate any other application you don’t find in the gallery (Non-gallery).
- Click on Create.
- Navigate to the Users and groups section in the application’s sidebar. Click on Add user/group at the top.

- To add a group in Microsoft Entra, click on None Selected under Users and groups, then type the group name (e.g., Microsoft Entra ID Practice Protect) in the search bar. Once the group appears, check the box next to it, and finally, click the Select button to confirm.
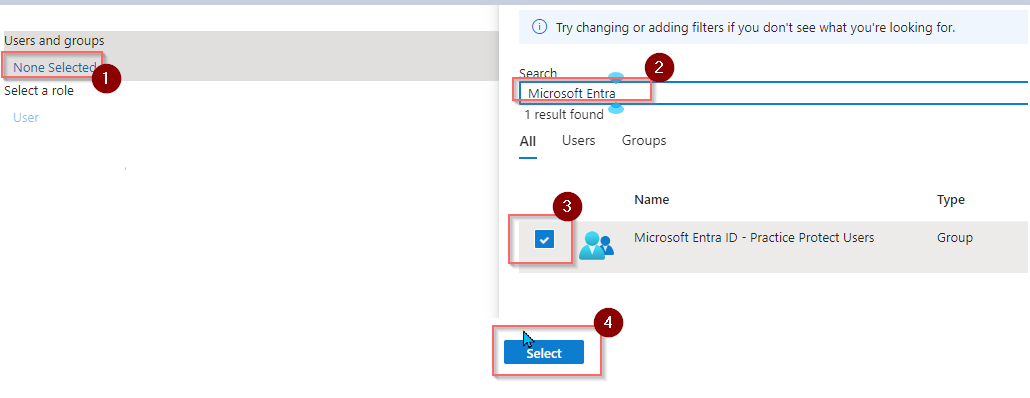
Note: If you’re using the Microsoft Entra ID Free license, you won’t be able to assign groups to the SAML application. In this case, you must manually add each user who needs access to the application.
- Click Assign.
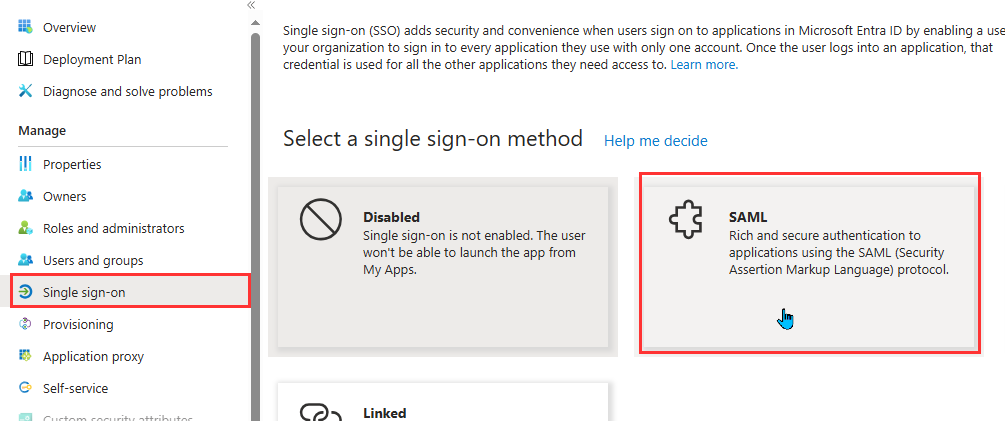
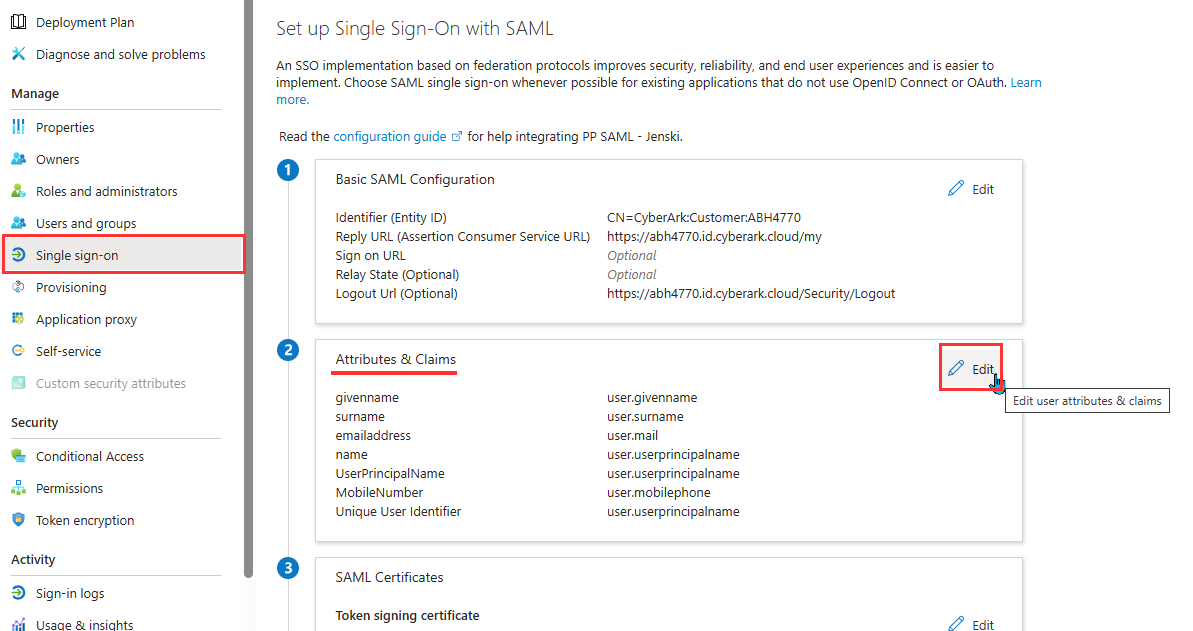
- Go to Single Sign-on. Choose SAML as the Single Sign-On method
- On the SAML page, click on Upload metadata file.
- Upload the file you downloaded from the step earlier then click Add.

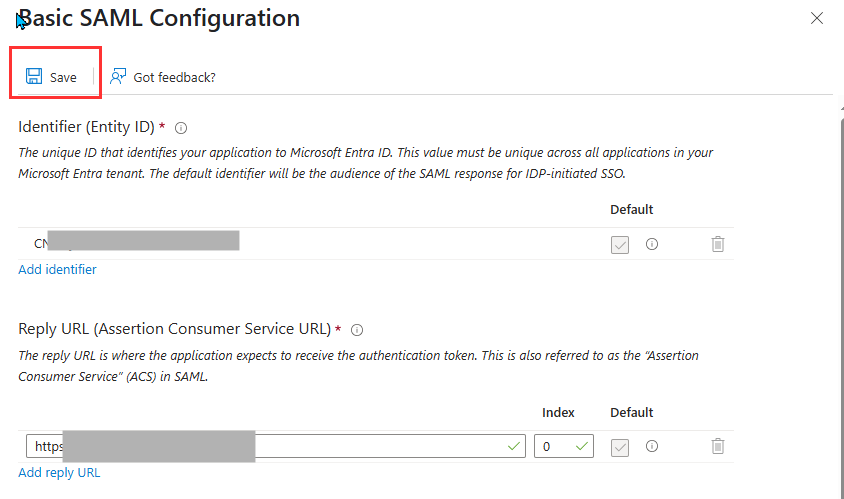
- From the Basic SAML configuration window, click Save.
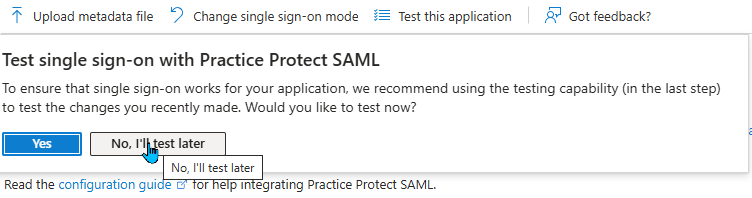
- When prompted to test SSO, select No, I’ll test later.
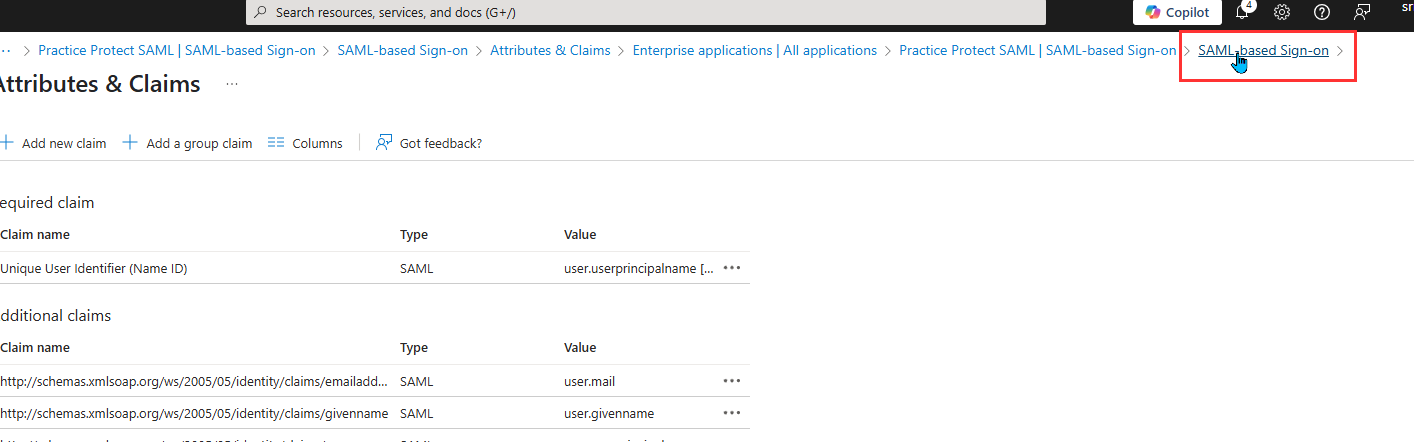
- On the SAML configuration, go to the Attributes & Claims section and click Edit.
- Click on Add new claim
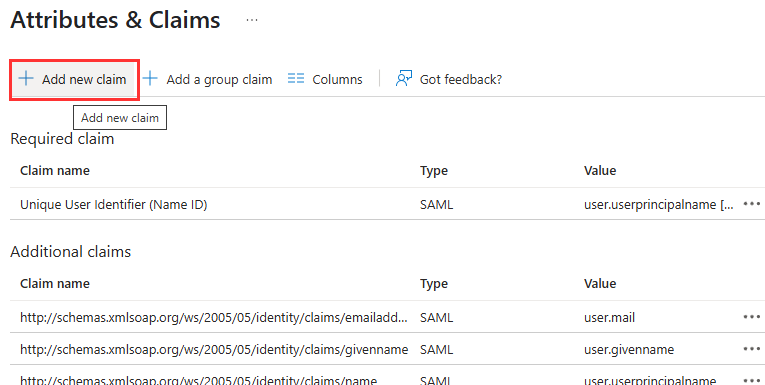
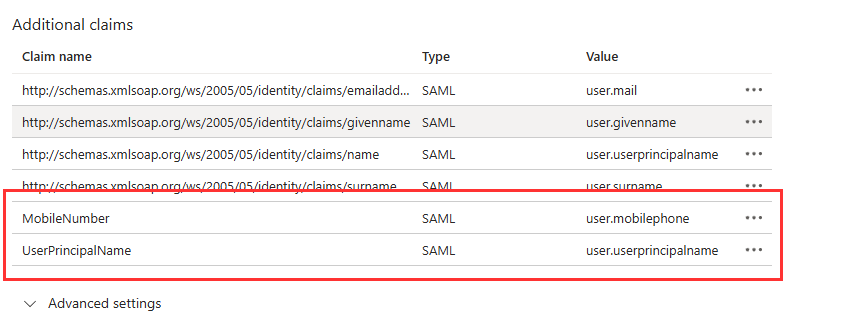
- Configure claims using the following values:
- Name: UserPrincipalName
- Source: Attribute
- Source Attribute: user.userprincipalname (Ensure there’s no quotation marks around the attribute).
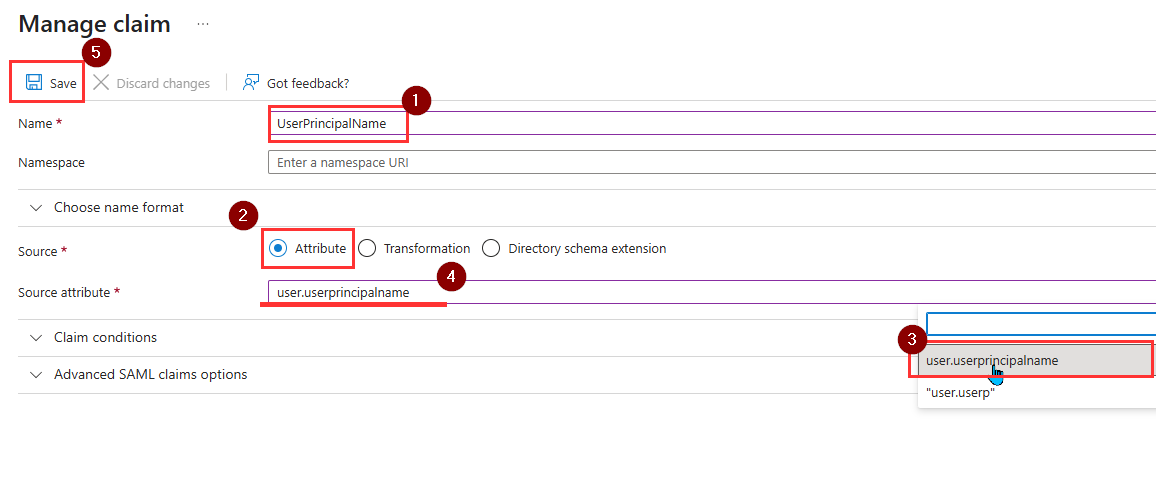
- Hit Save.
- Add another by clicking on Add new claim and set the parameters as follows:
- Name: MobileNumber
- Source: Attribute
- Source Attribute: user.mobilephone (Ensure there’s no quotation marks around the attribute).
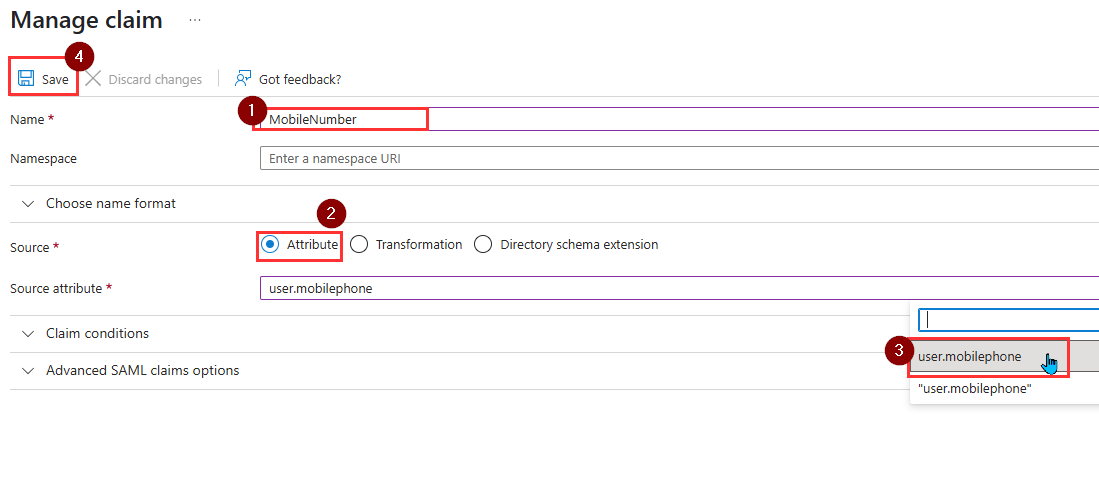
- Hit Save. You should have two new claims added.
- Return to the SAML Configuration page. If you prompted to test SSO again, select No, I’ll test later.
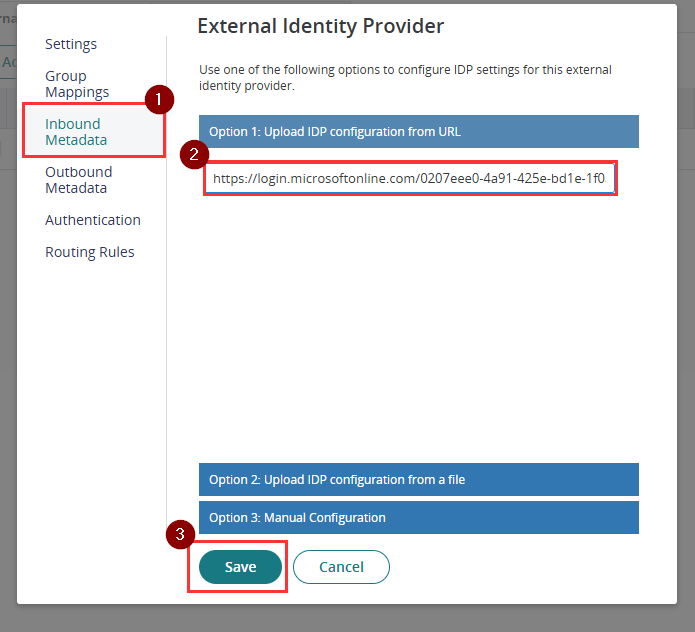
- Scroll down to the SAML Certificates section and copy the App Federation Metadata URL

- Return to the External Identity Provider configuration in Practice Protect and select Inbound Metadata. Under Option 1, paste the App Federation Metadata URL you copied from the previous step and click Save.
- Open the Microsoft Entra ID SAML configuration again. Go to Inbound Metadata. Under Option 3 add the below string to the end of the Identity Provider Login URL./?login_hint=[username]This ensures that the username is automatically passed to Microsoft when the login is initiated from Practice Protect. An example of the URL format is below.https://login.microsoftonline.com/12345678910-abcdefghi-987654/saml2/?login_hint=[username]
Note: Ensure there is no whitespace included at the end of the URL string.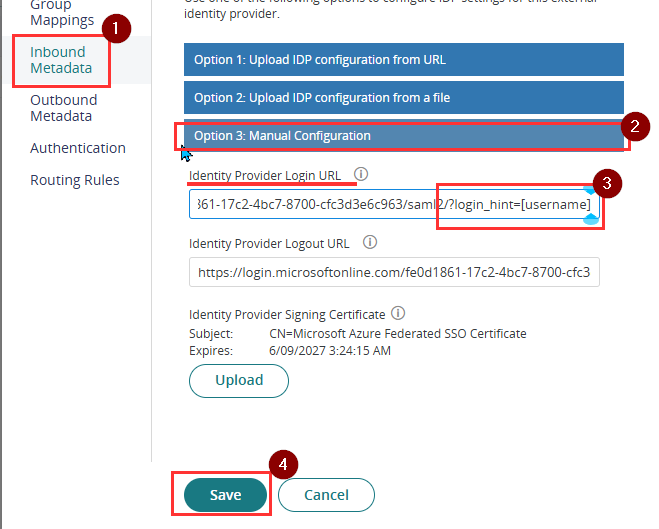
- Click Save.
- Open the Microsoft Entra ID SAML configuration in Practice Protect again, then go to the Authentication section and apply the settings below.
- Enable URL Redirect: Unticked
- Map federated user to existing directory user: Required
- Federated user attribute to be mapped: UserPrincipalName
- Mapped Directory Service: selected is Any Directory Service
- Directory user attribute to be mapped: Name
- Update cloud users with federated user attributes: Ticked
- Add mapped users to federated groups: Ticked
- Allow mapping to users in other federations: Unticked
- Create cloud user if unable to map: Unticked
- OAuth Credentials: Leave this settings Empty
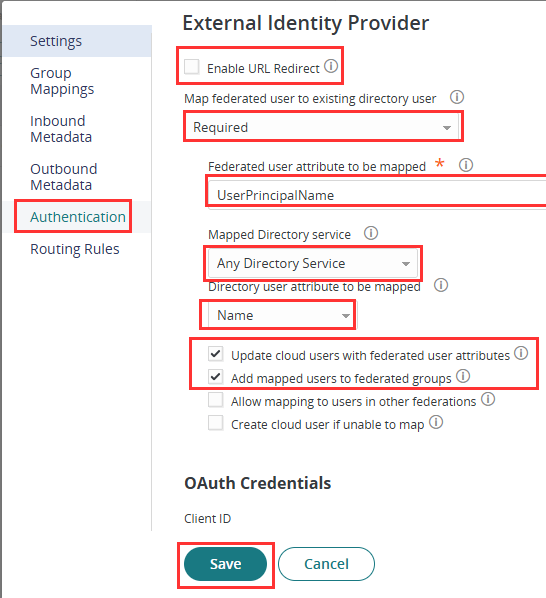
- Click Save.
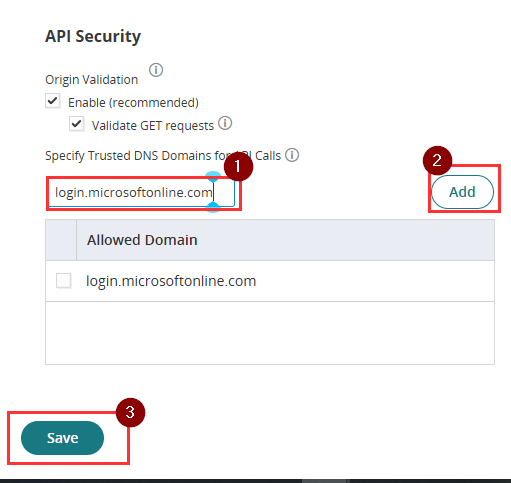
- On the left menu, go to Settings > Authentication > Security Settings. Proceed to API Security and click Add
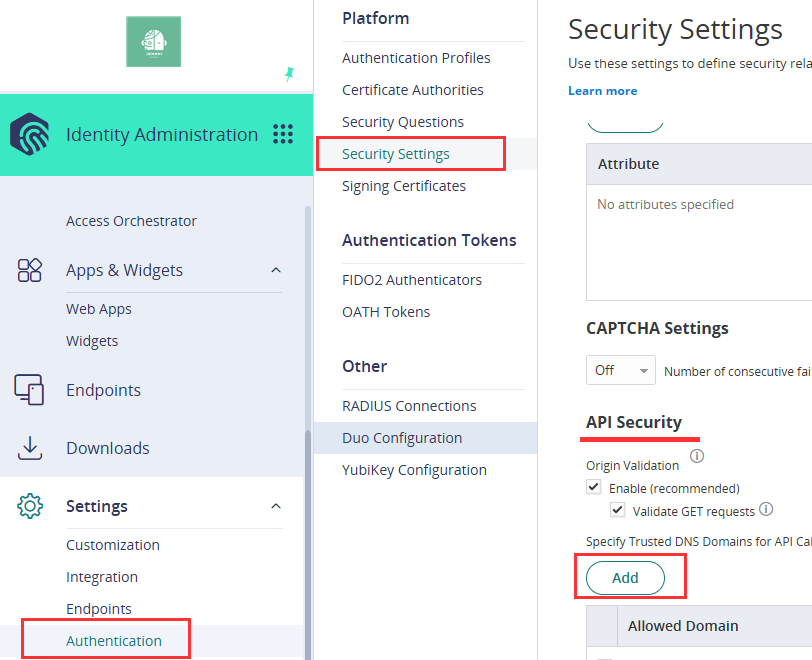
- Enter login.microsoftonline.com, click Add, and then click Save.
Configure SCIM Provisioning
- In the Practice Protect admin portal, go to Core Services > Users, then click Add User.

- Enter the below details:
- Login Name: entra_scim_service_user
- Suffix@: yourdomain.com
- Email address: Leave this field empty
- Display Name: Entra SCIM Service User
- Password: Select Generated
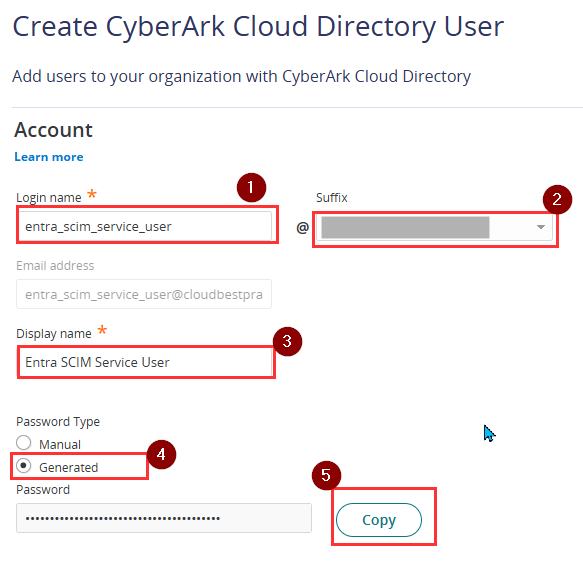
- Copy the generated password.
- On the Status section: Tick the box for Is OAuth confidential client. This will automatically select Password never expires and Is service user.
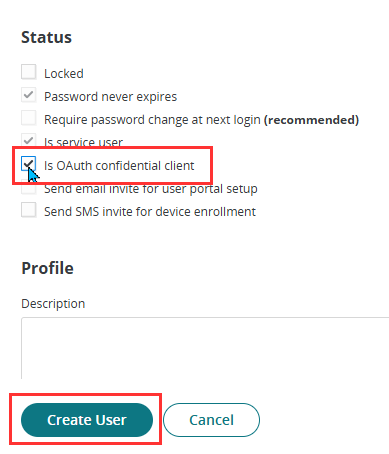
- Click Create User
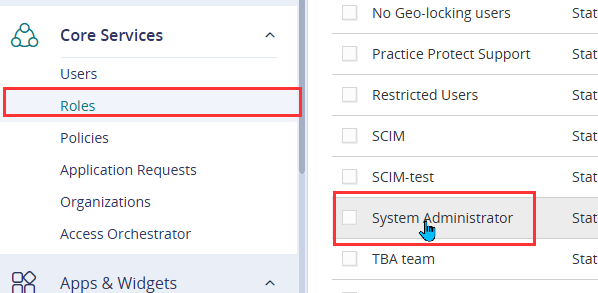
- Navigate to Core Services > Roles, then click on System Administrator.
- In the Members tab, click Add. From the list, select the service user created in the previous step (entra_scim_service_user@…)
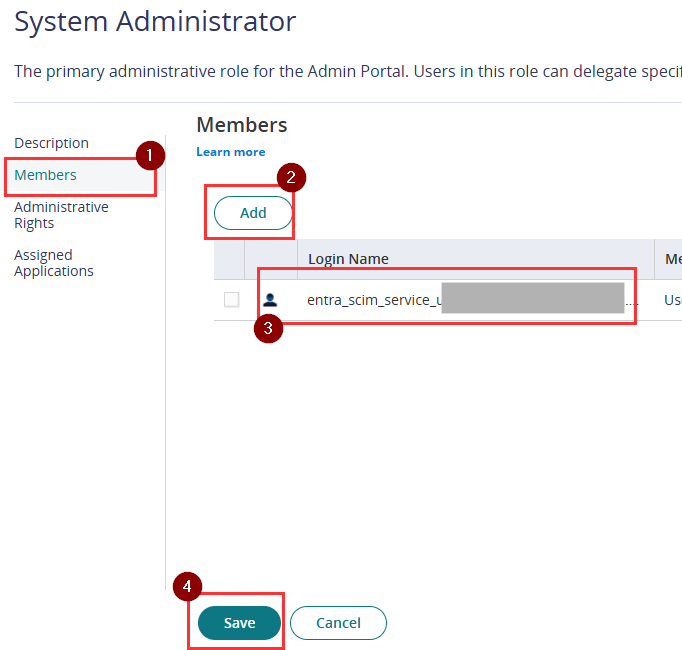
- Click Save
-
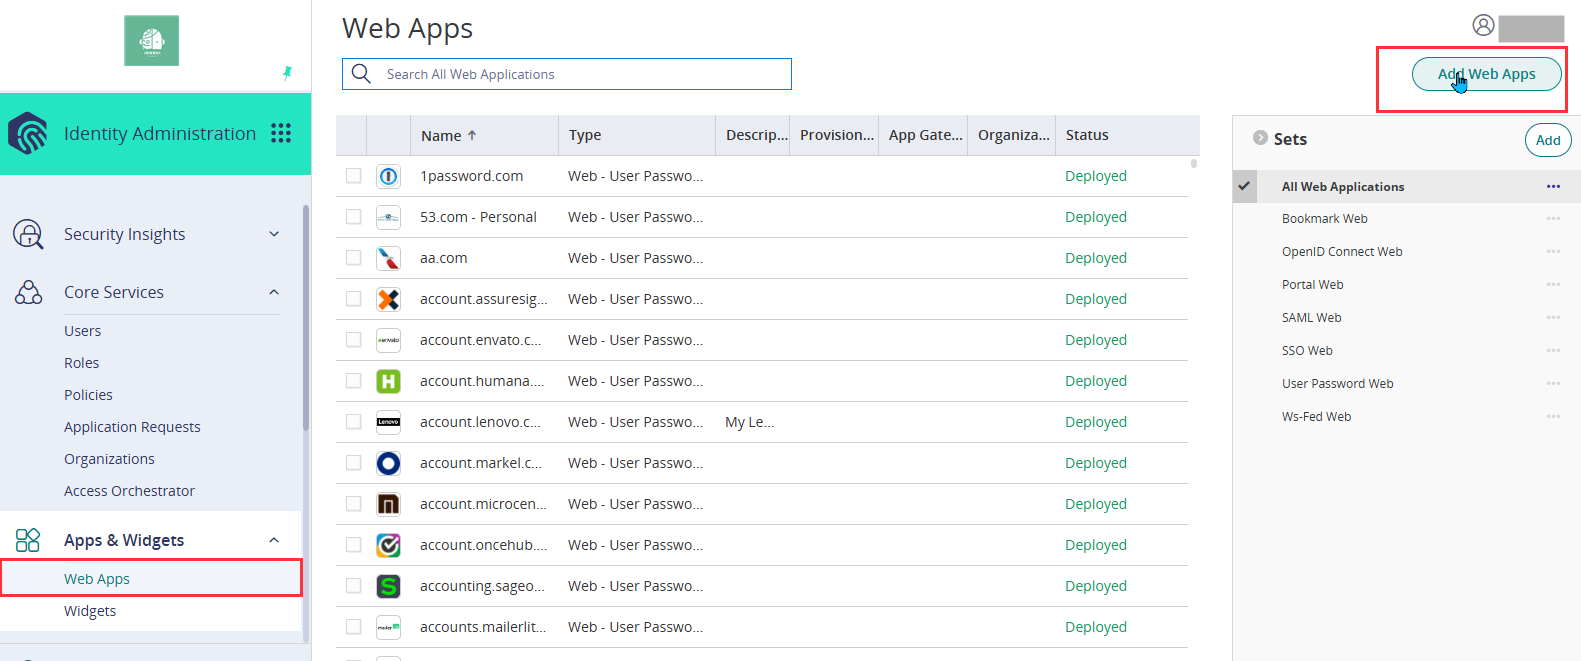
Go to Apps & Widgets > Web Apps, then click Add Web Apps.
-
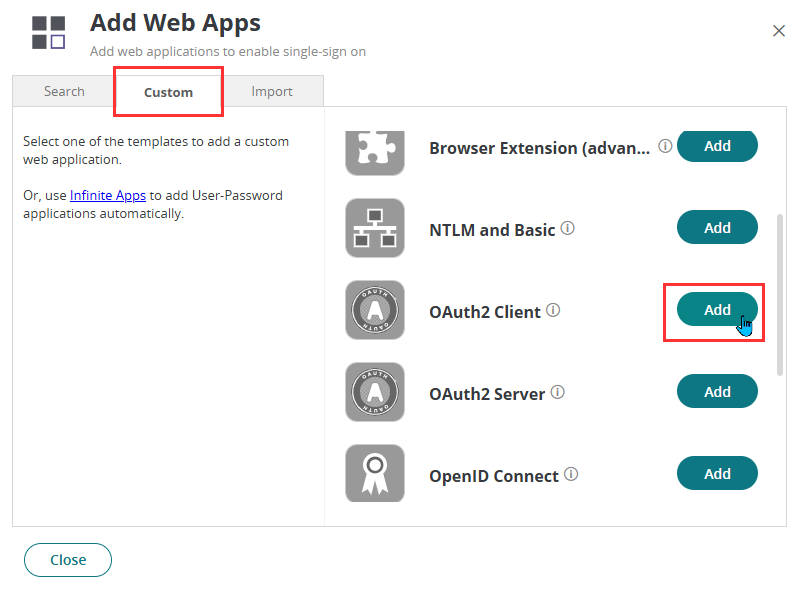
On the Custom tab, click Add next to OAuth2 Client. Once added, close the window and it will automatically open the settings page of the app.
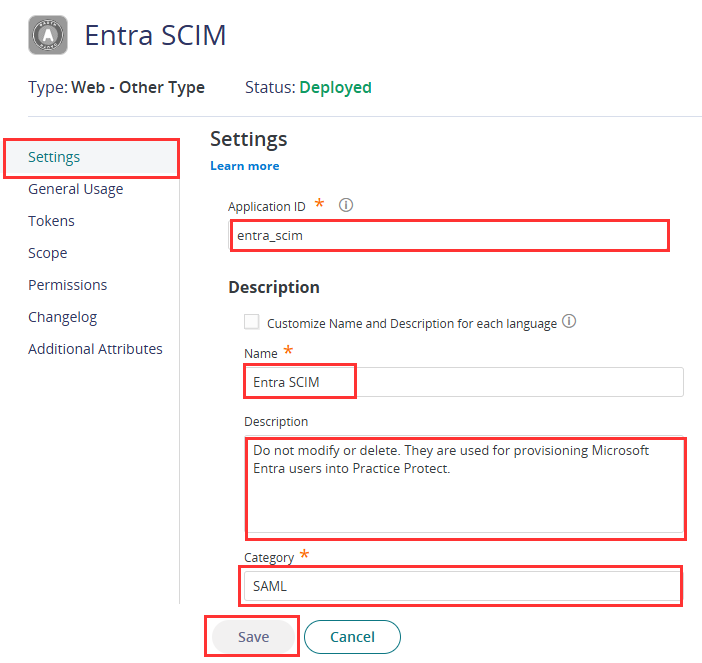
- Enter the following details:
- Application ID: entra_scim
- Name: Entra SCIM
- Description: Do not modify or delete. Used for provisioning Microsoft Entra users into Practice Protect.
- Category: SAML
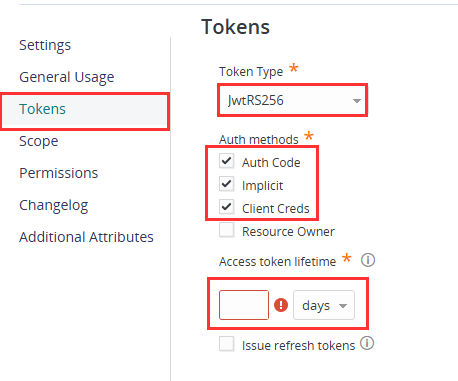
- On the Tokens tab enter the following settings:
- Token Type: JwtRS256
- Auth Methods: Tick the box for Auth Code, Implicit, and Client Creds
- Set your preferred access token lifetime. Take note, Microsoft does not support automated token refreshes in this instance. You will need to manually generate a new token before expiry.
- On the Scope tab, click Add under Authorized scopes and enter the following details:
- Name: scim
- Description: Entra SCIM
- Allowed REST API’s: Click Add and type in scim* under REST Regex
- Click Save

- Click Save again.
- On the Permissions tab, add the service user you created in a previous step (Entra SCIM User)
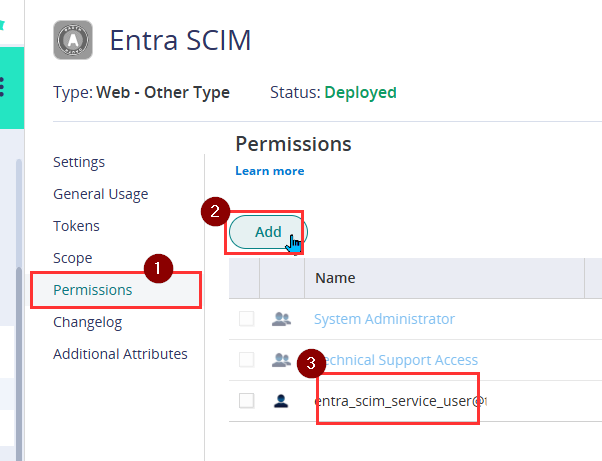
- Make sure Run and Automatically Deploy are ticked permissions.
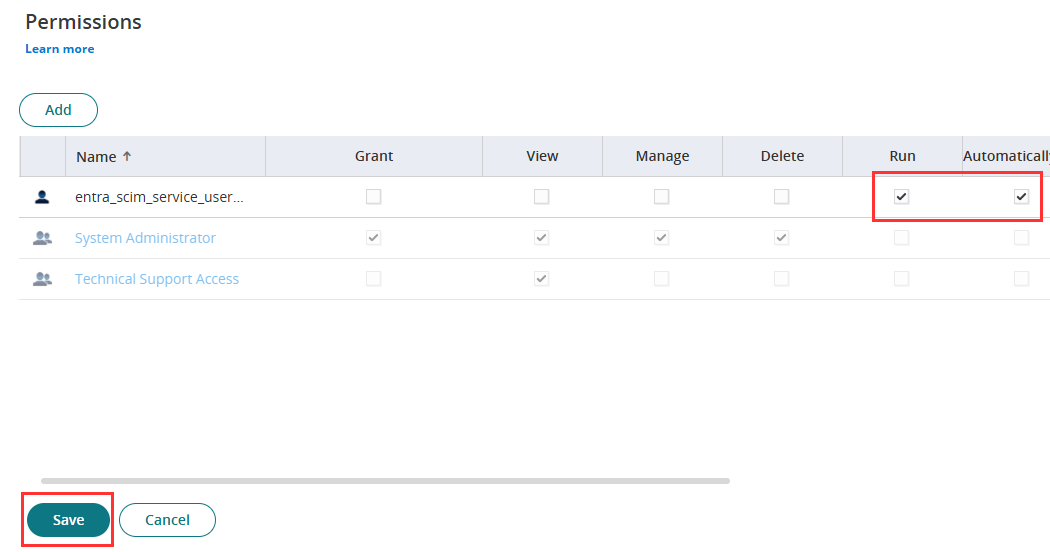
- Click Save.
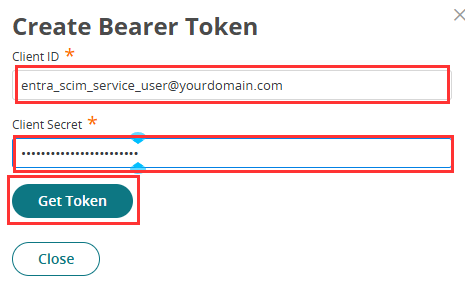
- In the OAuth2 Client app that you have just created, click Actions > Create Bearer Token

- Enter the below details:
- Client ID: Paste the service user’s login name copied from the previous step (entra_scim_service_user@yourdomain.com).
- Client Secret: Paste the service user’s generated password from the previous step
-
Click Get Token
-
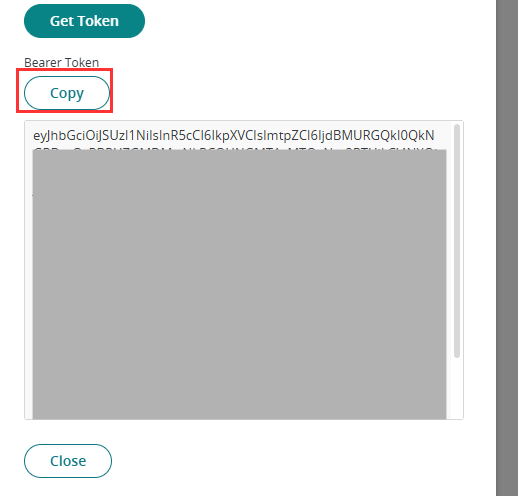
Copy the generated token as this will be used at a later step.
Enable SAML Provisioning in Microsoft Entra
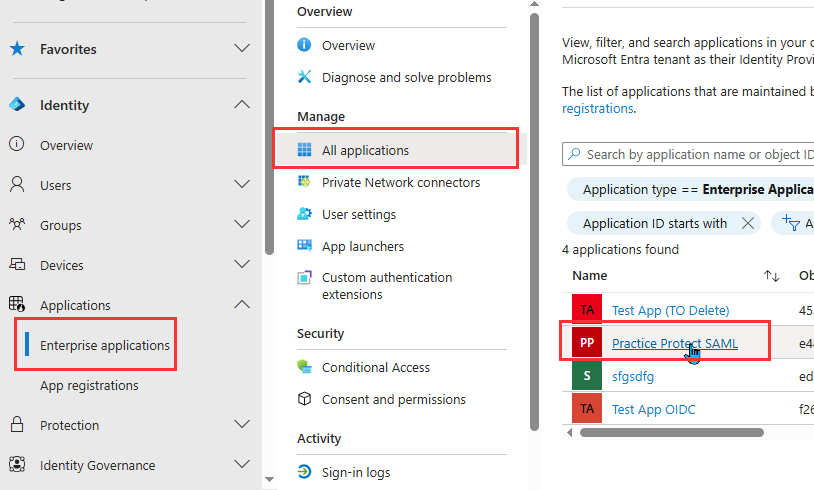
- In Microsoft Entra ID go to Enterprise Applications > All Applications > Open the application you made in the previous section.
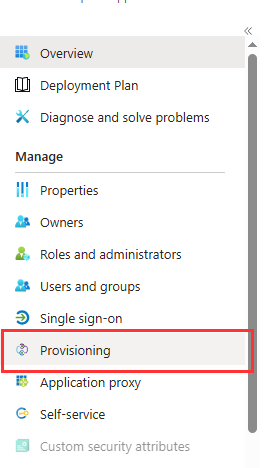
- Go to Provisioning.
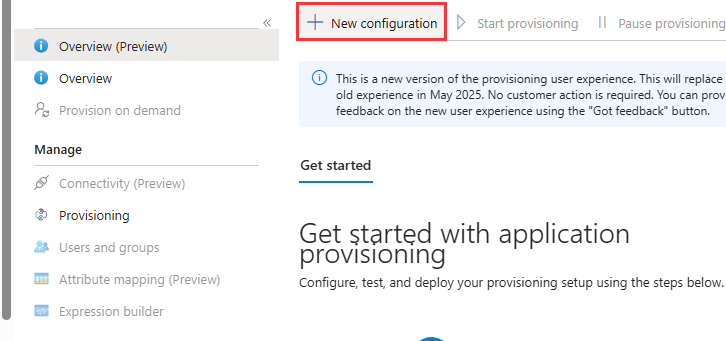
- Click on New Configuration
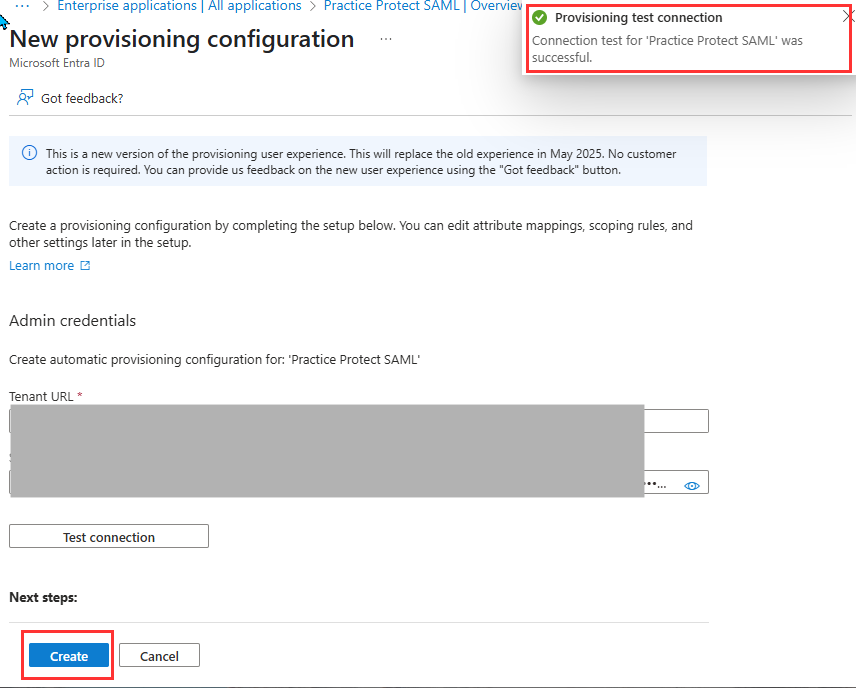
- Supply the admin credentials with the following details:
- Tenant URL: https://<TenantURL>/scim
Note: replace <TenantURL> with the your Tenant URL in Practice Protect. Example: https://abc123.id.cyberark.cloud/scim - Secret Token: The bearer token that you copied in a previous step.

- Tenant URL: https://<TenantURL>/scim
- Click on Test Connection then once successful, click Create.
- Go to Provisioning under Manage
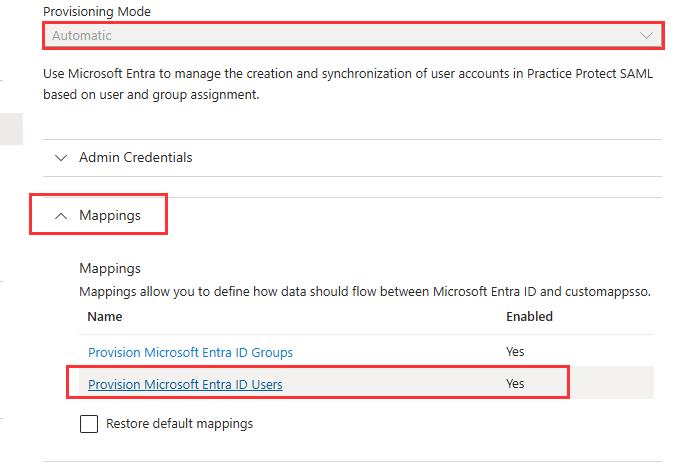
- Choose Automatic on Provisioning Mode
- Navigate to the Mappings section and select Provision Microsoft Entra ID Users.
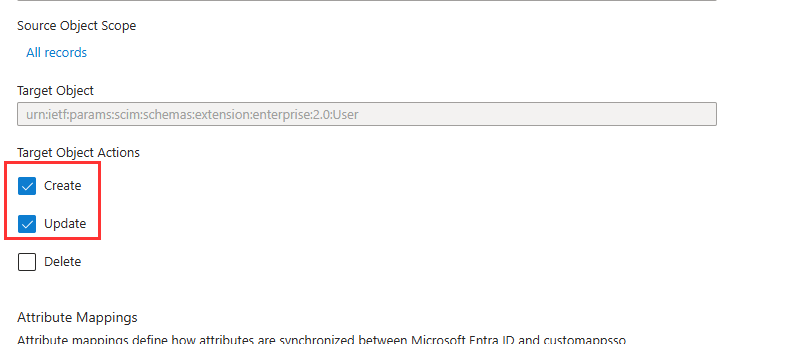
- Under Target Object Actions, tick Create and Update. Enabling the Delete action is optional. Take note, if a user is removed from the Enterprise Application assignment they will be deleted from Practice Protect without a recovery option.
- Under Attribute Mappings, we need to remove all attributes except for the below.
- userName
- Active
- displayName
- emails[type eq “work”].value
- phoneNumbers[type eq mobile”].value
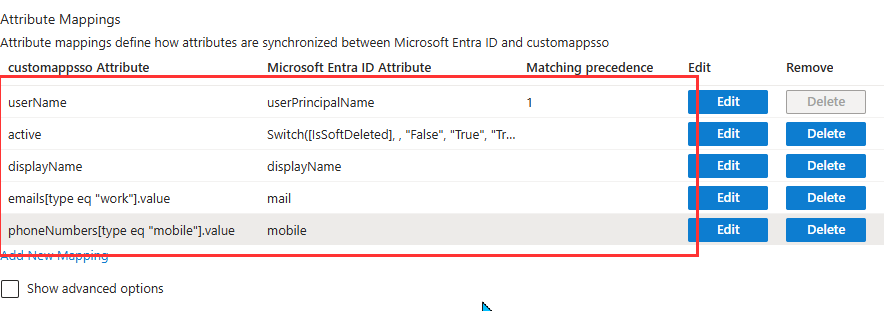
- Click Save at the top of the Attribute Mapping page, confirm by clicking Yes when prompted.
- Return to the Attribute Mappings section, then click Edit next to the userName attribute under customappsso.

- Setup with the following settings:
- Mapping Type: Select Expression
-
Expression: ToLower([userPrincipalName])
- Default value if null: Set to 1
- Target attribute: userName
- Match objects using this attribute: Yes
- Matching precedence: 1
- Apply this mapping: Always
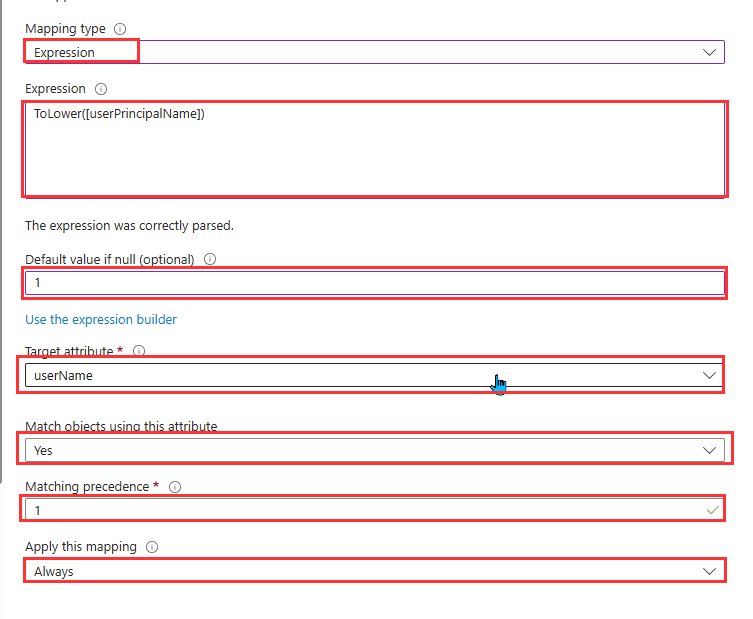
- Select OK and click Save at the top of the Attribute Mapping page, confirm by clicking Yes when prompted.
- Navigate back to the Practice Protect SAML application in Microsoft Entra. Then, under the Manage section, select Provisioning.
- Set the Provisioning Status to On to enable provisioning.
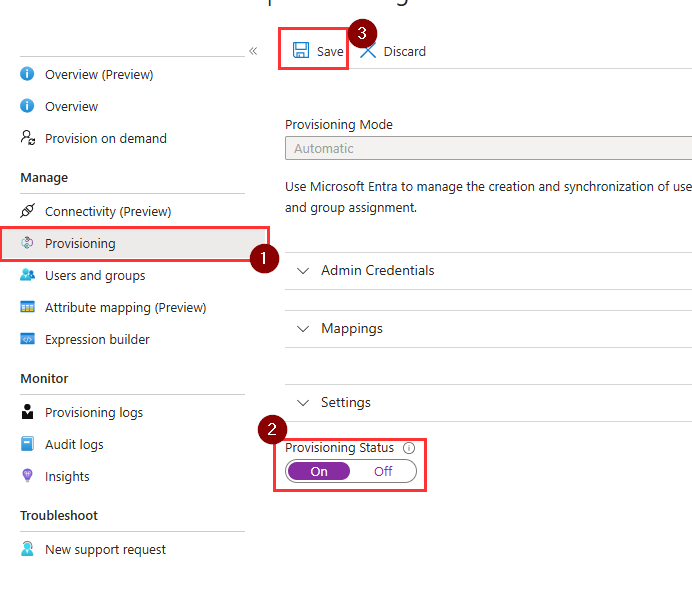
- Click Save.
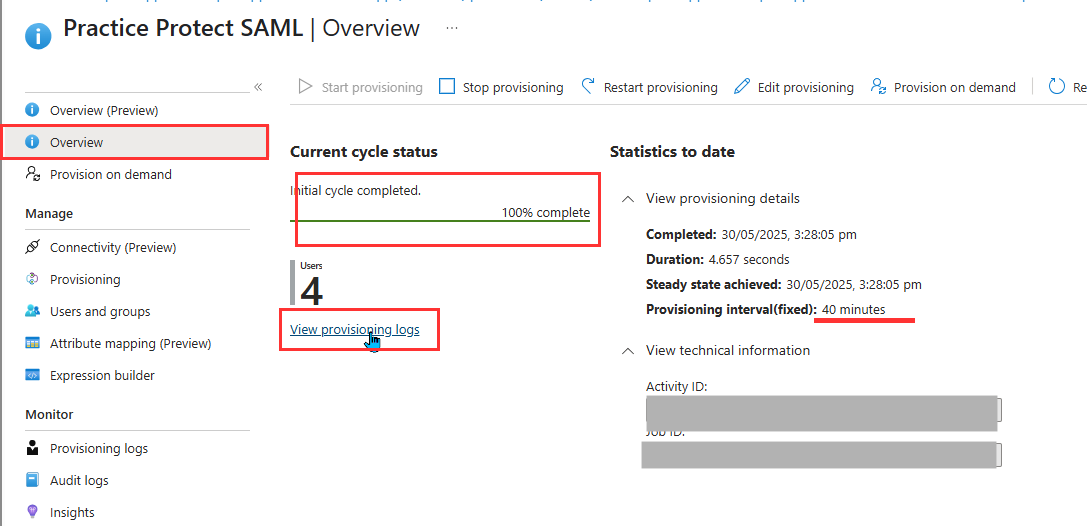
- Once provisioning is enabled, the initial provisioning cycle will start automatically. To verify the results, go to the Practice Protect SAML app and review the Overview section. You can click the Refresh button to update the provisioning status. Microsoft will automatically run provisioning syncs at 40 minute intervals.
- (Optional) You can also manually trigger provisioning by clicking Provision on demand. Then select the specific user or group to initiate a forced provisioning sync.

- Once the provisioning sync is complete, click on Provisioning Logs under the Manage section and verify that there are no provisioning failures

- (Optional) Under the Manage section, click Provisioning and go to the Settings section.
- Check the box for Send an email notification when a failure occurs. In the Notification Email field, enter a valid email address (e.g., admin@yourdomain.com). Note: Enabling email notifications for provisioning failures helps administrators stay informed in real time when user synchronization issues occur. This allows for faster troubleshooting and ensures that access issues are addressed promptly
- Check the box for prevent accidental deletion and put the preferred number, this is to prevent accidental mass deprovisioning, if the ‘delete’ is ticked in the provisioning action options.
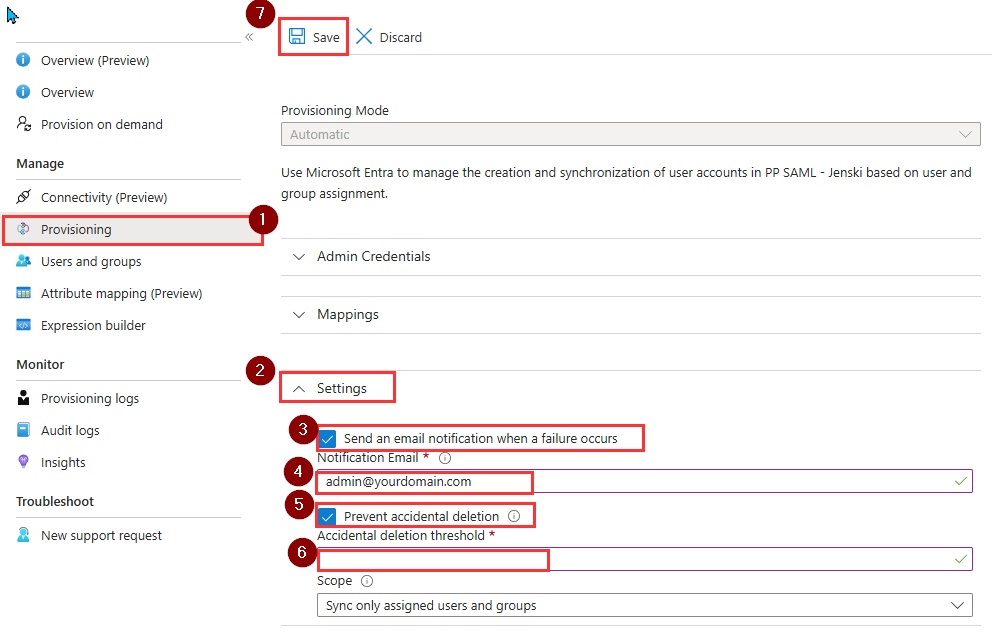
- Hit Save.
Update Authentication Policies in Practice Protect
It is recommended to keep the country or IP based restrictions enabled in Practice Protect. Combined with Conditional Access Policies in Microsoft, this will give you a multi-layered security setup. To ensure that users logging in via Entra SAML will continue to have the Practice Protect authentication policies applied, complete the below steps on all authentication policies.
-
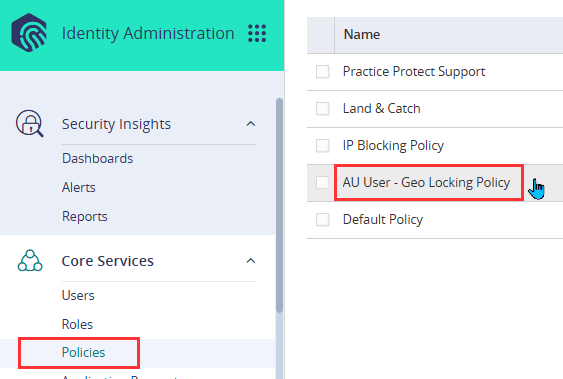
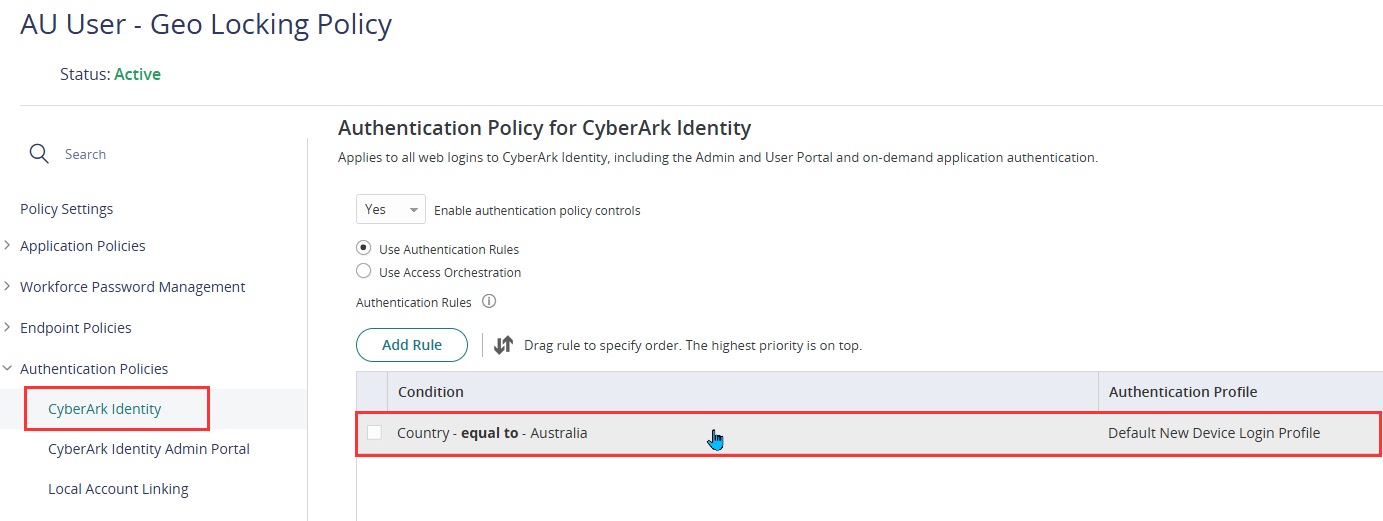
- In the Practice Protect Admin Portal, navigate to Policies under Core Services, then select one of the Country/IP-Based Restriction Policies (e.g., AU User – Geo Locking Policy).
- Select CyberArk Identity under Authentication Policies
- Tick Apply additional authentication rules to federated users.
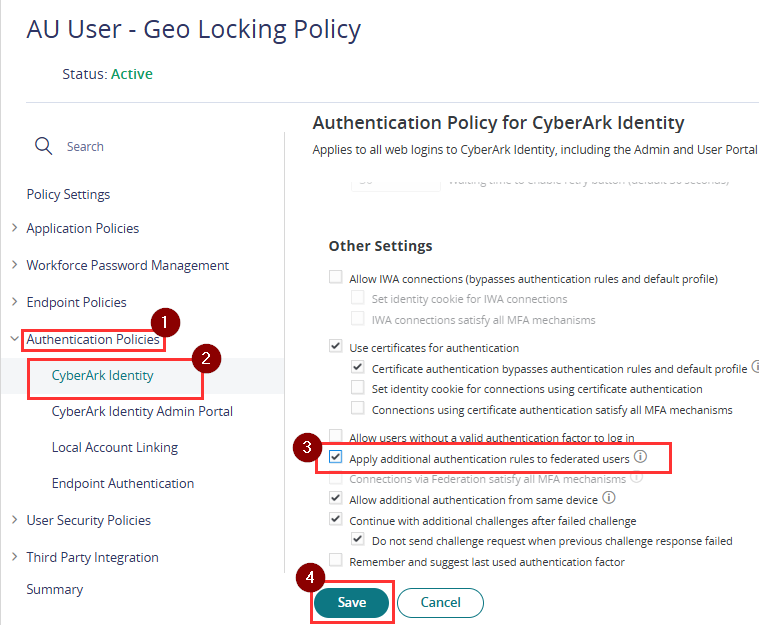
- Click Save.
- In the Practice Protect Admin Portal, navigate to Policies under Core Services, then select one of the Country/IP-Based Restriction Policies (e.g., AU User – Geo Locking Policy).
You can provision Groups from Entra ID into Practice Protect, which will appear as roles. It’s recommended to align the Group/Role assignment with your Conditional Access Policies and Practice Protect Authentication Policies for streamlined management. For example, if you use a group in Entra ID called ‘Australia Country Restriction’, you can provision this group into Practice Protect as a role, then assign that role to the ‘AU Geo-Locking’ policy.
Activate External IdP (Microsoft Entra ID SAML) in Practice Protect
- In the Practice Protect Admin Portal go to Settings > Users > External Identity Providers, then click on the Microsoft Entra ID SAML provider you added in a previous step.
- Tick the Active checkbox, then click Save.

Note: Login Authentication will now redirect to Microsoft 365. For any domains listed under Routing Rules > Federated Domains in the External Identity Provider configuration (Microsoft Entra ID SAML) - Test with a user to ensure they can successfully log in and access their Practice Protect via their Microsoft 365 credentials.
(Optional) Configure MFA in Practice Protect
By default after enabling Entra SAML, users will continue to be prompt to enter their Practice Protect MFA mechanism. You can optionally disable this behavior by following the steps below. It’s important that if the below steps are completed & Practice Protect MFA is disabled, that the MFA is instead enforced by Microsoft 365.
- In the Practice Protect Admin Portal, navigate to Policies under Core Services, then select one of the Country/IP-Based Restriction Policies (e.g., AU User – Geo Locking Policy).
- Select CyberArk Identity under Authentication Policies
- On the Authentication Rule, click on the existing rule added and it will open a pop-up form.
- Change the Authentication Profile from Default New Device Login Profile to Default Other Login Profile and click Ok
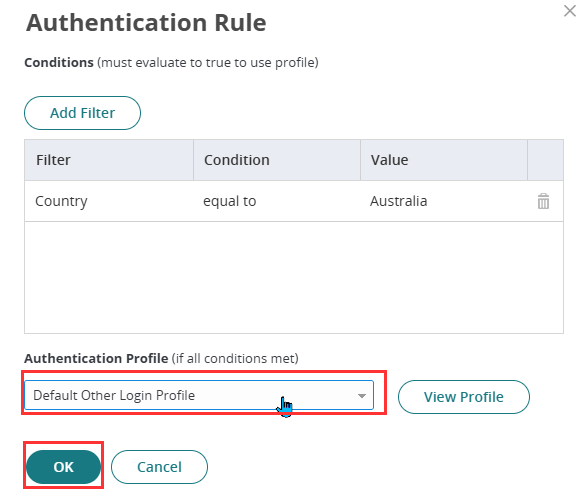 This configuration enforces Microsoft as the sole MFA method in Practice Protect and bypasses the prompt for Practice Protect username and password.
 - Click Save. Repeat the steps above to apply it on other country/IP based restrictions Policies.
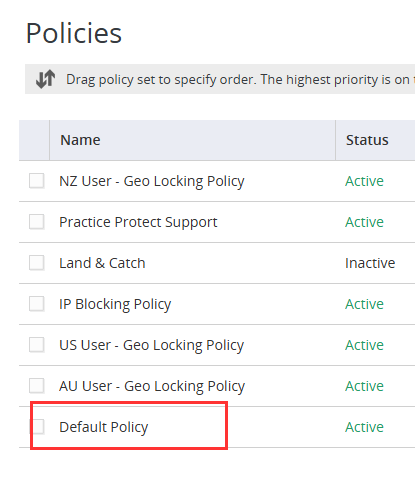
- Go to the Default Policy, can be found at the bottom of the list.
- In the User Security Policies section, click on User Account Settings.
- Apply the following configuration settings:
- Number of authentication factors user is required to configure upon login – Set to (—)
- Prompt users to set up mobile number on login – No
- Enable users to configure an OATH OTP client – No
- Enable users to configure Security Questions – No
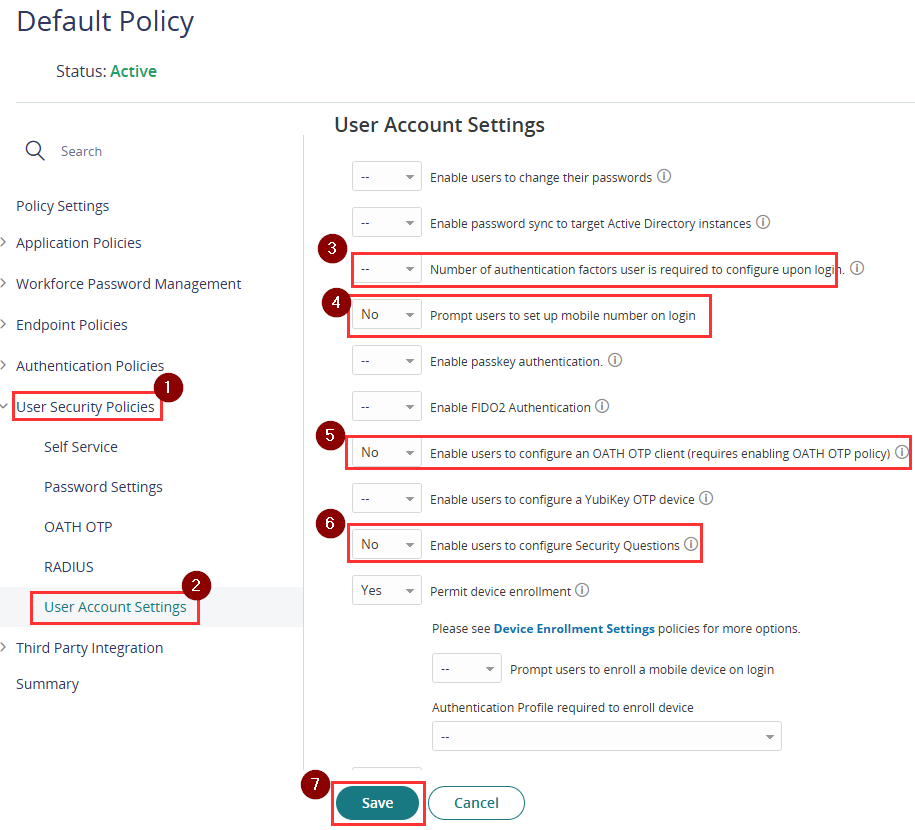 These settings prevent users from being prompted to configure MFA within Practice Protect, as Microsoft login and MFA have been designated as the sole authentication method.
- Click Save.