
Purpose
Google Workspace (formerly known as G-Suite) offers single sign-on via SAML integration with Practice Protect. This provides a seamless login experience to the Google apps (ex. Gmail, G-Drive & etc.) using IdP-initiated SAML.
Practice Protect will configure this on your behalf. Please send us an email at support@practiceprotect.com
This also include to option to enable user provisioning. When it is enabled, it allows Practice Protect to manage user account creation and basic user information updates. Providing a centralised management platform for your employee’s access to Google Apps.
Prerequisites
- Google Workspace business subscription (Starter, Standard or Plus)
- Account in Google Workspace with Super Admin rights
- Google usernames should match the login names in Practice Protect (ex. username@yourdomain.com)
Instructions
- Login to your Practice Protect and switch to the Admin portal (ex. mydomain.practiceprotect.app).

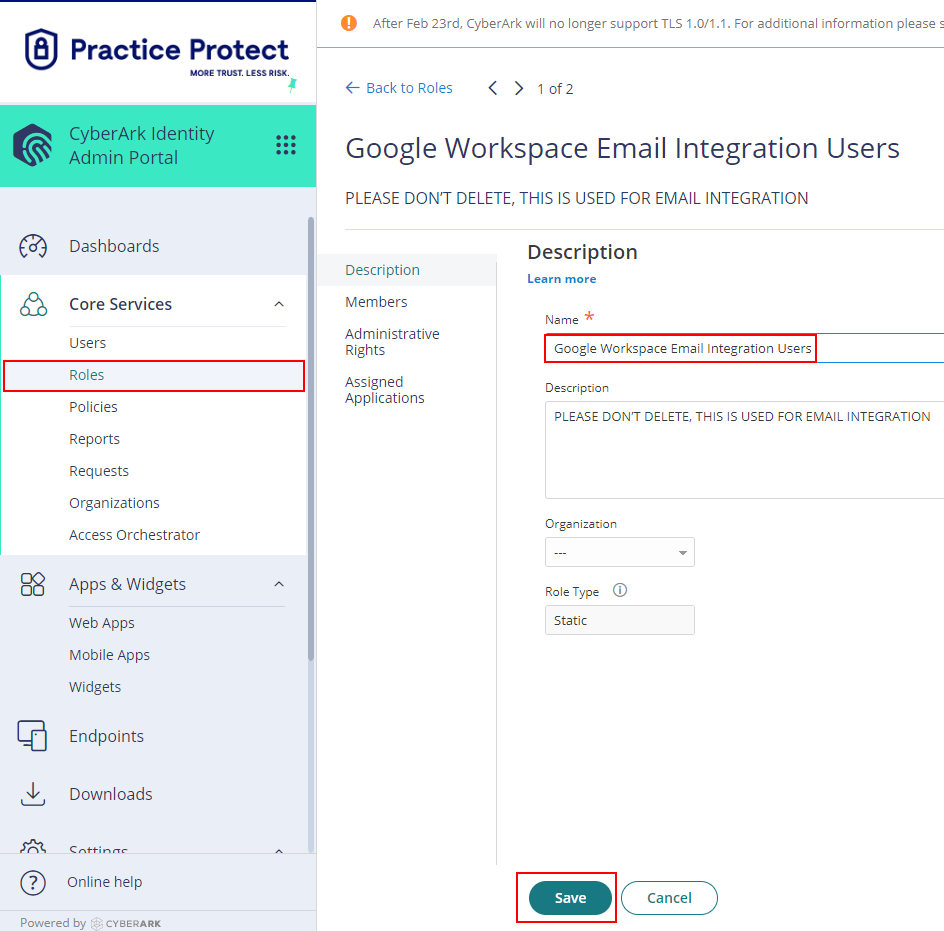
- On Core Services, Click on Roles > Add Roles. Create a role and set the name field to Google Workspace Email Integration Users. Then Save.
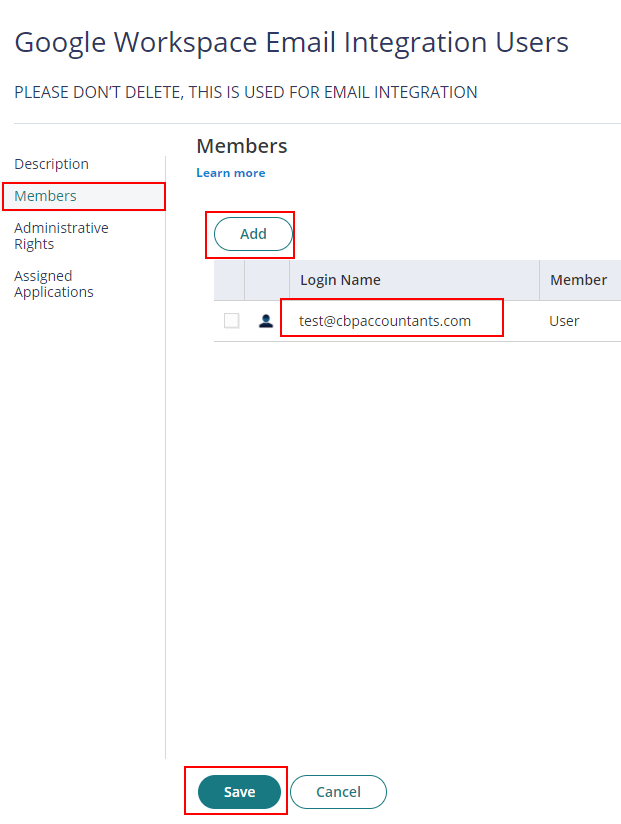
- With the created role, click on Members > Add. Add each user that be part of the integration. Then Save.
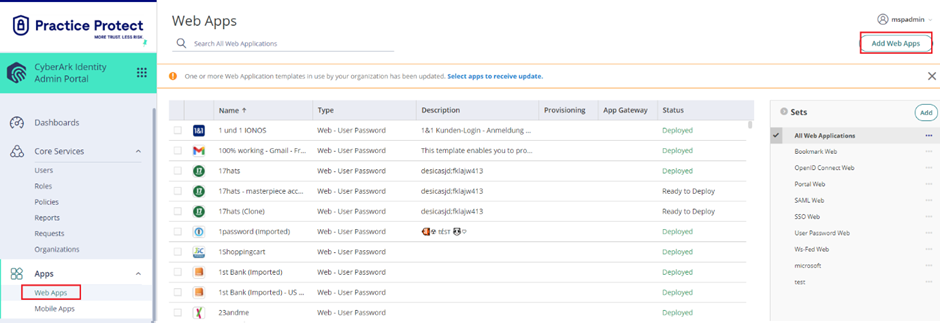
- From the Apps & Widgets, go to the Web Apps section. Then, choose Add Web Apps in the top right corner.
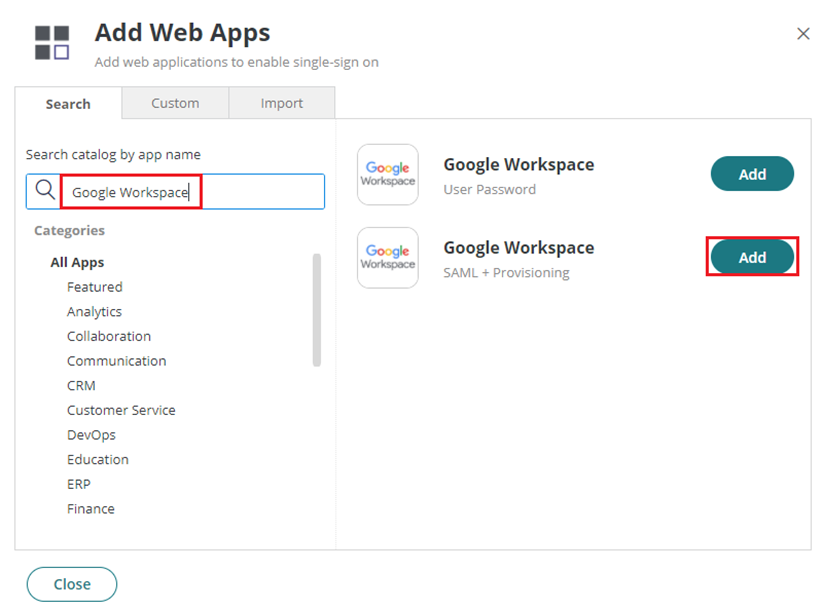
- On the app catalog, search for Google Workspace. Click Add right next to Google Workspace (SAML + Provisioning). Close when prompted.
- On the app Settings, enter the Primary Domain you have in Google Workspace to the Your Primary Domain in Google Workspace field.
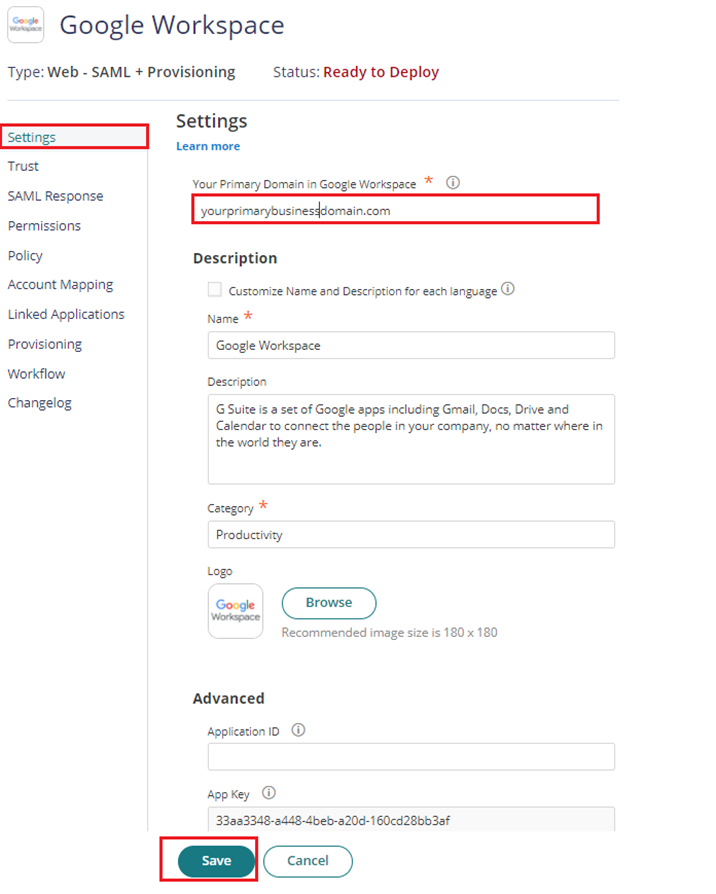
NOTE: if you don’t know the Primary Domain, sign in to google workspace using an admin account and go to this page. This will show the list of domains the organization have including the Primary Domain. - Click Save.
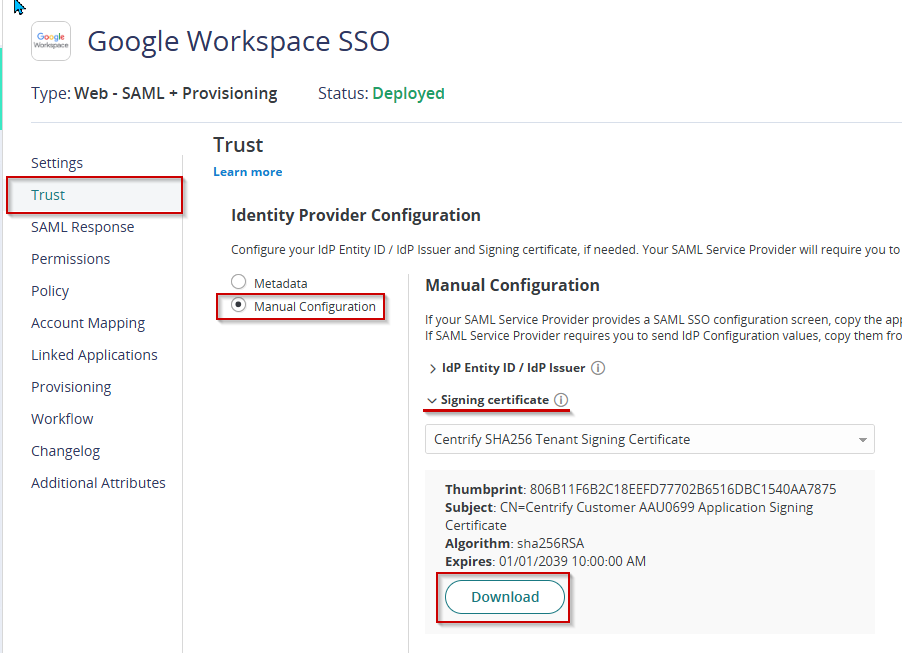
- Proceed on Trust. Under Identity Provider Configuration select Manual Configuration. Click on the dropdown for Signing Certificate and download. Keep the file as this is needed in Google Workspace.
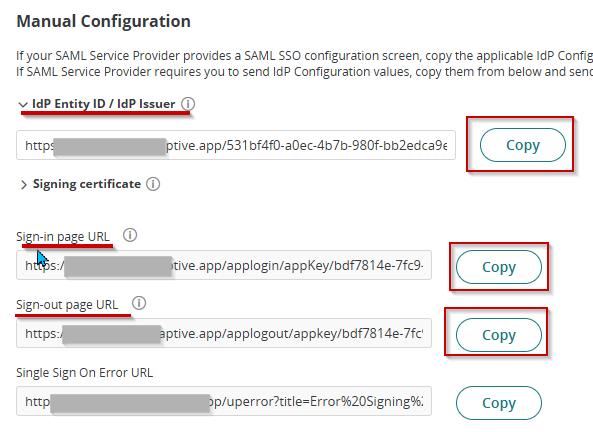
- On the same page, copy the following URL and keep it on your Notepad as this will be needed for the next steps.
- IdP Entity ID / IdP Issuer
- Sign-in page URL
- Sign-out page URL
- Click Save. Leave the page open.
- Open a new tab in your browser and this time sign in to Google Admin using a Super Admin account
- On the left menu, go to Security > Authentication > click SSO with third party IdP. Click ADD SAML PROFILE
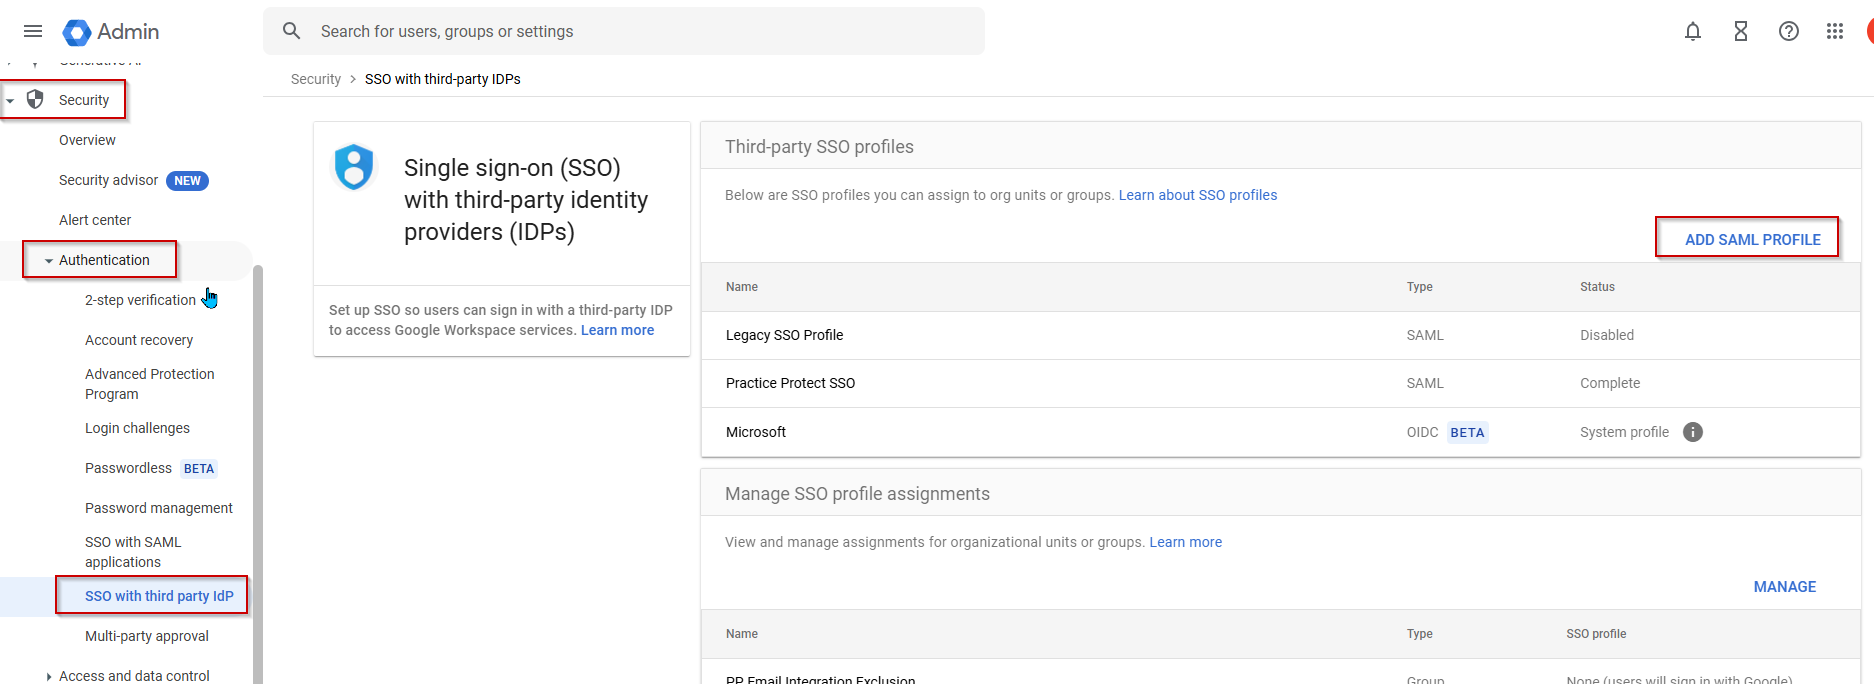
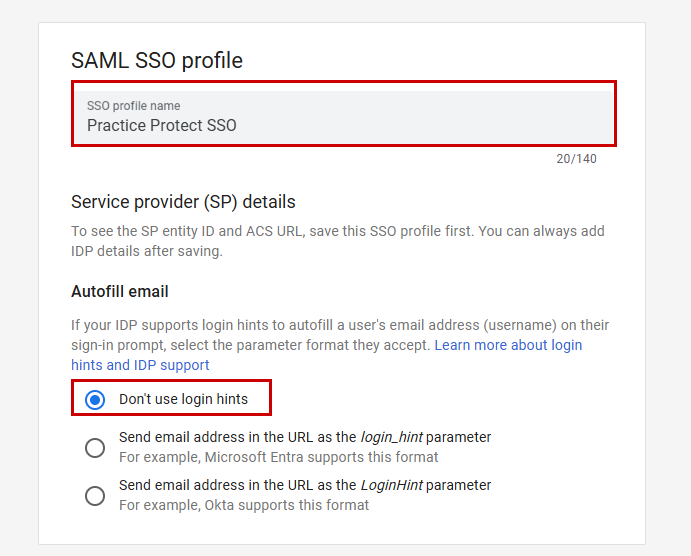
Note: This page could be different on your side, click Get Started and ADD SAML PROFILE - Set the SSO Profile Name to Practice Protect SSO
- Set the Autofill email to Don’t use login hints.
- Setup the SSO profile with the following IDP details:
- IDP entity ID – paste the Idp Entity URL copied from step 9
- Sign-in page URL – paste the Sign in page URL copied from step 9
- Sign-out page URL – paste the Sign-out page URL copied from step 9
- Change password URL – paste the Tenant URL you have in Practice Protect (ex. https://yourdomain.id.cyberark.cloud)
- Verification certificate – upload the certificate you downloaded from Step 8
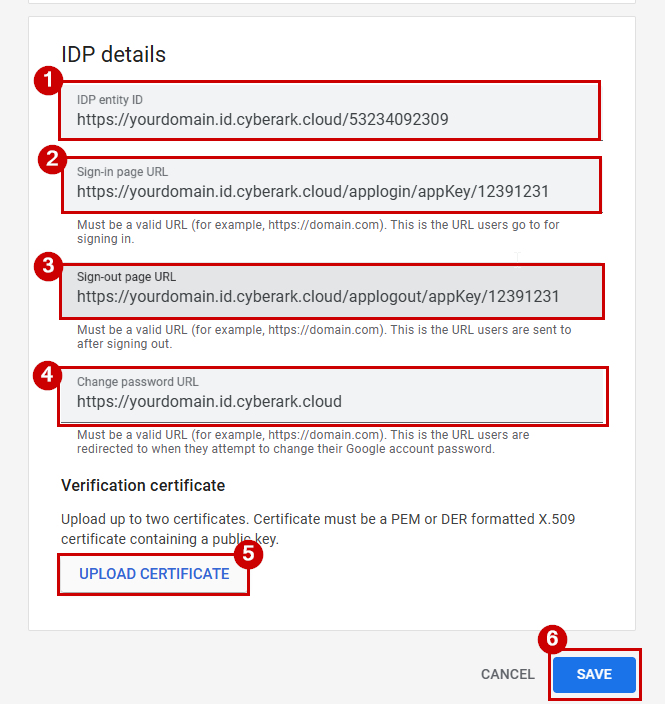
- Click SAVE.
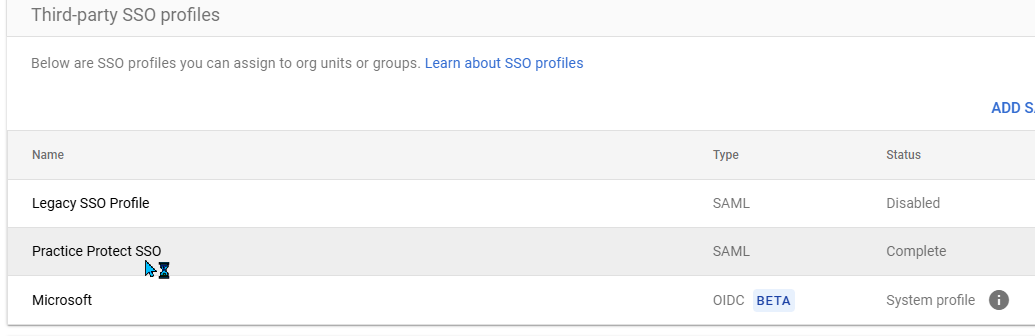
- From the third party SSO profiles, click on the Practice Protect SSO profile created. This opens up the configuration details.
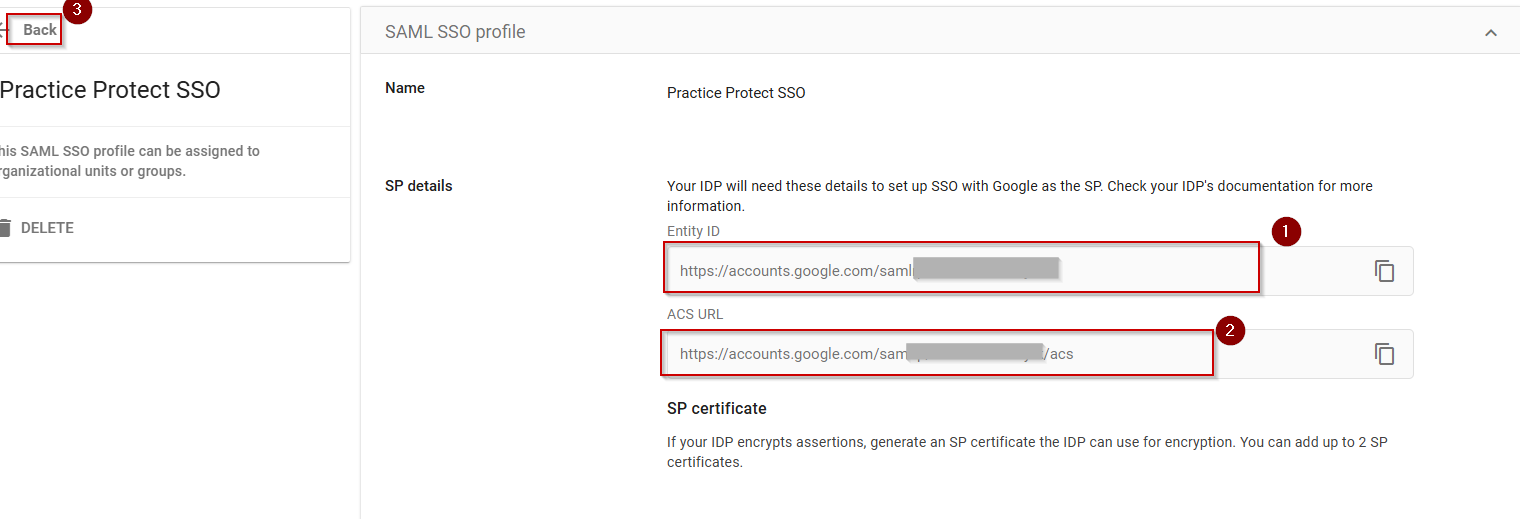
- Copy both the Entity ID and ACS URL. Close the page.
- Return to Practice Protect Admin Portal > Apps & Widgets > Web Apps > Google Workspace.
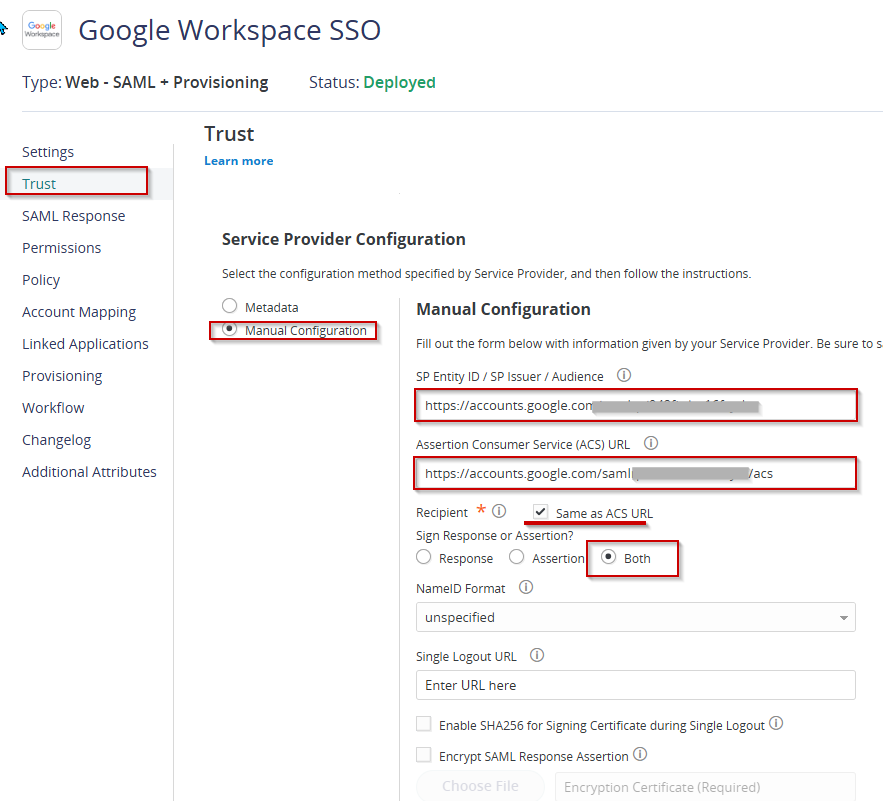
- Return to Trust and proceed to Service Provider Configuration. Select Manual Configuration
- Set the following details below:
- SP Entity ID / SP Issuer / Audience – paste the Entity ID url you copied from Step 16
- Assertion Consumer Service (ACS) URL – paste the ACS url you copied from Step 16
- Sign Response or Assertion – select Both
- Hit Save.
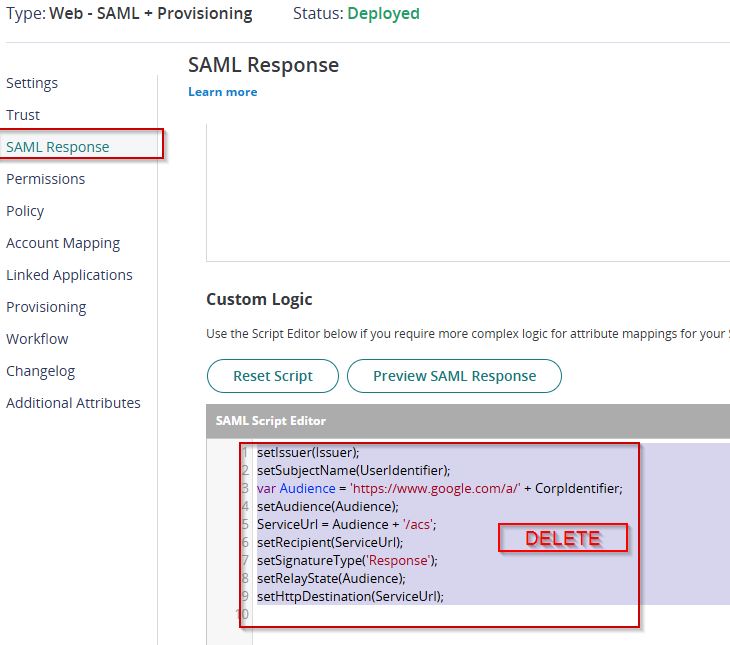
Go to SAML Response > Custom Logic. Remove any script added and click Save.
Remove Google Workspace administrator privileges (Super Admin)
Accounts that have Super Admin rights will not be email integrated so to apply, one should consider removing its privilege and set it as a regular user. You can still re-apply low type of privilege (User Management)
Take note that there should be at least one Super Admin Account within Google Workspace for revoking any poor changes and serve as a fallback.
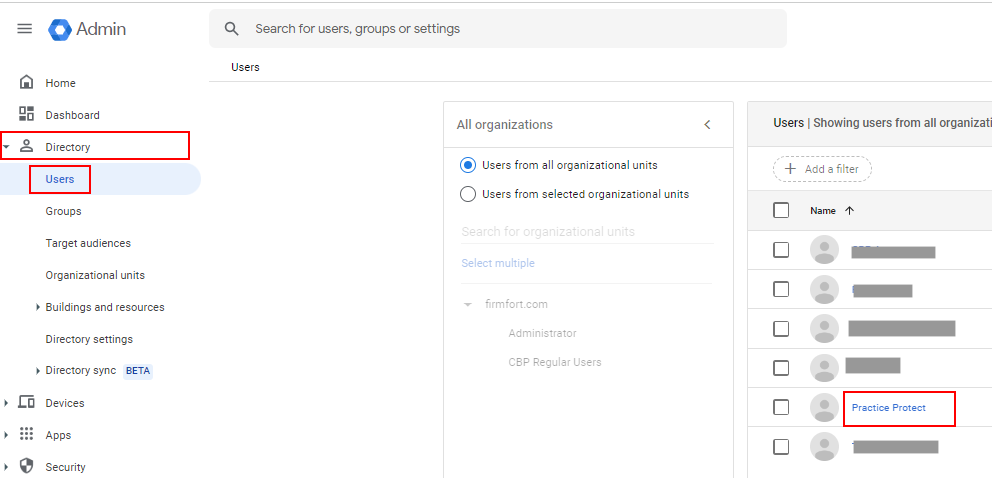
- In the Google Admin Console, go to the left navigation Menu > Directory > Users. You must be signed in as a Super Admin for this task.
- Select and click the user’s name of the admin you wish to revoke privilege. This should open their account setup page.
- Click the Admin roles and privilege
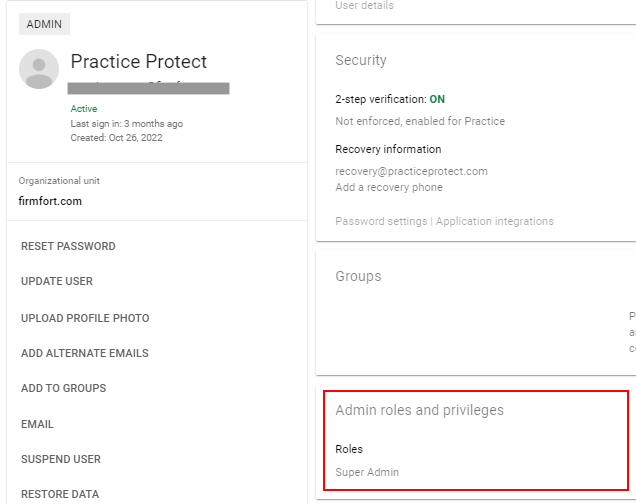
- Select the desired role (Ex. Super Admin). then click on the slider to revoke or remove the role.
- At the bottom section, click Save. You’ll get a pop-up confirmation message that the roles have been updated.
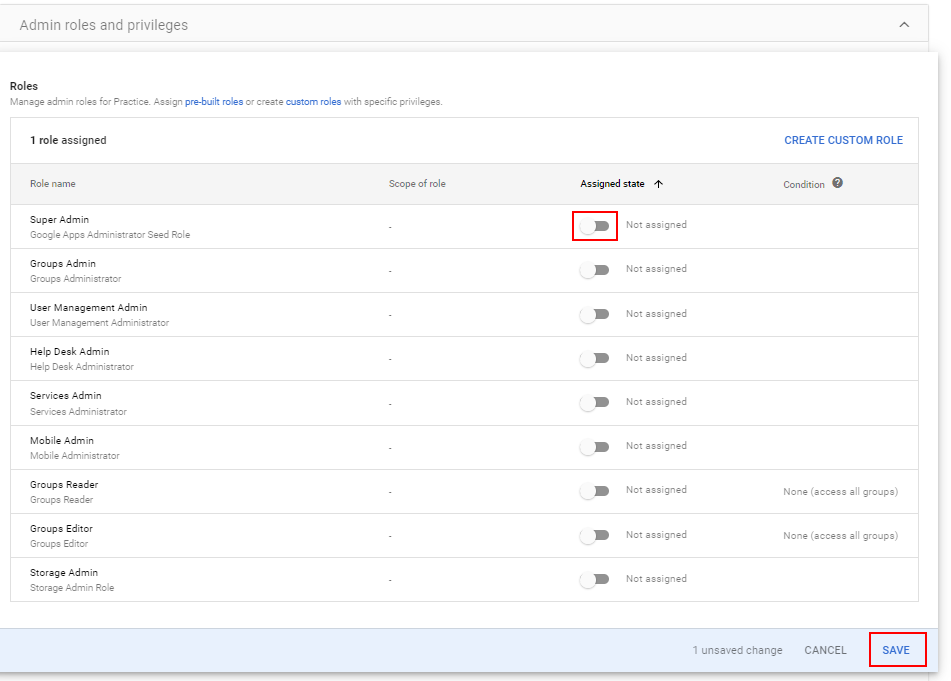
Note: You can still assign other admin rights, but not Super Admin privileges
Enable Google Workspace Email Integration
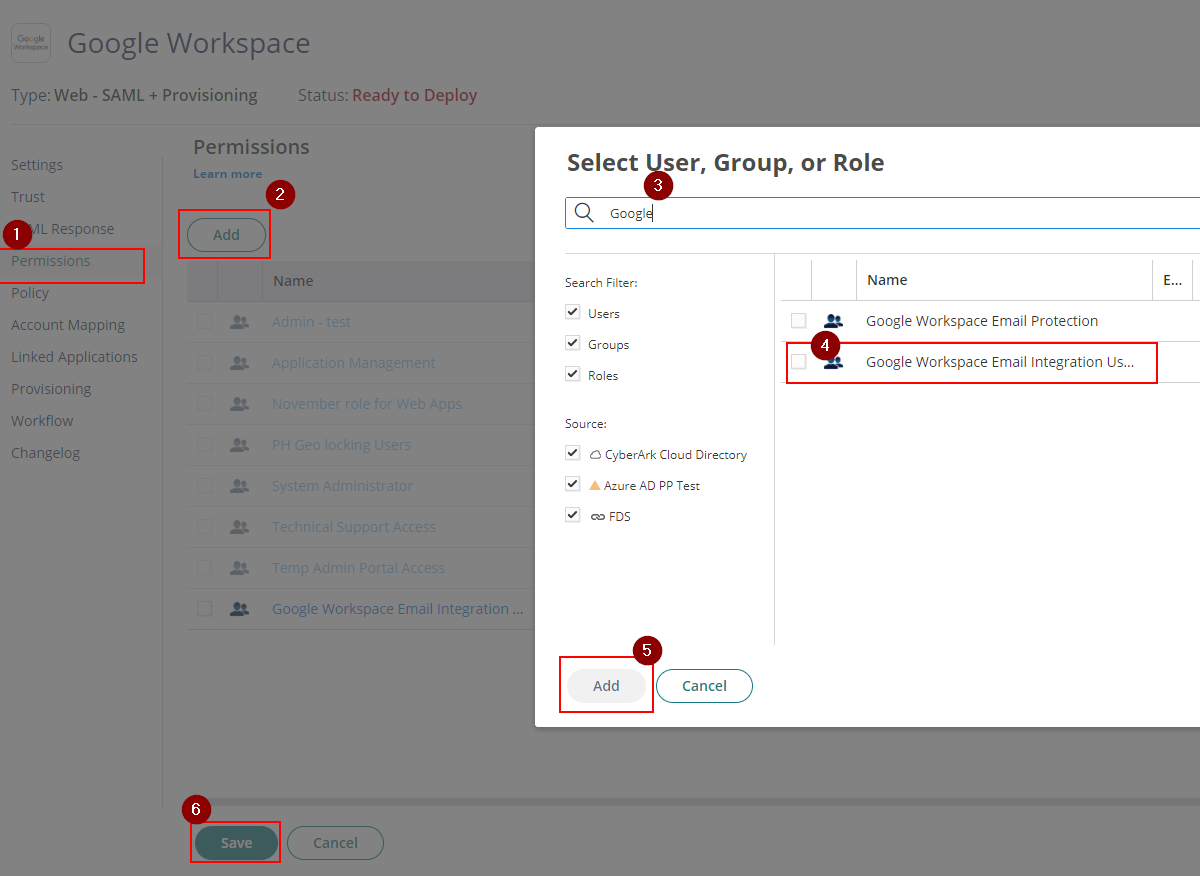
- Return to Practice Protect Admin Portal > Apps & Widgets > Web Apps > Google Workspace.
- Go to Permissions. On Permissions, Add the role that contains the users for email integration (i.e. Google Workspace Email Integration Users) and click Save This should display the app on their user portal and can be used once activated.
- Return to Google Admin > Security > Authentication > SSO with Third party IdP
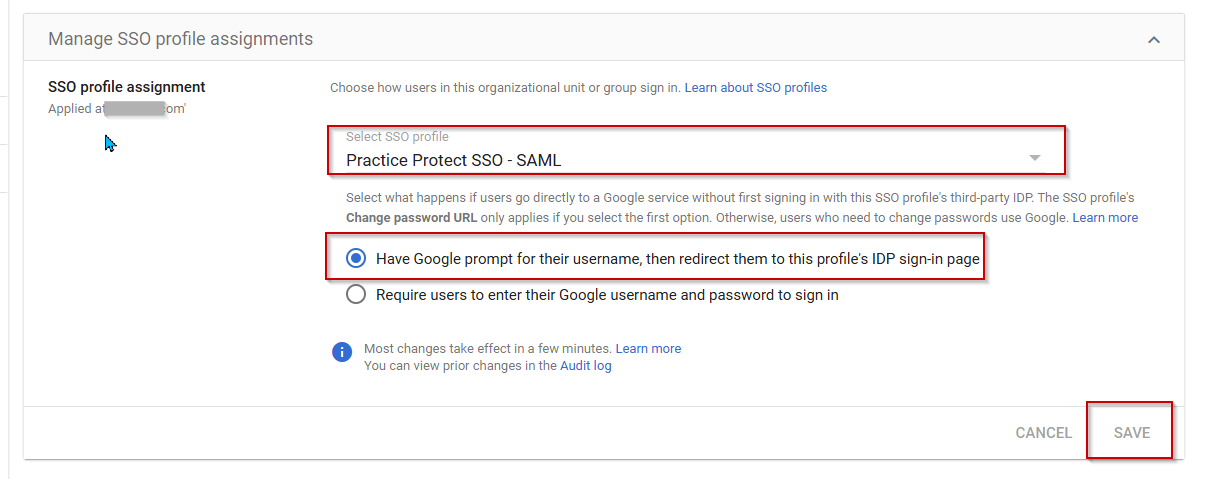
- On Manage SSO profile assignments, click MANAGE.
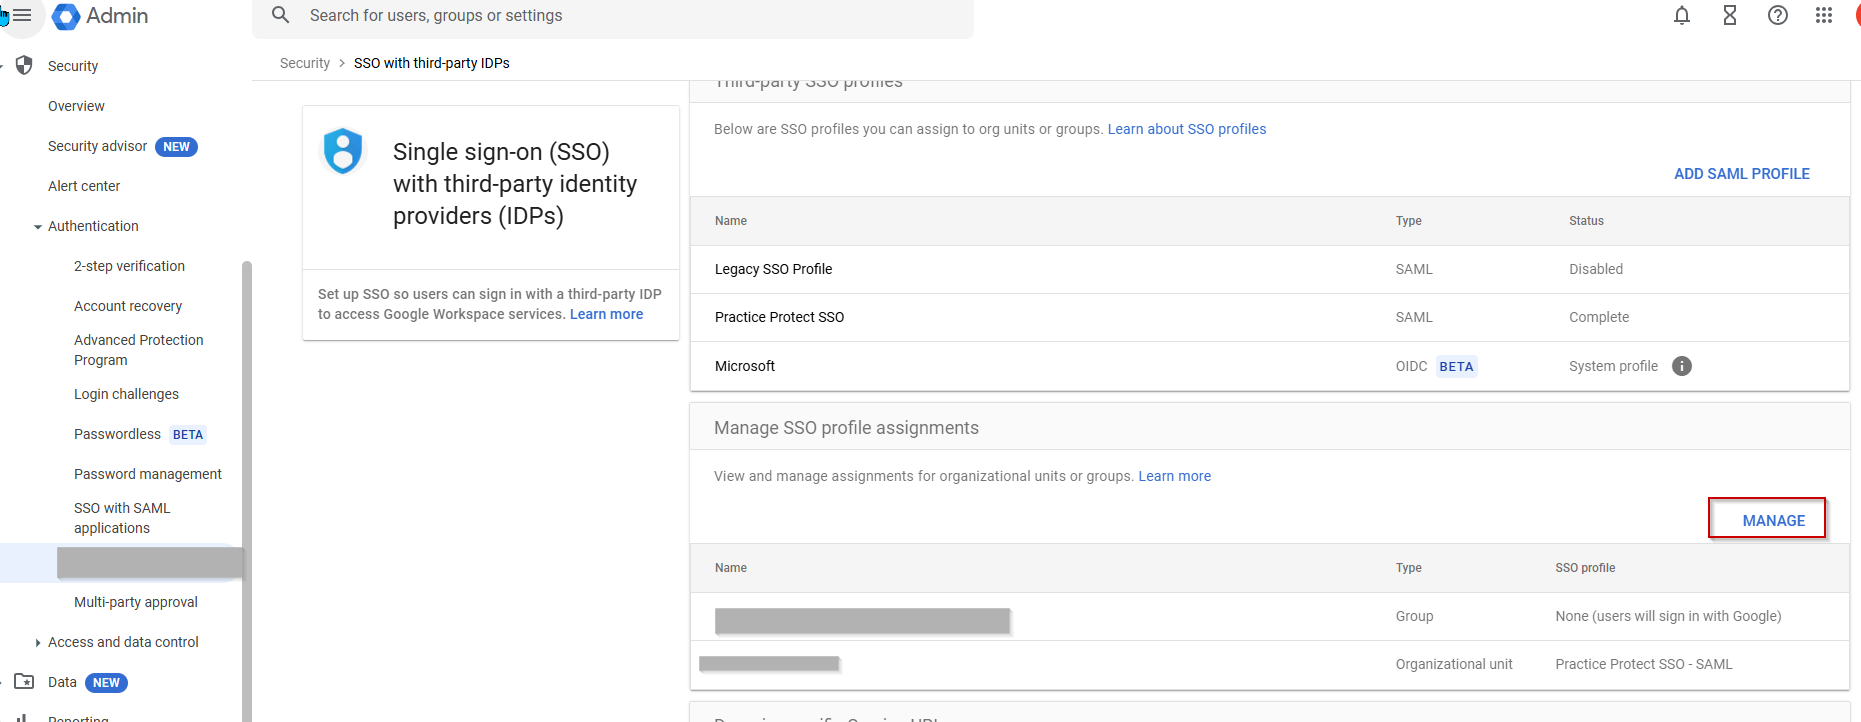
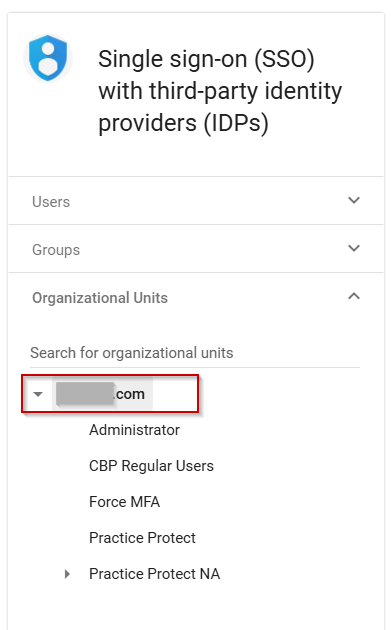
Note: You may have a prompt for Get Started window, click Get Started > Click Manage - From the Organizational Unit (OU), select the appropriate OU where the users belong. If you select the primary/root OU, the SSO will apply to all users within the organization.
 Note: If you wish to exclude some users, you can follow this guide
 - Select the SSO profile you created from the previous step (Ex. Practice Protect SSO – SAML)
- Choose Have google prompt for their username, then redirect them to this profile’s IDP sign-in page. Click Save
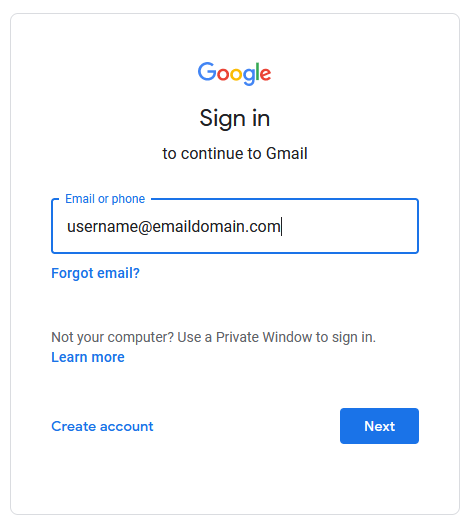
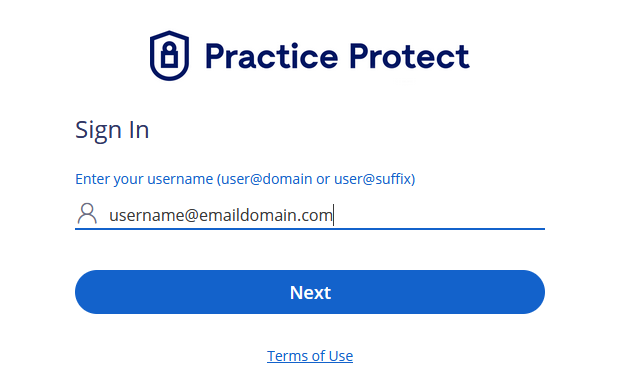
- Email Integration is now enabled. Test by signing in to any Google Workspace apps (Gmail, G-Drive, etc.) directly in the browser or mobile app (if using). Enter Email/Username then click Next. This should redirect the page to Practice Protect for login authentication.
Enable and Setup Provisioning
-
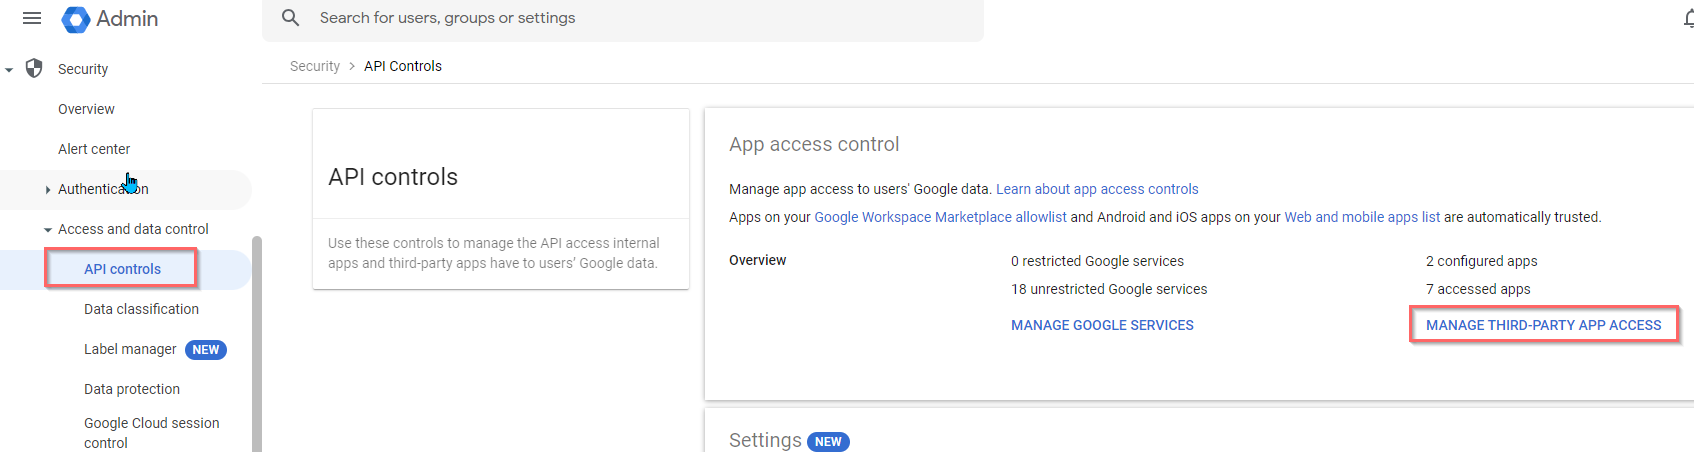
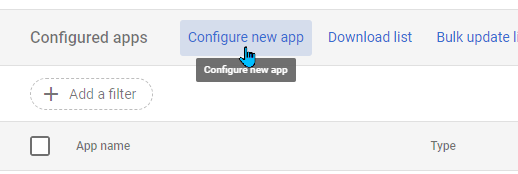
- Return to Google Admin and proceed to API Controls > MANAGE THIRD-PARTY APP ACCESS
- Click on Configure new App.
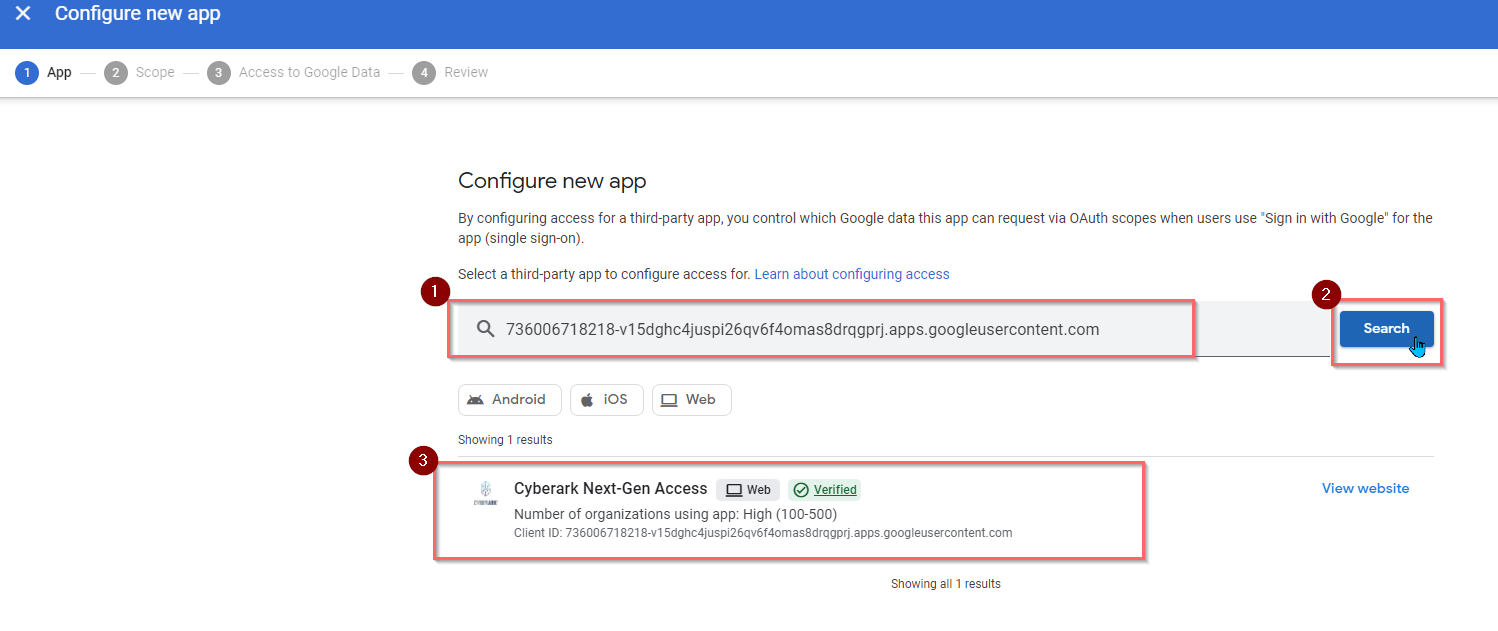
- Enter the below CyberArk ID in the field and click Search
- Pick the Cyberark Next-Gen Access.
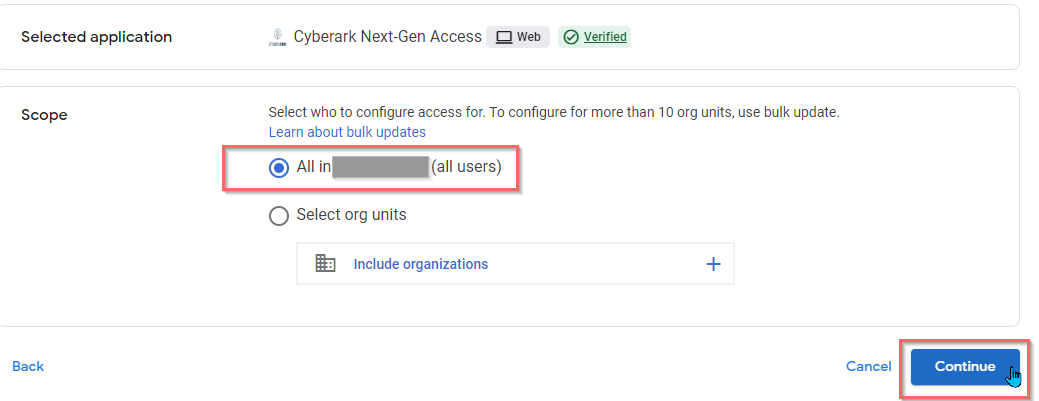
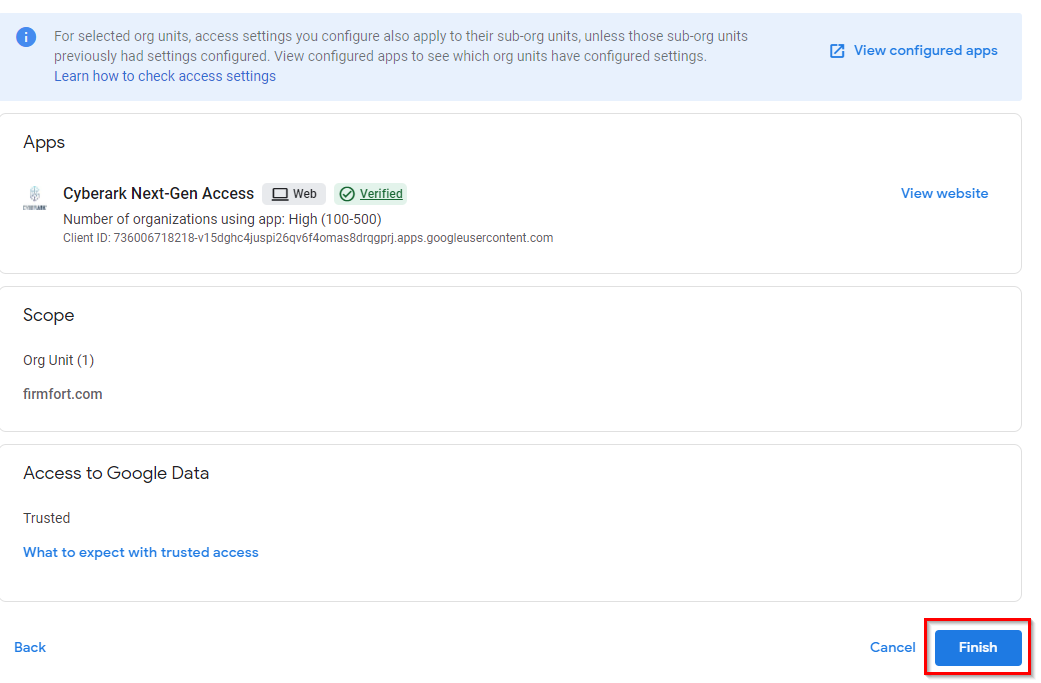
- Select All in domain.com (all users) in the Scope and click Continue.
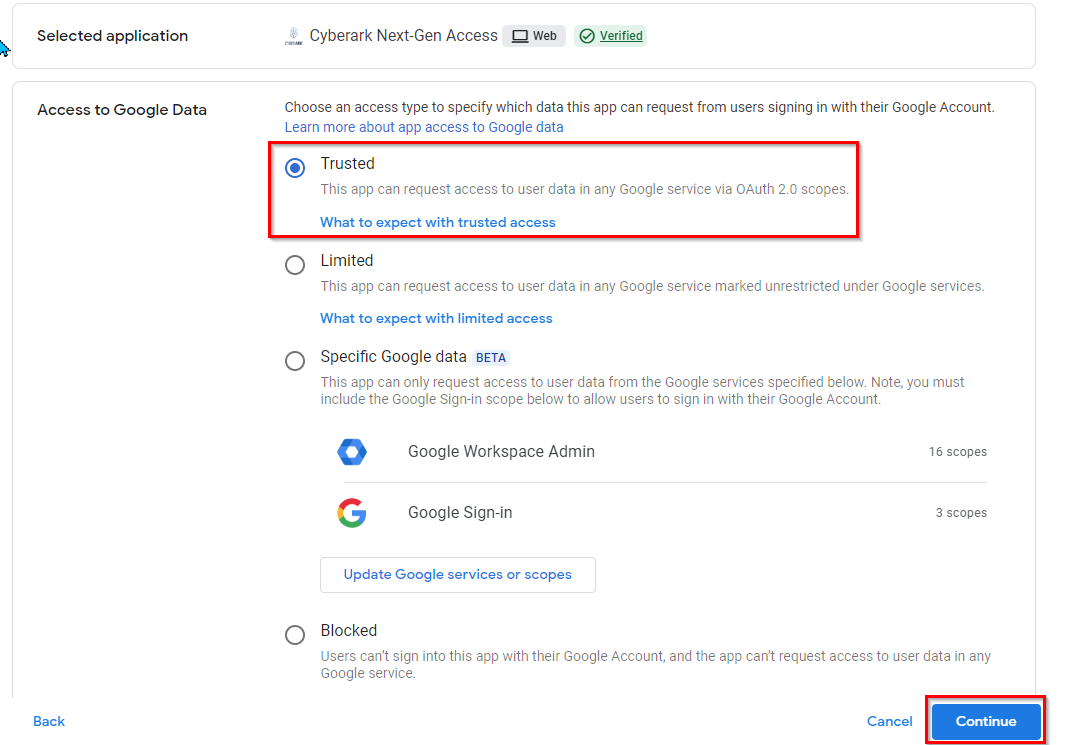
- Choose Trusted and click Continue.
- On the configuration review, click Finish.
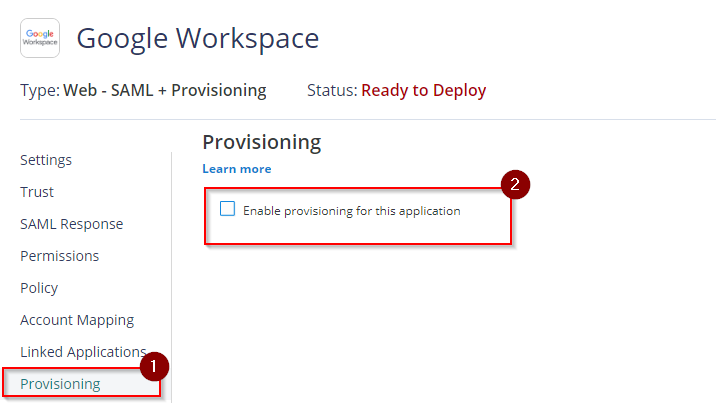
- Return to the Practice Protect Admin Portal and on the Web Apps, find and click the app, Google Workspace that was created in Step 6.
- Within the app menu, select Provisioning and then tick the box Enable provisioning for this application. This reveals the configuration settings that require to be set up.
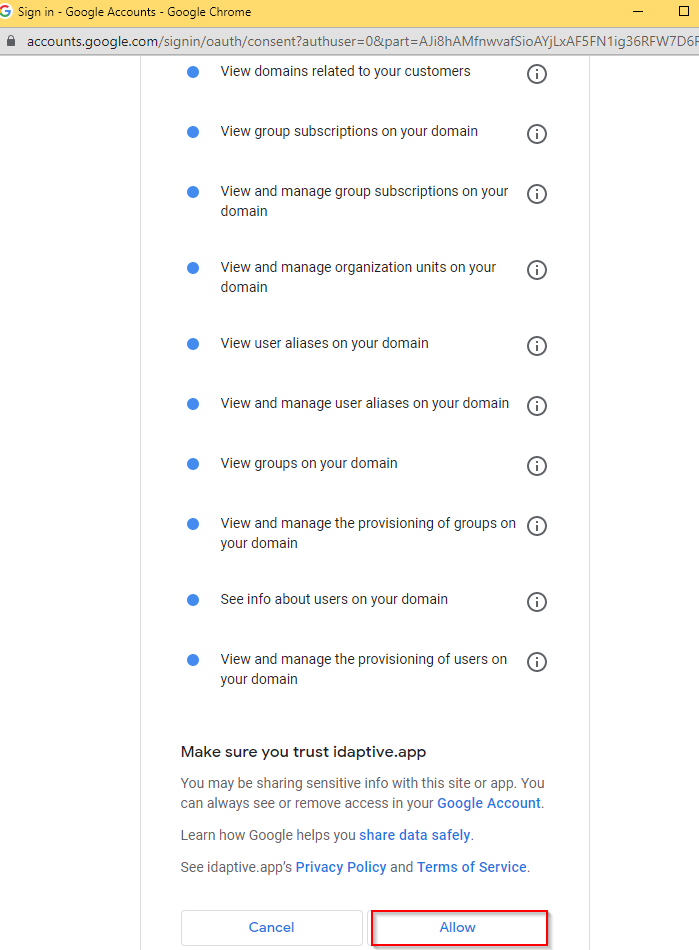
- To proceed, make sure that Live Mode is selected and click Authorize. This will prompt you to log in on Google Workspace. Use the Super Admin account credential.
- Click ALLOW to authorize Practice Protect Identity Service to provision users. It will notify you once authorization is successful.
Note: If the rest of the configuration settings are still not loading even after a successful authorization, just refresh the page where provisioning settings is open. - On Sync Options, tick the box of the following:
– Sync (overwrite) users to target application when existing users are found with the same principal name.
– Do not de-provision (deactivate or delete) users in target application when the users are removed from mapped role.
– User Deprovisioning Options: Disable user
– Deprovision (deactivate or delete) users in this application when they are disabled in the source directory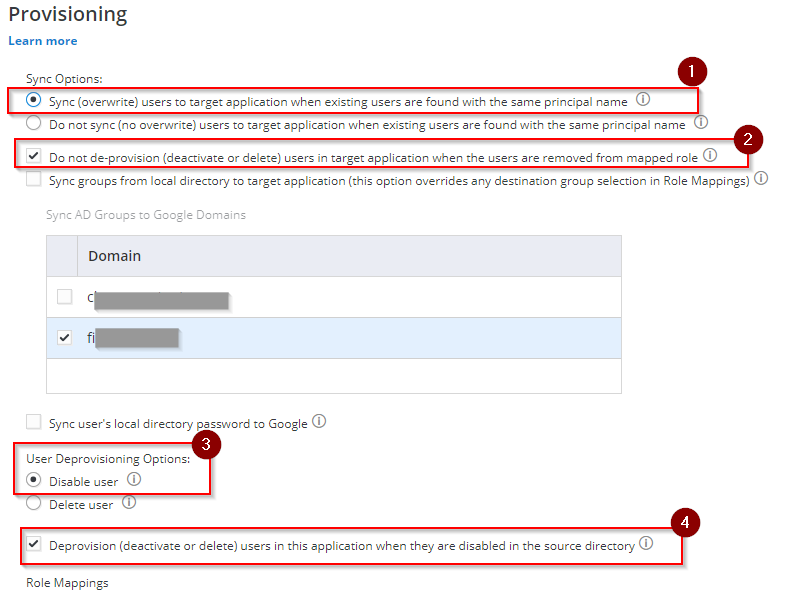
- Scroll down to Role Mapping and click Add. A new pop-up setting will show up (Role mapping).
– Role field, select the role that was created from Step no. 3 (i.e. Google Workspace Email Integration Users).
– Destination Organizational Unit field, select the OU that corresponds to the created Role in Google Workspace(i.e./Administrator). Otherwise, select “/” for all.
– Destination Domain/Group Select the desired domain if you have more than 1 domain. Otherwise, leave it blank.

This is how you can also map a Group from Google Workspace and that is by creating an equivalent Role in Practice Protect, assigning the members then mapping it on the Role Mapping Provisioning Settings. - Hit Done to apply. Then select Save.
NOTE: When you create a user in Practice Protect then assign that user to the Role (i.e Google Workspace User) that user will be provisioned (created) to its corresponding Destination Organizational Unit (OU) in Google Workspace once synced. - The next step below is to add a provisioning script
- On Provisioning, click on Provisioning Script. Within the script editor remove all of them and replace them with the below:
if (source.Classification == "User") {

destination.DisplayName = source.DisplayName;

destination.PrimaryEmail = source.Email;
trace('DisplayName=' + destination.DisplayName);

trace('PrimaryEmail=' + destination.PrimaryEmail);
var nameTokens = source.DisplayName.split(" ");

destination.FirstName = nameTokens[0];

if (nameTokens.length == 1) {

destination.LastName = nameTokens[0];

}

else {

destination.LastName = nameTokens.slice(1, nameTokens.length).join(" ");

}
var proxyAddresses = source.Get("Proxy_Addresses");

if (proxyAddresses !== null && proxyAddresses.Length > 0) {

var addrString = "";

for (var i = 0; i < proxyAddresses.Length; i++) {

if (addrString) {

addrString += "," + proxyAddresses[i];

} else {

addrString = proxyAddresses[i];

}}

destination.Aliases = addrString;}}
if (source.Classification == "Group") {

var propArr = getSourcePropertyByName("description");

if (propArr && propArr.Length) {

destination.Description = propArr[0];

}

destination.Email = source.Email;

propArr = getSourcePropertyByName("name");

if (propArr && propArr.Length) {

destination.Name = propArr[0];

}}
- The script should look like this.

- On Provisioning, click on Provisioning Script. Within the script editor remove all of them and replace them with the below:
- Hit Save to apply.
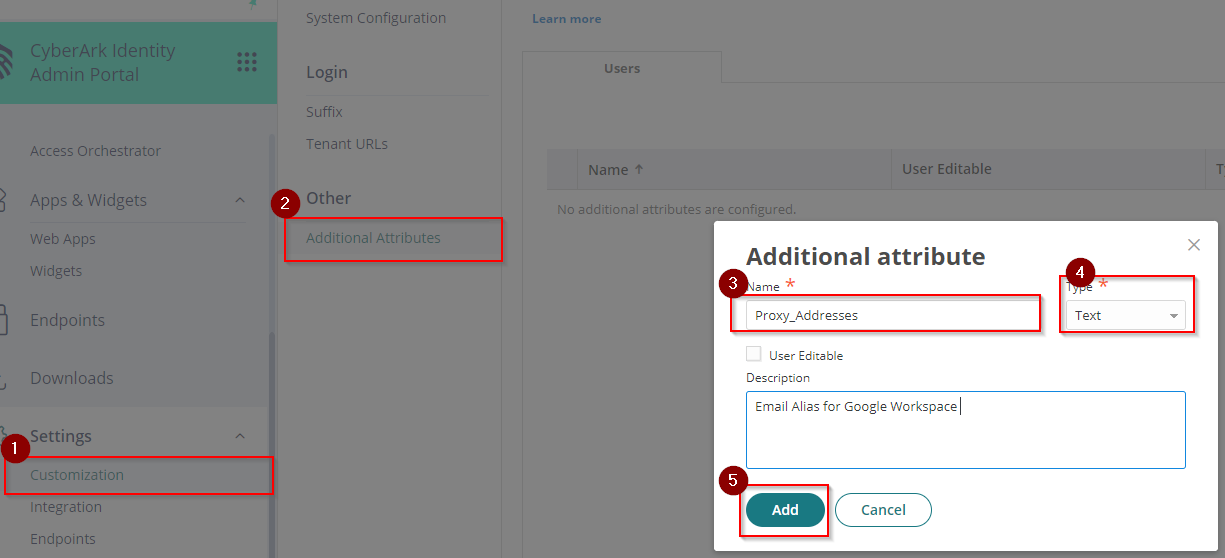
- Go to Settings > Customization > Additional Attributes > click Add. On Additional Attribute page Enter Proxy_Addresses on the Name field then select Text on the Type and click Add.
- (Optional) Add new email aliases/proxy addresses for the users if necessary. Go back to Core Services > Users > Click on the desired user > Additional Attributes > Add the additional alias on Proxy_Addresses value. If multiple, make sure to separate each alias by a comma (,) i.e. alias1@emaildomain.com, alias2@emaildomain.com
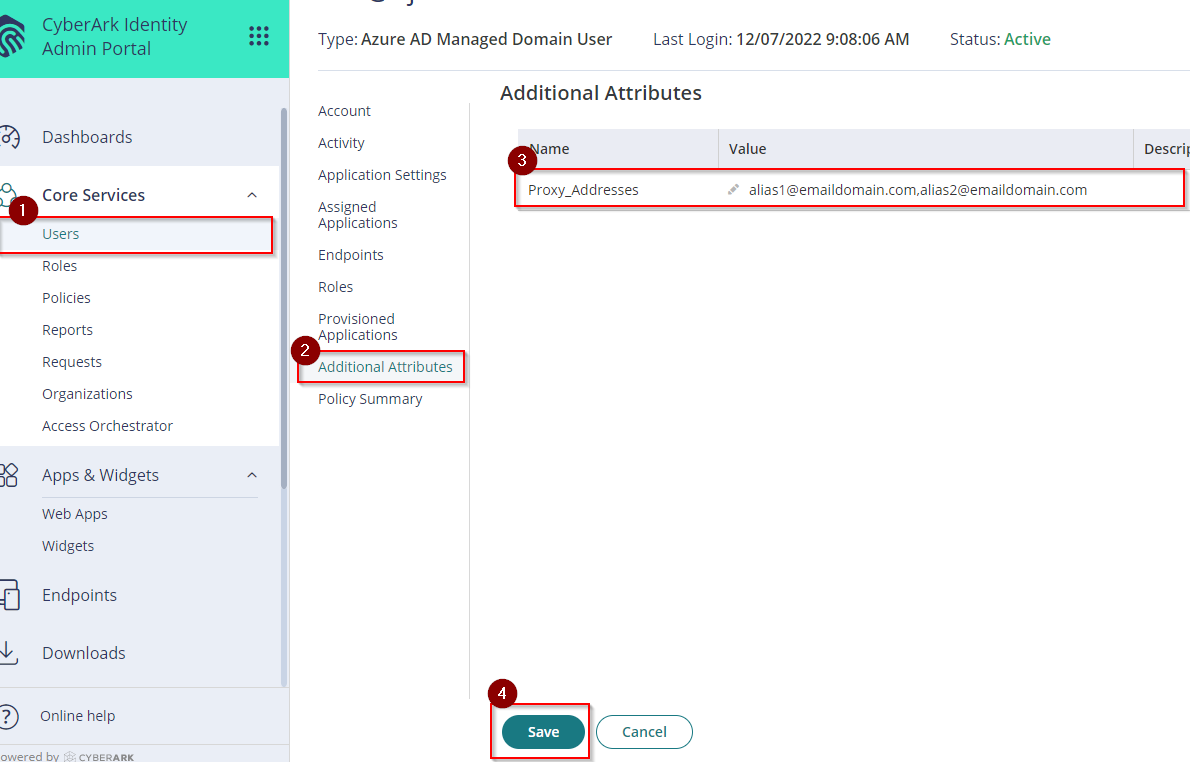
- Click Save.
- Start manual synchronization by going to the Settings > Users > Outbound Provisioning. On Provisioning Enabled Applications > Select the app (e.g. Google Workspace) and press Start Sync
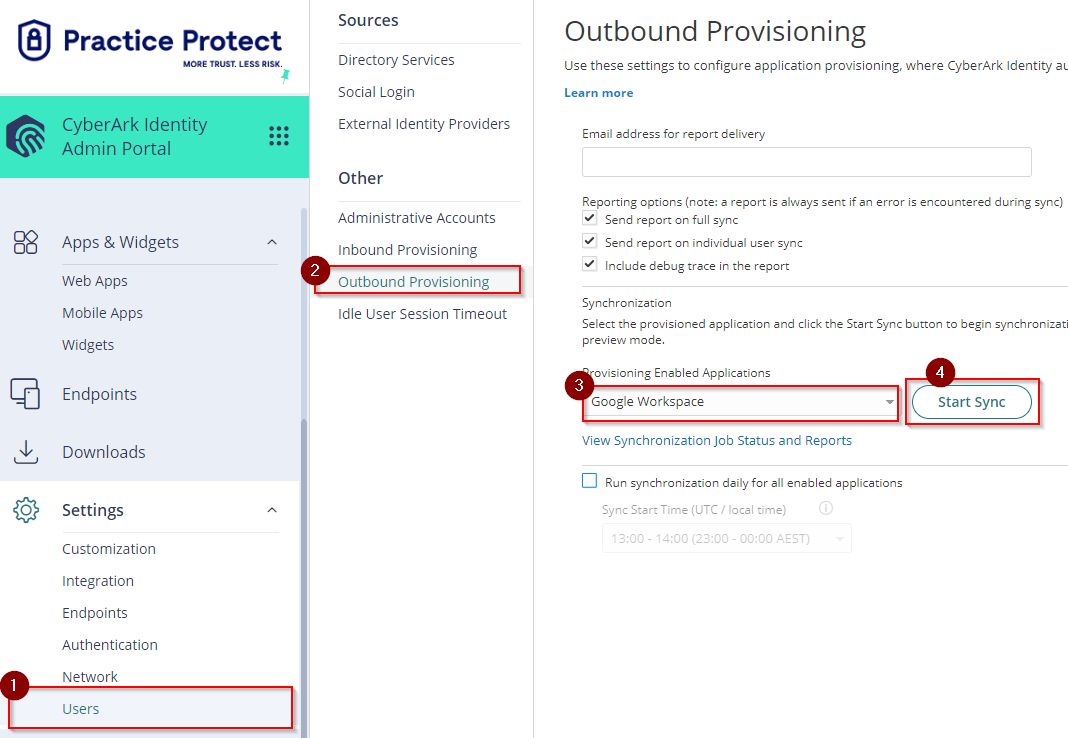
- You can view the real-time status of synchronization by clicking on View Synchronization Job Status and Reports. Once the Synchronization is successful and completed for all users, any changes in Practice Protect will be reflected in Google Workspace.
- This completes the configuration setup of Google Workspace with Provisioning for Practice Protect.
- Return to Google Admin and proceed to API Controls > MANAGE THIRD-PARTY APP ACCESS