
Purpose
When a Office 365 tenant is email protected “Federated” with Practice Protect, the management of Office 365 Licensing can be controlled by Role’s in Practice Protect to simplify management.
Note: AzureAD Connector Tenants with Local Active Directory Sync are excluded from this are are managed as normal.
When using the option to sync Licensing It is important to understand this works to avoid any inconveniences. Users are required to be assigned to a Role in Practice Protect, this Role is then linked to Office 365 License in the Office 365 App. These Roles are normally called the same name as the license. Users can be assigned to multiple Roles in order to be assigned to multiple Office 365 licenses.
Removing Licenses from a User in Office 365 is controlled the same way, you must remove the user from the role on Practice Protects side. This change then syncs to Office 365 removing that License from the Office 365 Account.
It is very important for all sync users to assign the license in Practice Protect and not manually assign it in O365 portal. The synchronization runs daily, so if the license is assigned manually in O365 this will be overwritten according to the license assignment in Practice Protect after the daily scheduled synchronization job.
This article will guide you through on how to properly assign Office 365 license to Federated accounts depending on the option selected.
Prerequisites
- Practice Protect Admin Portal Access
- Office 365 Administrator Access (Global Admin)
- Available license to be assigned to the new user or existing user. Practice Protect does not purchase licenses during sync. If a license isn’t available, you are required to increase the count prior to syncing.
- Role created in Practice Protect – This will be the Role in Practice Protect named according to the license assignment (i.e. Office 365 Business Premium, Office 365 E3, Exchange Online (Plan 1), Microsoft Flow Free etc.)
Instructions (Office 365 Controlled)
These instructions will cover how to disable the Role/Licensing Sync to Office 365.
1. From the Admin Portal, go to Apps and Open the Office 365 Federation App.
2. Go to Permissions and check the role listed. Note the role name. (Can also create a new role)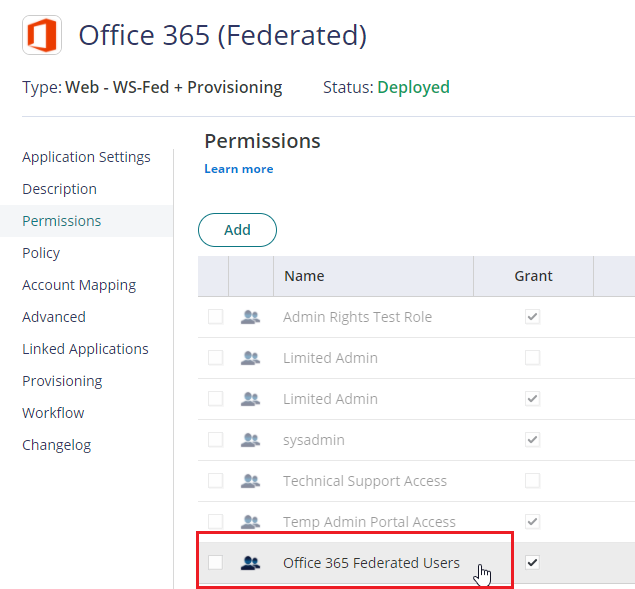
3. Go to provisioning and scroll down to Role Mappings. Click Add.
4. Find the role from step 2. Don’t select any licenses and click Done.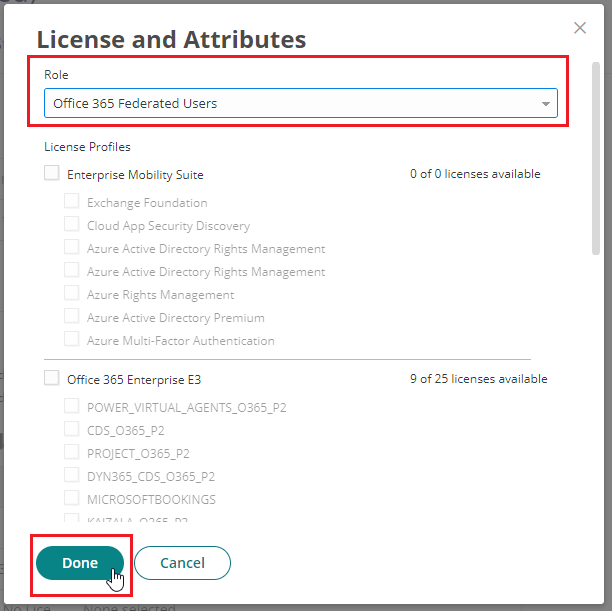
5. Confirm the Role is now listed and Licenses is set to “None Selected”. Click Save.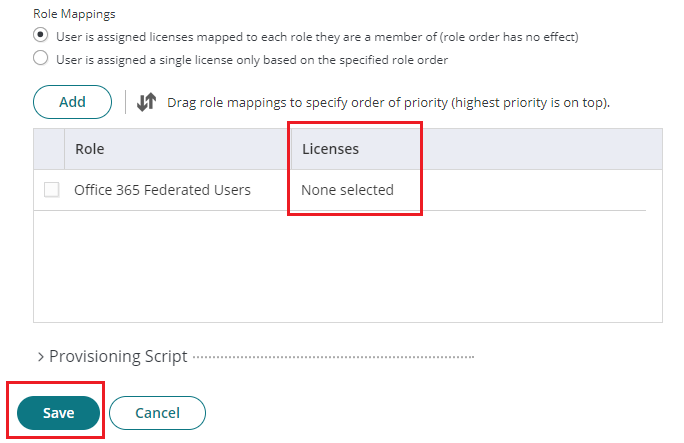
6. Users in the Role will now have their licensing controlled in Office 365 and syncs from Practice Protect to Office 365 will not overwrite licensing assignment.
7. Note. For federated users to be able to access Office 365, they MUST be a member of a Role listed in both the Permissions section and Role Mapping Section. IF they are not members in both the account will not be able to successfully login to Office 365.
Instructions (Practice Protect Controlled)
These instructions will cover how to setup Role/Licensing Sync to Office 365.
1. You need to ensure that you have an available license to be assign to the users (i.e. Office 365 Business Premium)
2. Login to O365 Admin Portal using the Office 365 Admin account.
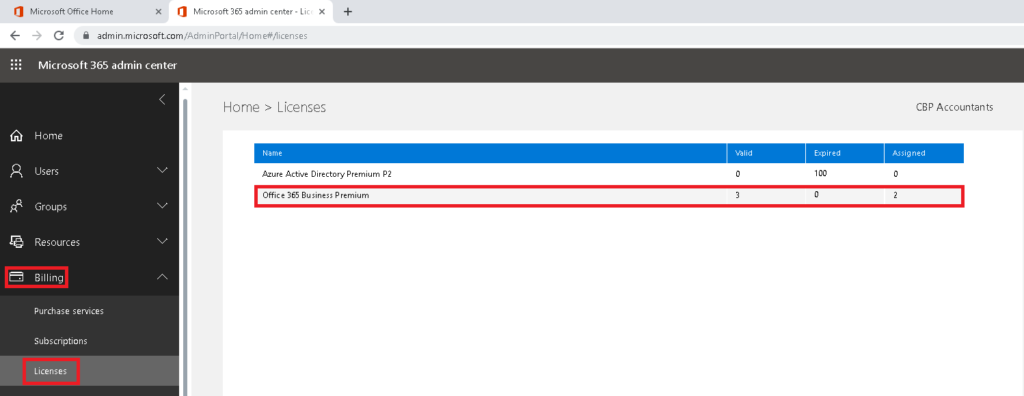
3. Go to Billing > Licenses. On this example we’ll use Office 365 Business Premium. As shown on the screenshot there are 3 valid license and 2 Assigned so we have 1 available license that can be use to assign. If you want to assign multiple licenses to the user make sure the others has available license.
4. Login to Practice Protect and switch to the Admin Portal.
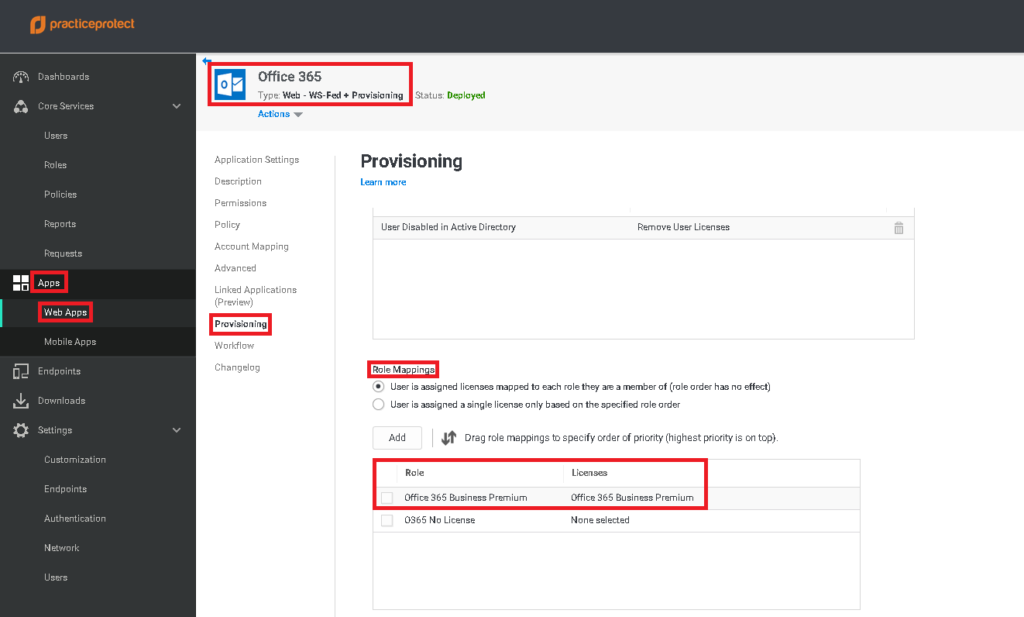
5. You need to ensure that the Roles are mapped according to its license asisgnement. To verify this, go to Apps > Web Apps > Select Office 365 Web – WS-Fed + Provisioning > Click on Provisioning. On Role Mappings, double check if the Role is mapped according to its licenses (i.e Office Business Premium Role is mapped to Office 365 Business Premium License). If the Role is mapped correctly proceed on step 6, otherwise (Role not mapped or Incorrect mapping) go to step a.
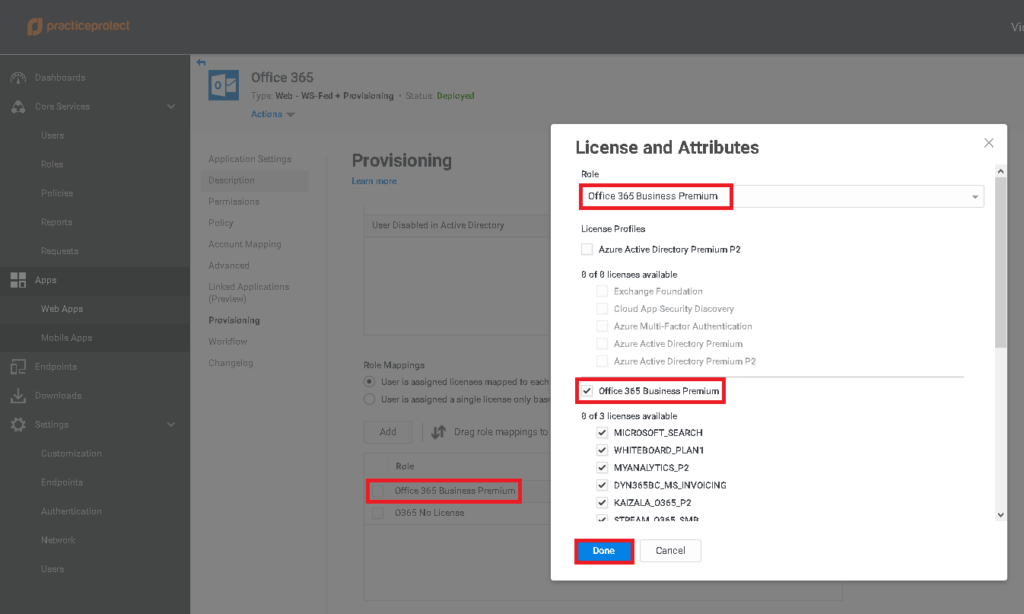
a. For Incorrect mapping, double click the role (i.e. Office 365 Business Premium) under Role Mappings. On License and Attributes page select the Role (i.e. Office 365 Business Premium) from the Role drop down. On License Profiles section, tick the box of the corresponding License (i.e. Office 365 Business Premium). Click Done. Click Save.
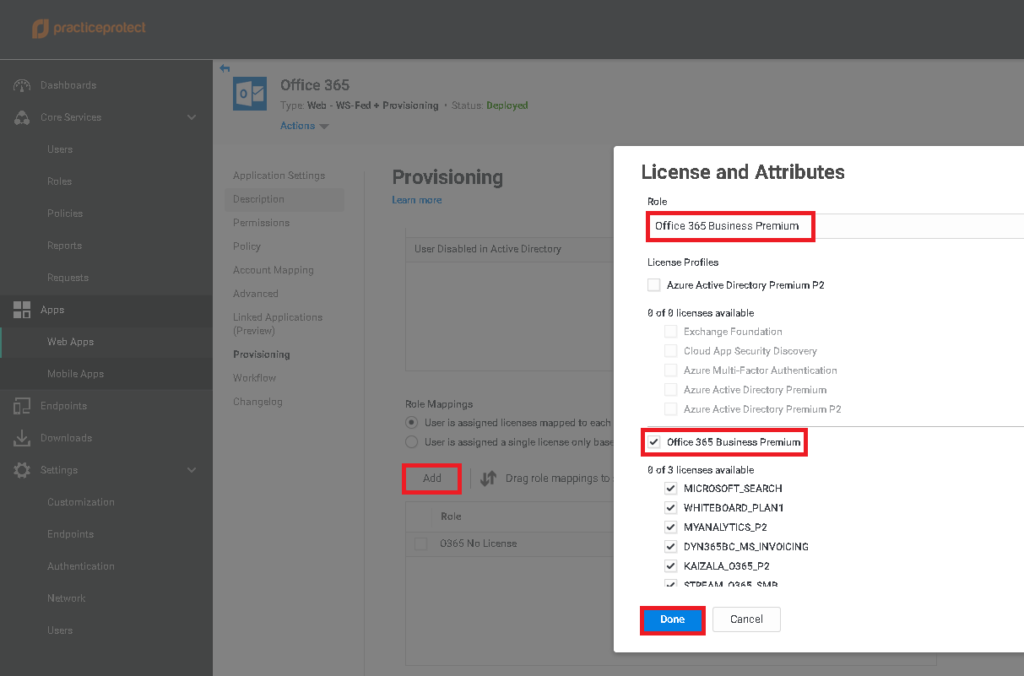
b. If the Role is not mapped (New license assignment), Click Add under Role Mappings. On License and Attributes page select the Role (i.e. Office 365 Business Premium) from the Role drop down. On License Profiles section, tick the box of the corresponding License (i.e. Office 365 Business Premium). Click Done. Click Save.
c. This should set the mapping of Roles and Office 365 License correctly. You should be ready to add the users in the corresponding Role.
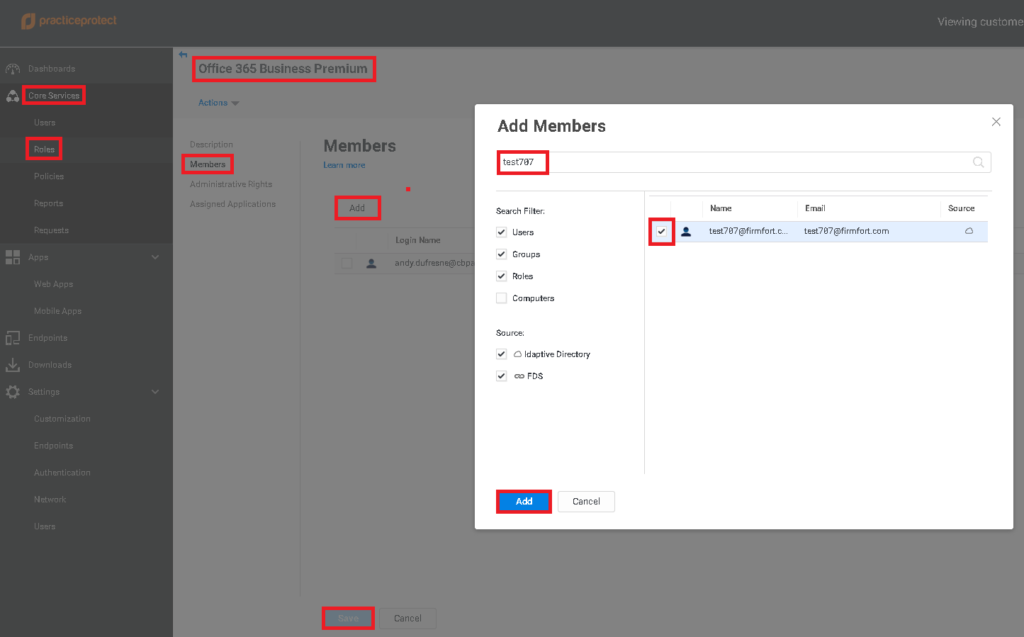
6. On Core Service, click Roles >Click on the Role (i.e. Office 365 Business Premium) > Members > Add > search the user to be added on this Role/license. Search the user (i.e. Test707) to be added with this license > Click Add. Then Click Save.
7. You can either wait for it overnight to sync (daily synchronization schedule) or Run a manual sync.
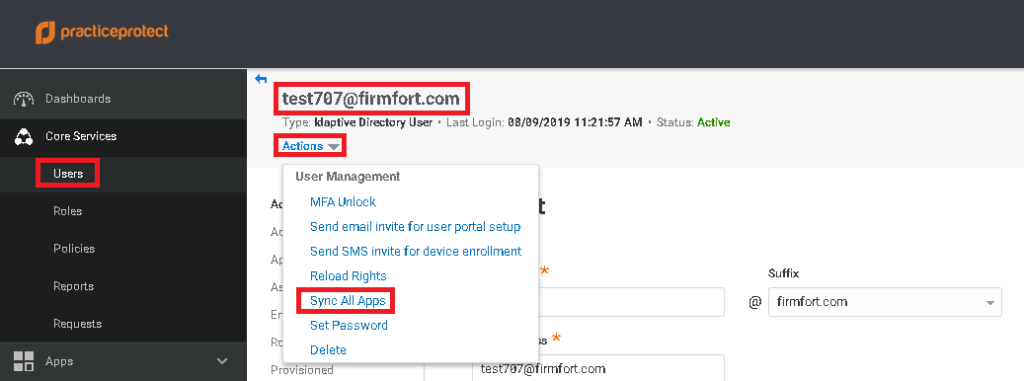
8. To run a manual sync, go to Users > select the user (i.e. test707) to sync > Click Actions > Click on Sync All Apps. This starts the synchronization for this user to Office 365.
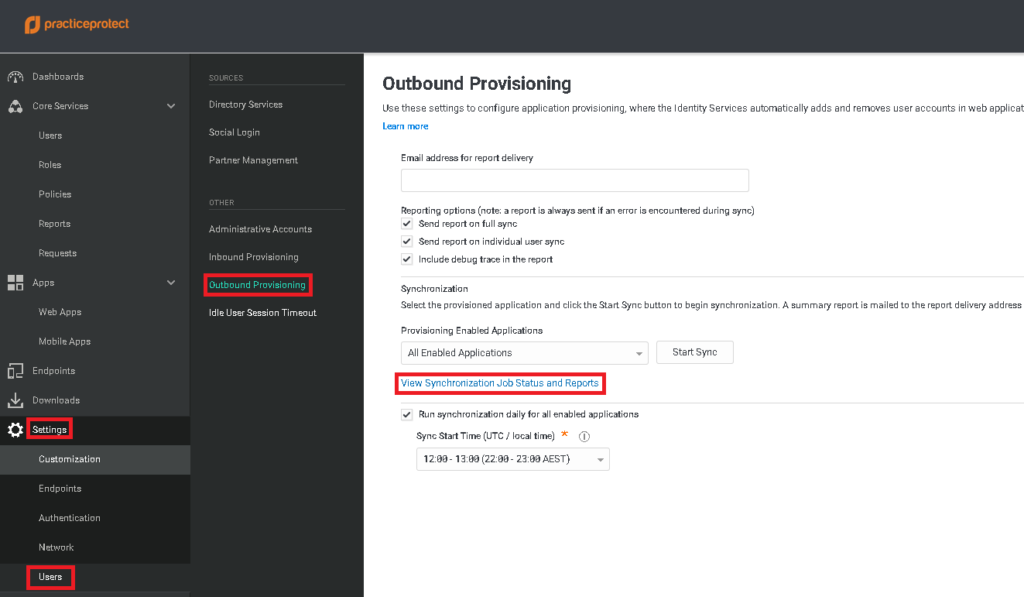
9. To check the status of the synchronization job, go to Settings > Users > Outbound Provisioning > Click on View Synchronization Job Status and Reports.
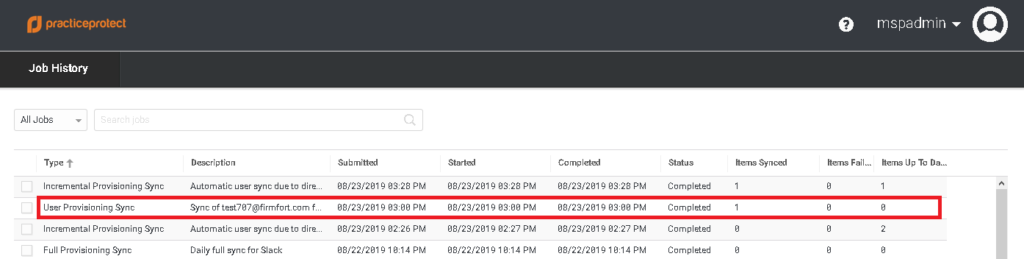
10. This opens a new tab with the Synchronization Job History. Make sure the sync shows Completed and No Issues. Common issues on the Sync would be license mismatched or no available license to assign. Before doing the license assignment make sure to understand Office 365 Licensing and there are no licensing conflict that you need to assign.
11. Once the Sync has completed, this will assign the license in Office 365. Go back to the O365 Admin portal and confirm the license assignment.

12. In the event that you want to add new Office 365 license in the future (i.e. Power BI Pro), the first thing that you need to do is to create the Role in Practice Protect Admin portal and name that role accordingly (i.e. Power Bi Pro). You can follow this Guide on how to create Roles in PPO. Add the user as member (who needs Power BI Pro Office 365 license) on this newly created Role and follow the process from step 1. You can have multiple Office 365 License, you just have to make sure that there are no conflicts on the license assignment.